If you’re looking to refresh your garden without a full redesign, we can help.Start with a 20-minute reset: clear debris, deadhead, lightly prune, and sweep paths. Re-cut bed lines with a spade for crisp edges, then top-dress bare soil with 1–2 inches of compost and add 2–3 inches of mulch, kept off stems. Fill gaps with seasonal plug-ins (grouped in threes) and divide crowded perennials at the same depth. Finish with one bold focal point, tuned irrigation, and warm string or uplights—next up, simple upgrades that add wow fast.
Key Takeaways
- Do a 20-minute reset: remove debris, edge beds, sweep paths, and stake or lightly prune floppy perennials for instant tidiness.
- Top-dress with 1–2 inches of compost and refresh mulch to 2–3 inches, keeping both off stems to improve soil and looks.
- Fill gaps with seasonal plug-in plants, grouped in threes, or add a tray of annuals for fast color without replanting everything.
- Walk the garden to check moisture, pests, and disease; prune dead growth, quarantine suspect plants, and adjust irrigation before problems spread.
- Add one focal-point “anchor” and simple lighting—solar path lights, uplights, or string lights—to upgrade impact and evening ambiance quickly.
Weekend Garden Refresh Plan: Quick Checklist
If you’ve only got a weekend to reboot your outdoor space, a tight checklist keeps you focused and prevents “wander-and-weed” time sinks. Start Saturday with a 20-minute reset: haul debris, edge beds, and sweep hardscape.
Next, top-dress bare soil with compost and refresh mulch to a consistent 2–3 inches, keeping it off stems. Deadhead, lightly prune, and stake floppy perennials; then fill gaps with a few high-impact containers or a tray of annuals in one color trend (whites or dusty pastels).
Sunday, tune irrigation, clean and sharpen tools, and rinse planters. Add one piece of Garden art as a focal point, and boost wildlife habitat with a shallow water dish, native nectar plants, and a no-spray pledge.
Garden Walk-Through: 7 Things to Fix First
Start your walk-through by checking plant health—look for yellowing leaves, pest damage, and weak new growth so you can triage fast.
Next, clean up edges and borders by re-cutting lines, pulling spillover grass, and topping up mulch for that crisp, modern look.
Finally, note where light falls and where water pools, then flag spots that need pruning, a shade swap, or a quick drainage fix.
Assess Plant Health
Before you buy anything new, take five minutes to assess plant health—because a quick garden walk-through shows you what’s thriving and what’s quietly failing.
Start with plant diagnostics: check leaf color, turgor, and new growth, then flip leaves to spot stippling, webbing, or eggs. Note patterns—only one plant, one bed, or the whole garden—so you don’t misread a watering issue as disease.
For pest identification, look for chewed margins, slime trails, aphid clusters, or fine frass, and match damage to likely culprits.
Test soil moisture two inches down, and watch for root flare burying or girdling stems.
Prune dead tips, remove diseased foliage, and quarantine suspect plants before you spread problems.
Tidy Edges And Borders
Once you’ve spotted what’s thriving and what’s struggling, clean edges and borders to make the whole garden look intentionally designed—fast.
Start by re-cutting bed lines with a half-moon edger or flat spade; aim for smooth curves or crisp right angles, not wobbly in-between. Lift turf that’s crept into beds, then slice roots cleanly so plants don’t tear out later.
Refresh garden borders with a 2–3 inch trench edge for a modern, minimalist look, or install steel or recycled-plastic edging for a sharp, on-trend “outline” effect.
Top up mulch to the edge so lines read from the patio.
Finally, sweep paths, reset displaced pavers, and rake gravel back into place for instant order.
Improve Light And Drainage
If your beds stay soggy after rain or key areas sit in permanent shade, fix light and drainage next because they dictate what’ll actually thrive. Start with shade optimization: prune up low tree limbs, thin crowded shrubs, and reflect light with pale gravel or a light-painted fence. Track sun for a day; move containers and sun-lovers to the brightest pocket you’ve got.
For water management, test drainage by filling a hole with water; if it’s still there after 4 hours, you need action. Regrade soil to shed water away from crowns, add compost to improve structure, and top-dress with grit on heavy clay. Install a simple French drain or a narrow swale along the low spot. Use rain chains into a barrel to slow runoff, too.
Reset Fast: Weed, Prune, and Clear Clutter
When you need your garden to look better fast, start with a three-part reset: weed aggressively, prune with purpose, and clear anything that doesn’t belong.
For Weed control, hit weeds right after rain or watering, when roots slide out cleanly; target seed heads first, then work zones: paths, beds, around crowns. Use a hori-hori or dandelion fork for taproots, and top up bare soil with compost to smother regrowth.
Next, apply smart pruning techniques: remove dead, crossing, and inward-growing stems, then shorten leggy growth to an outward-facing bud. Disinfect pruners between plants, and don’t “shear” shrubs unless they’re meant to be clipped.
Finish by pulling faded pots, broken stakes, and random décor. Keep tools, tags, and hoses tidy.
Crisp Edges That Instantly Neaten a Garden

Because your eye reads the garden’s outline before it registers plants, crisp edges deliver an instant “finished” look with minimal effort. Start by reestablishing bed lines: lay a hose to sketch curves, then cut a clean trench with a half-moon edger or spade for sharp definition.
Choose edging techniques that match your style and maintenance tolerance. For a modern look, install steel or aluminum strips flush with the soil; they’re discreet and hold tight curves.
Prefer classic? Use brick on edge or stone set level for durability and mower-friendly passes. Budget option: create a 3–4-inch spade-cut “V” edge and keep it recut seasonally.
Whatever border materials you pick, align heights, tamp firmly, and sweep stray soil off paths.
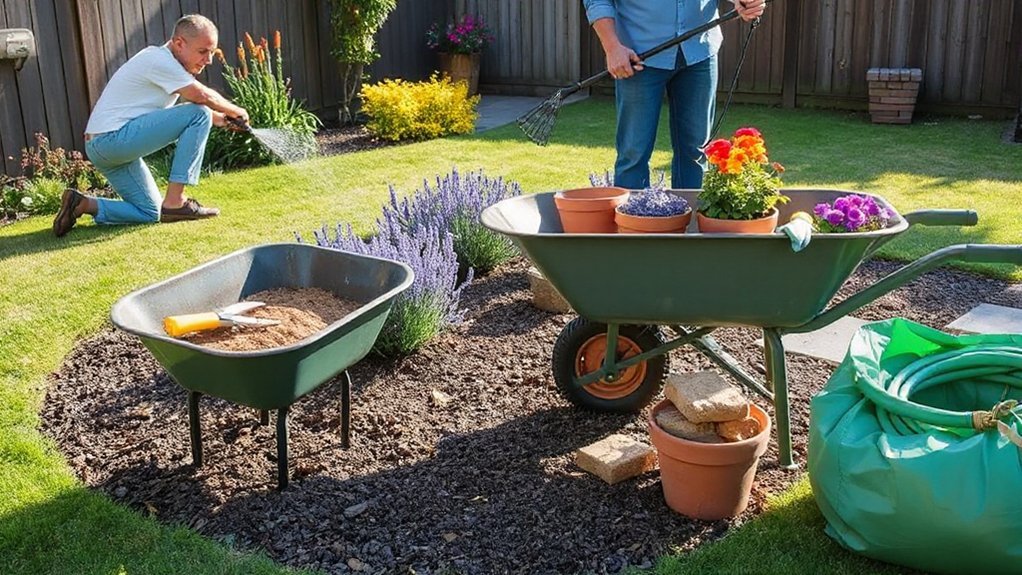
Mulch + Compost: The Fastest Bed Makeover
After you’ve sharpened the bed lines, spread compost and mulch to make everything look intentionally styled—fast. For compost application, lay a 1–2 inch layer around perennials and shrubs, keeping it 2 inches off stems and crowns. Rake it level so it reads like a clean, curated topdressing, not a dump. Water it in to settle particles and kickstart soil biology.
Next, add mulch for instant polish and long-term Mulch benefits: moisture retention, cooler roots, fewer weeds, and less soil splash on foliage. Aim for 2–3 inches, and match mulch color to your hardscape for a modern, unified look. Feather edges at paths, avoid volcano mulching, and top up thin spots after rain compacts it down.
Add Seasonal Color With Plug-In Plants
A few well-placed “plug-in” plants can make your refreshed beds look finished in under an hour. Use them like accessories: tuck color at path edges, entry corners, and in gaps between established shrubs.
For instant Seasonal color, choose nursery pots already in bud—calibrachoa, petunias, begonias, coleus, dusty miller, or compact dahlias. Repeat one or two hues for a designer look, then add one contrasting “pop” near focal points.
Keep spacing tight for impact: aim for foliage to touch at maturity. Water deeply after planting and top-dress with a thin mulch ring to hide disturbed soil.
If you’re short on time, group plug-in plants in threes for easy, rhythmic placement.
Divide and Replant Crowded Perennials
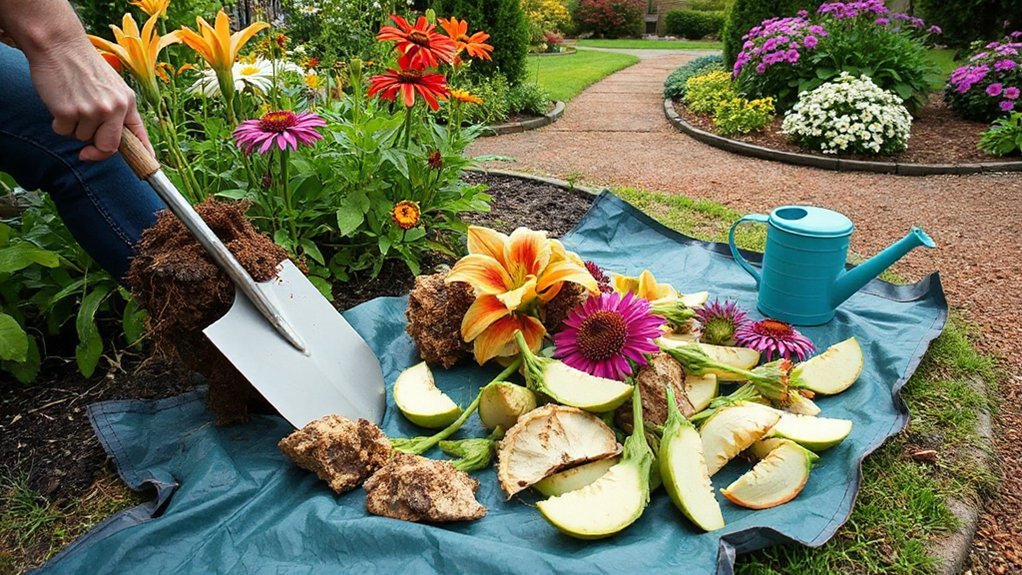
Plug-in plants deliver quick color, but crowded perennials do the opposite—they choke airflow, shrink blooms, and leave bare centers that make beds look tired.
Fix it with Root division: lift the clump in early spring or after flowering, slice it into fist-size sections with a spade or knife, and toss woody, hollow middles. Replant divisions at the original depth, water deeply, and mulch lightly to steady moisture without smothering crowns.
Use this reset to modernize your layout with Companion planting. Pair your refreshed divisions with low, pollinator-friendly fillers that hide stems and suppress weeds, like nepeta around peonies or sedum near coneflowers.
Space for mature width, label varieties, and top-dress with compost for a clean, designer finish.
Update Containers With 3 Easy Combos
Even if your beds look freshly divided, tired pots on the patio can still make the whole garden feel dated—so swap them out with three foolproof, modern combos that balance a thriller (height), filler (body), and spiller (flow).
Choose Container color combinations first, then lock in Plant pairing strategies based on sun and watering needs.
Combo 1 (sun, bold): black pot + purple fountain grass (thriller), orange calibrachoa (filler), silver dichondra (spiller).
Combo 2 (part shade, soft): matte white pot + Japanese forest grass, pink begonias, creeping Jenny.
Combo 3 (hot/dry, modern): terracotta pot + upright rosemary, blue fescue, trailing sedum.
Refresh soil, top-dress with compost, and swap plants seasonally to keep the look current.
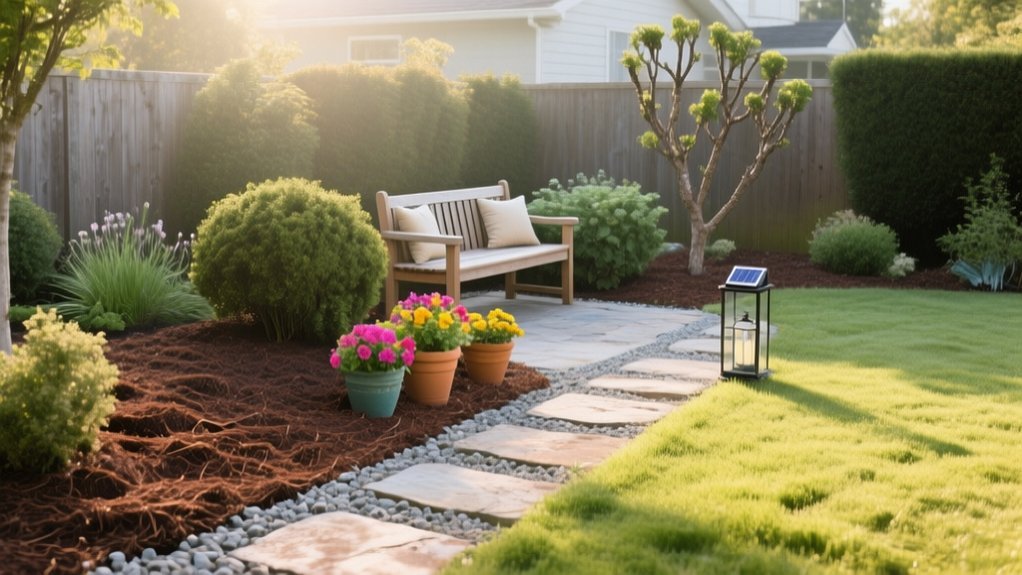
Add One Focal Point to Pull It Together
Once you’ve refreshed your containers, add a single focal point that acts like a visual “anchor” and makes the whole space feel intentional. Pick one statement piece and repeat its material or color elsewhere so it doesn’t look random.
Strong focal point ideas include a slim obelisk in a border, a sculptural boulder, a birdbath with a clean silhouette, or a bold-leaf specimen in a large pot.
Place it where sightlines land: the end of a path, the center of a view from your patio, or against a blank fence. Keep scale honest—about one-third the height of nearby shrubs—and give it breathing room with low plantings around the base.
You’ll create visual anchors without redesigning beds.
Simple Outdoor Lighting for Evening Wow
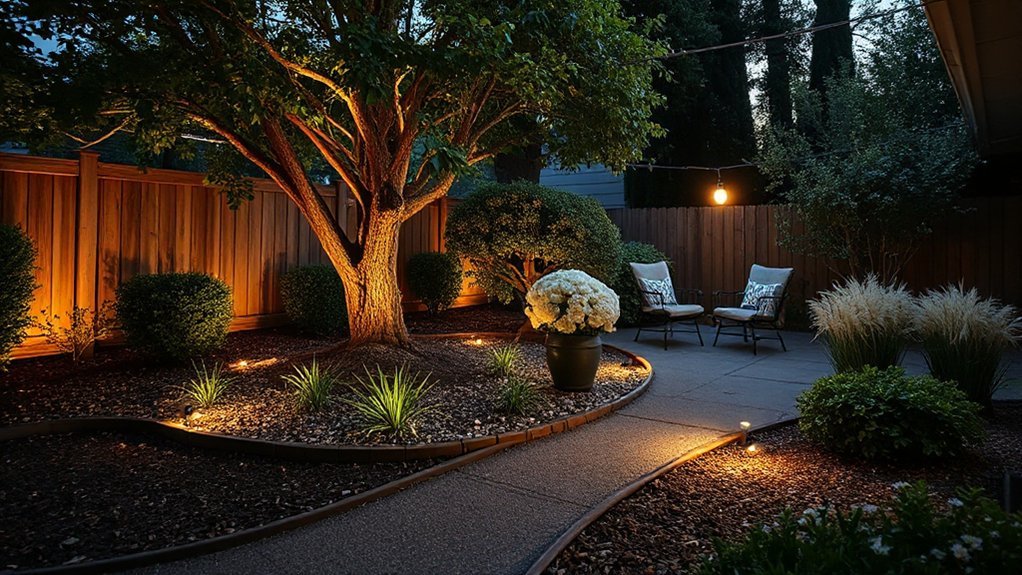
Once you’ve set a focal point, use simple exterior lighting to make your garden pop after dark. Place solar path lights along edges and turns for safe, clean lines.
Then add subtle uplights at the base of trees and shrubs to sculpt height and texture.
Finish with warm string lights over a seating area or along a fence for that cozy, trend-right ambience.
Solar Path Lights Placement
Because a few well-placed solar path lights can change how your garden feels after sunset, start by mapping the route you actually walk—front gate to porch, patio to shed, steps to beds—and place lights where your feet need guidance, not where they merely look “symmetrical.”
Space them about 6–10 feet apart for a clean, modern rhythm, tighten that spacing near turns and stairs, and stagger fixtures on alternating sides to cut glare and keep shadows from pooling.
For reliable solar lighting, choose fixtures with warm (2700–3000K) LEDs and larger panels, then angle panels toward open sky, not under dense foliage.
Keep heads low to avoid eye-level hotspots, and rotate beams down the path for crisp pathway illumination.
Before staking anything, set lights out for a night test and adjust for puddles, mulch edges, and trip hazards.
Uplighting Trees And Shrubs
After you’ve dialed in safe path lighting, add instant drama by uplighting your trees and shrubs: tuck a low, weather-rated spotlight 12–24 inches from the trunk or main stems, aim it up through the canopy, and let the leaves do the work of diffusing the beam.
For clean, modern tree illumination, choose warm white (2700–3000K) LEDs and keep output modest to avoid glare. Angle the fixture slightly off-center to reveal bark texture and create layered shadows.
For shrub lighting, place smaller spots behind or within the plant mass so the foliage glows, not the hardware. Use stakes or ground mounts, bury cable 6 inches deep, and add a timer or photocell for set-and-forget consistency.
String Lights For Ambience
If you want instant evening “wow” without trenching or transformers, string lights deliver the fastest ambience upgrade. Hang them in a gentle zigzag over a patio, between fence posts, or from a house eave to a sturdy tree limb.
Choose warm-white LED (2200–2700K) for cozy garden ambiance, and look for weather-rated, shatterproof bulbs.
Use a guide wire or turnbuckles to keep lines taut, then clip lights so they don’t sag after rain. Plug into a GFCI outlet, add a smart outdoor timer, and set them to turn on at dusk.
For a trend-forward look, mix globe bulbs with micro “fairy” strands in shrubs, keeping spacing even and cords hidden. Keep light height above head level and away from branches.
Frequently Asked Questions
How Much Will a Weekend Garden Refresh Typically Cost?
You’ll typically spend $150–$800 for a weekend garden refresh, depending on your garden budget. Use refresh tactics like mulch, edging, annuals, and solar lights; DIY saves, while soil delivery, rentals, or pros raise costs.
What’s the Best Refresh Approach for Renters or Temporary Gardens?
Hit the ground running: you’ll get the best renter refresh by using Container planting you can move anytime. Layer lightweight planters, vertical trellises, and add Seasonal updates—swap annuals, bulbs, and string lights.
How Can I Refresh a Garden With Severe Shade and Poor Drainage?
You’ll refresh it by prioritizing drainage improvements: raise beds, add compost and grit, and cut compacted soil. Then plant shade tolerant plants like ferns, hostas, hellebores, and sedges, plus stylish gravel paths.
Which Changes Boost Curb Appeal Most for a Home Sale?
You’ll boost curb appeal most with fresh mulch, crisp edging, and a statement entry planting—Realtors report 92% say curb appeal sways buyers. Prioritize Plant selection for year-round color, plus Soil improvement for healthier, fuller beds.
How Do I Refresh the Garden Safely if I Have Pets?
Choose pet safe plants and avoid toxic mulch or cocoa husks. Use non toxic fertilizers, store chemicals locked, and rinse paws after play. Add raised beds, drip irrigation, and secure fencing so pets don’t dig.
Conclusion
You don’t need a grand “Versailles” overhaul to make your garden feel brand-new. Follow your weekend checklist: pull weeds, prune, clear clutter, then sharpen edges like you’re drawing clean lines on a sketch. Top beds with compost and fresh mulch for that instant, magazine-ready finish. Split crowded perennials, refresh containers with simple color combos, and add one focal point—a pot, bench, or orb. Finish with soft lighting, and you’ll want to linger outside.