Exterior lighting done right makes your home safer, more secure, and more welcoming after dark. You’ll spot steps, edges, and grade changes clearly, while shielded fixtures cut glare and eliminate deep shadows near doors, garages, and side yards. You can extend patio time, guide movement with overlapping path lights, and add curb appeal by highlighting trees and textured walls with warm 2700–3000K LEDs. Keep going to see how to map zones, layer light, and save energy.
Key Takeaways
- Done right, exterior lighting reduces trips and falls by clearly defining steps, edges, and grade changes.
- It boosts security by eliminating deep shadows near entries, garages, and side yards without creating glare or backlighting.
- Thoughtful layering extends outdoor usability, providing comfortable baseline visibility plus focused light for doors, paths, and activities.
- Accent lighting elevates curb appeal by highlighting trees, textured walls, and architectural details with controlled, warm illumination.
- Efficient LEDs, timers, motion sensors, and seasonal maintenance lower energy costs while keeping coverage consistent and fixtures properly aimed.
What Great Exterior Lighting Does for You?
When you invest in great exterior lighting, you don’t just make your home look better—you make it safer, more functional, and easier to enjoy after dark. You reduce trip hazards by defining steps, edges, and grade changes, and you improve security by eliminating deep shadows near entries, garages, and side yards.
You also extend usable space, so patios and walkways stay practical for guests and everyday routines.
You strengthen landscape aesthetics by highlighting key trees, textured walls, and focal beds while keeping the overall scene balanced and glare-free. You protect nighttime comfort with shielded fixtures and warm color temperatures that preserve visibility without harshness.
You improve energy efficiency by choosing LEDs, right-sizing lumen output, and using timers, photocells, or motion controls to prevent wasted runtime.
Start With a Quick Exterior Lighting Walkthrough
Start with a quick walkthrough of your exterior at dusk and mark your key lighting zones—entries, paths, driveways, steps, and gathering areas.
Check fixture placement for coverage and glare, confirming lights aim where you walk and don’t spill into windows or neighbors’ yards.
As you go, note what improves safety (clear sightlines, no dark gaps) and what sets the right ambiance (balanced brightness, warm color, subtle accents).
Identify Key Lighting Zones
Before you choose fixtures or bulb types, walk your property at dusk and map the exterior into clear lighting zones—entry and egress points, primary pathways and steps, driveways and parking areas, garage and service doors, patios and outdoor living spaces, landscape and architectural features, and perimeter/security edges.
Note where you hesitate, squint, or feel exposed; those zones demand functional light first. Next, identify areas where you want mood and curb appeal: porches, seating pockets, specimen trees, textured walls, and address numbers.
Separate task zones from accent zones so you can tune brightness and timing without overlighting the whole yard. This zoning also supports energy efficiency by limiting run time to what each zone needs, while protecting landscape aesthetics by preventing harsh spill and glare.
Record your zones on a simple sketch.
Check Fixture Placement
Although you’ve already mapped your lighting zones, you still need a quick dusk-to-dark walkthrough to verify fixture placement and catch problems that a sketch can’t reveal—glare at eye level, light spilling into windows, shadows across steps, and “hot spots” that make adjacent areas feel darker.
Start at the street and follow your normal approach, pausing at each zone boundary to judge shifts. Check that wall sconces sit high enough to shield the lamp, and that downlights aim straight down, not outward.
Stand at key viewpoints—driveway, front door, patio—and confirm you can’t see bare bulbs. Look for uneven wash on siding or trees and adjust spacing or aiming.
If spill persists, add baffles, louvers, or tighter optics. Recheck after tweaks.
Note Safety And Ambiance
Once your fixtures sit where they belong, use that same dusk-to-dark walkthrough to grade what matters most: safety and ambiance. Start at the street and confirm your address is readable, then trace every route you’ll use: driveway, steps, gates, and side yards. You should see edges, changes in elevation, and trip hazards without glare in your eyes.
Adjust aim, add shields, or drop wattage until shadows look controlled, not chaotic. Next, pause at gathering zones and check comfort: faces should read clearly, and the light should support conversation, not overpower it.
Tie it to garden aesthetics by highlighting one focal plant group and keeping the rest subdued. Finally, verify seasonal lighting won’t blind neighbors or wash out your main layers.
Map Lighting by Entry, Paths, Patio, Driveway
Next, you’ll map lighting by zone—entry, pathways, patio, and driveway—so every fixture supports safety and usability without glare.
Start at the entry and along paths: mark door hardware, steps, changes in grade, and intersections that need clear, even illumination.
Then map the patio and driveway by activity and movement—seating edges, grill or dining areas, parking/turn zones, and the garage approach—so you can place lights with purpose and consistent coverage.
Entry And Pathway Lighting
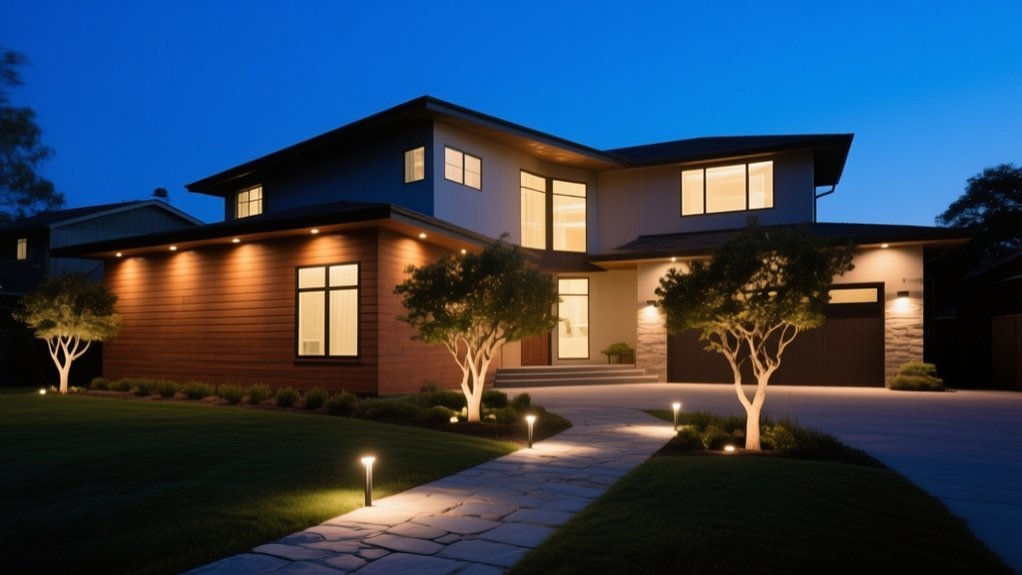
Where do you need light to guide people safely and make your home feel welcoming—at the entry, along paths, across the patio, or down the driveway? Start at your front door: you’ll reduce trips, improve security, and reinforce landscape aesthetics when you place layered light where feet and faces need it.
Use warm, shielded fixtures to cut glare and keep sightlines clear. Prioritize energy efficiency with LED lamps, dusk-to-dawn photocells, and motion boosts only where needed. Map spacing so pools of light overlap, not compete, and aim beams down to protect night skies.
Picture it like this:
- A soft wash on your door hardware, so keys find the lock fast.
- Low path lights that “stitch” each step with even, quiet halos.
- Subtle riser or edge lighting that defines turns and grade changes.
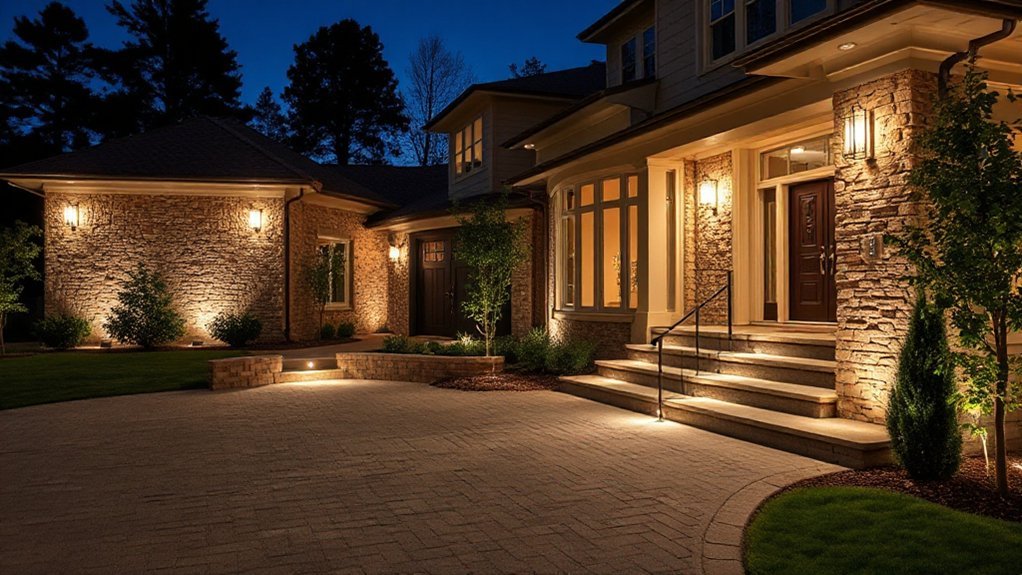
Patio And Driveway Mapping
How do you keep exterior lighting coherent from the front entry to the back patio and out to the driveway? You map it as one system, not isolated fixtures. Start by sketching zones: entry, paths, patio, and drive, then assign tasks—safe walking, seating comfort, vehicle guidance. Keep color temperature consistent (2700–3000K) so the scene reads as intentional and supports landscape aesthetics.
On the patio, layer low-glare sources: step lights, under-cap lights, and dimmable downlights aimed away from sightlines. For the driveway, use shielded bollards or downlighting to define edges without blasting neighbors.
Tie zones to separate controls and schedules for energy efficiency, and verify beam spread so light overlaps without hotspots or dark gaps.
Layer Ambient, Task, and Accent Lighting
- A soft perimeter wash that keeps the yard readable
- Focused step and entry pools that guide movement
- Narrow accents that sculpt trees, stone, and signage
Pick the Right Brightness and Color Temperature
Even if you’ve layered ambient, task, and accent fixtures correctly, the design won’t feel right until you dial in brightness and color temperature. Start by matching output to the job: pathways and steps need modest, uniform light, while work zones demand higher Brightness levels with minimal glare. Use dimmers or selectable-lumen fixtures so you can fine-tune after dark, not just on paper.
Then set Color temperature with intent. Choose warmer light (around 2700–3000K) for relaxed evening use and to avoid harsh contrast against landscaping. Go slightly cooler (3000–3500K) only where you need crisp visibility, like grills or utility doors.
Keep one temperature per zone, and aim for consistent color across fixture types.
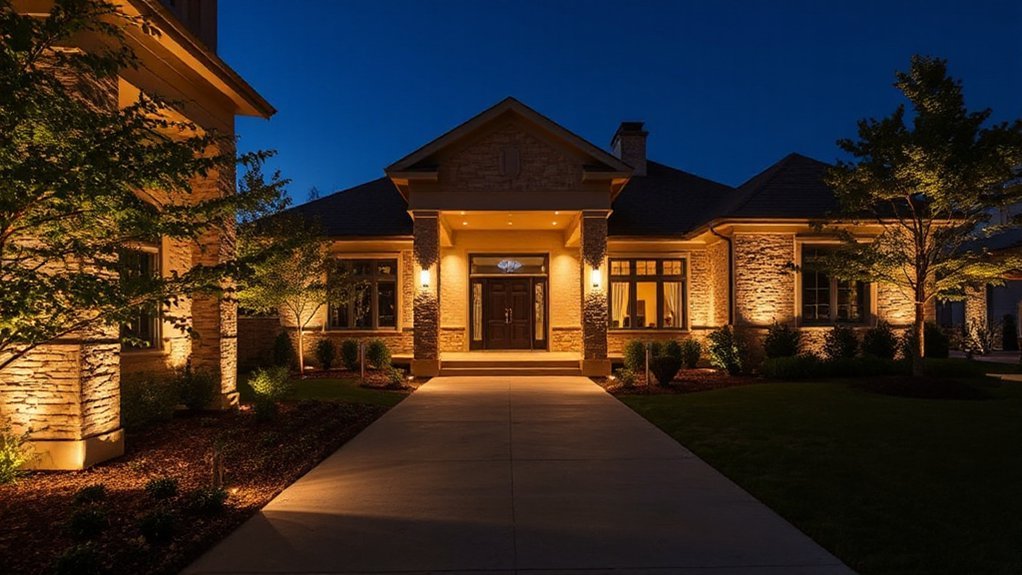
Boost Curb Appeal With Front-Yard Lighting
You’ll boost curb appeal fastest when you layer front-yard lighting to create depth—combine low path lights, mid-level washes on landscaping, and a focused accent on a focal point.
Aim fixtures to clearly define walkways and steps, then highlight standout features like a mature tree, architectural columns, or a textured facade.
Keep beams controlled and glare-free so your yard looks polished from the street, not overlit.
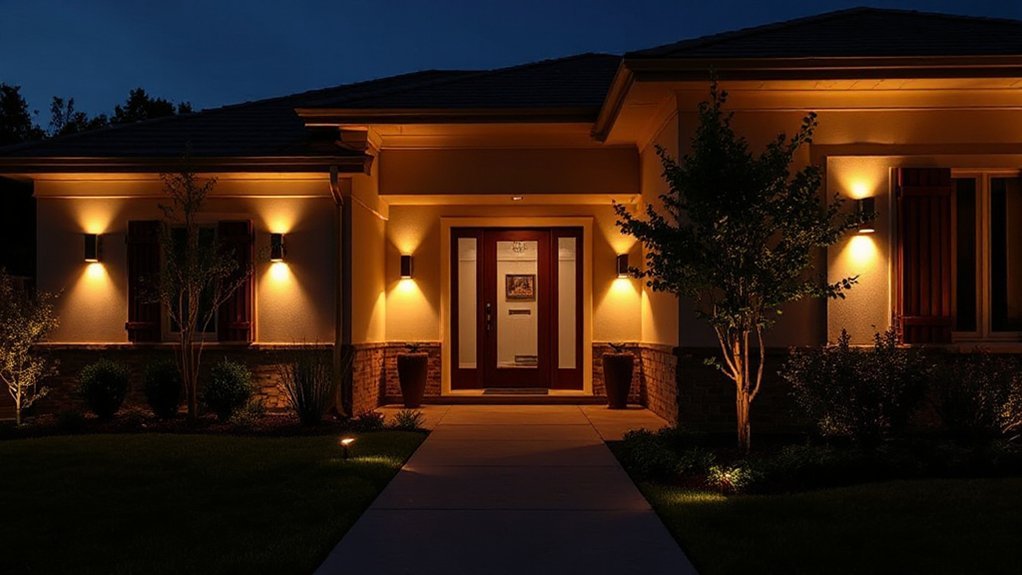
Layered Light For Depth
When you layer different types of exterior lighting, the front yard gains depth, contrast, and a more intentional “designed” look after dark. Start by setting a clear hierarchy: ambient light establishes baseline visibility, task light supports key entry actions, and accent light adds controlled drama without glare.
Use warm LEDs to enhance color contrast in brick, siding, and landscaping while maintaining energy efficiency.
- A soft porch-ceiling glow that washes the entry, keeping shadows off faces and hardware.
- Downward sconces on either side of the door to frame the façade and reduce harsh hotspots.
- Tight-beam uplights aimed at a specimen tree or textured stone to create layered silhouettes.
Keep fixtures shielded, match color temperatures, and put each layer on its own dimmer for fine tuning.
Highlight Paths And Features
Because the eye naturally follows light, well-placed path and feature lighting can pull attention from the street to your front door while making the yard feel safer and more intentional.
Space path lights 6–8 feet apart, stagger them, and aim them down to prevent glare. Choose warm 2700–3000K LEDs so surfaces look inviting, not washed out. Use shielded fixtures to keep light off neighbors and the night sky.
For focal points, uplight a specimen tree, wash a textured wall, or graze stone steps to reveal depth and improve garden aesthetics.
Add a low-voltage transformer with a timer or photocell so it runs reliably.
Account for seasonal effects by adjusting beam angles as foliage changes and snow reflects.
Highlight Architectural Features Without Glare
Although bold lighting can make a façade pop, it often creates harsh glare that washes out the very details you’re trying to showcase. You’ll get cleaner definition by hiding sources, aiming beams with precision, and using the lowest output that still reveals texture.
Choose warm LEDs and shielded fixtures to cut light pollution, and consider solar power uplights where wiring would force compromised placement.
- Tuck a narrow-beam uplight behind shrubs to rake brick and stone, not your eyes.
- Mount a downlight under eaves to graze columns evenly, keeping the lamp fully concealed.
- Use adjustable wall washers on a dimmer to trace cornices and trim without hot spots.
Test at night, then tilt until the surface glows and the fixture disappears.
Improve Safety and Security With Smart Placement
A well-planned exterior lighting layout improves safety and security by eliminating blind spots without turning your yard into a glare field. Start at entries: place downlights above doors and garage access, aimed toward thresholds so faces and keys stay visible.
Light walkways with low path fixtures spaced to overlap beams, keeping steps and changes in grade readable. Add shielded wall packs at side yards, trash enclosures, and gates, angled down to prevent backlighting that silhouettes you.
Use cross-lighting on driveways so vehicles, curbs, and pedestrians stand out from multiple angles. Keep fixtures consistent in height and color temperature to avoid dark pockets.
Consider solar advantages for remote corners while maintaining energy efficiency across the layout.
Cut Costs With LEDs, Timers, and Motion Sensors
When you pair efficient LEDs with simple controls like timers and motion sensors, you can cut exterior lighting costs without sacrificing coverage or comfort. LEDs deliver strong illumination at lower wattage, boosting Energy efficiency and extending run time before you notice it on your bill.
- Swap porch and garage bulbs for 3000K LED lamps, so your entry stays bright while power use drops.
- Set dusk-to-dawn timers for path lights, creating a steady ribbon of light that shuts off before morning waste.
- Add motion sensors at side gates and driveways, so light snaps on only when someone approaches, then fades back to dark.
You’ll see immediate cost savings, and you’ll keep lighting where it matters, when it matters, every night.
Avoid Common Outdoor Lighting Mistakes and Upkeep Issues
Because small setup errors can undo even the best fixture choice, you’ll want to avoid the outdoor lighting mistakes that cause glare, dark gaps, premature failures, and higher maintenance. Aim fixtures down and shield lamps so you don’t blast windows or sightlines. Keep beam spreads consistent, then layer path, accent, and wash lighting to protect landscape aesthetics without overlighting.
Don’t mix color temperatures; choose one Kelvin range for a cohesive outdoor decoration look.
For reliability, use outdoor-rated connectors, gel-filled wire nuts, and proper burial depth; loose splices invite corrosion and flicker. Match transformer capacity to load with headroom, and balance runs to reduce voltage drop.
Clean lenses seasonally, trim plants before they block beams, and re-aim after storms or settling. Replace failing gaskets promptly to keep water out.
Frequently Asked Questions
Do I Need Permits or HOA Approval for New Exterior Lighting?
You might need permits and HOA approval, depending on your city codes and HOA rules. Check setback, wattage, and fixture height limits. Submit a lighting design emphasizing energy efficiency to speed approvals and avoid fines.
How Do Coastal Weather and Salt Air Affect Outdoor Light Fixtures?
Like sandpaper on steel, coastal weather and salt air accelerate Salt corrosion, pitting metals, clouding lenses, and degrading seals. You’ll need marine-grade materials, sealed housings, and regular rinsing to boost Weather resilience and extend lifespan.
What Warranty Terms Should I Look for in Outdoor Lighting Products?
You should look for Warranty coverage that includes at least 5 years on LEDs/driver, 1–2 years on finishes, clear exclusions, easy claims, transferable terms, and labor coverage; these protect product longevity in harsh outdoor conditions.
Can Exterior Lighting Interfere With My Wi‑Fi or Other Wireless Devices?
A lighthouse rarely drowns a radio, but cheap LED drivers can: you’ll see wireless interference and signal disruption. Choose FCC/CE-certified fixtures, keep power supplies distant from routers, use shielded cables, and test before installing.
How Do I Choose a Contractor Versus Installing Exterior Lighting Myself?
Choose a contractor when you need code compliance, trenching, or complex controls; DIY suits simple plug-in kits. Watch DIY pitfalls: voltage drop, waterproofing, permits. Prioritize Contractor selection: licensed, insured, references, clear scope, warranty.
Conclusion
When you design exterior lighting right, you boost curb appeal, extend usable outdoor time, and guide guests safely from street to door. You’ll get the best results by mapping key zones, layering ambient/task/accent light, and choosing warm, controlled brightness that flatters materials without glare. Place fixtures to eliminate shadows at steps and entries, then cut waste with LEDs, timers, and motion sensors. Remember: measure twice, cut once—then maintain lenses and trims.