

When an emergency repair hits, you’ll stay calmer by following a safety-first script: secure people, evacuate if there’s smoke, gas odor, sparking, or heat, and avoid switches or flames. Shut off the nearest safe utility (water valve, gas meter quarter-turn, or main breaker) and verify flow stops. Contain damage with towels, buckets, and plastic sheeting. Take fast photos and notes before cleanup, then call 911, your landlord, utilities, or a licensed pro. Next, you’ll see a simple checklist.
Key Takeaways
- Prioritize safety: evacuate, do a headcount, assess hazards from a distance, and avoid sparks or switches near fumes.
- Shut off the relevant utility at the nearest safe valve or breaker, verify flow stops, and tag it to prevent accidental reactivation.
- Contain damage fast with towels, buckets, plastic sheeting, and moving valuables, then ventilate only when it’s safe.
- Document everything before cleanup using wide and close photos, notes, and receipts to support contractors, landlords, and insurance claims.
- Contact the right party immediately—landlord, utility, licensed pro, or emergency services—clearly describe symptoms, hazards, and request ETA and permits.
Do These 5 Things in the First Minutes

If something breaks and you can tell it’s an emergency, start by securing people, then the property. Next, shut off the relevant utility at the closest safe shutoff (water, power, or gas) and tag it so nobody flips it back.
Third, document fast: take photos, note time, and keep receipts to support insurance and code-compliant repairs.
Fourth, contain damage with simple controls from your emergency kit—bucket, towels, plastic sheeting, tape—without attempting regulated work you’re not licensed for.
Fifth, call the right pro or your landlord, describe symptoms, and ask for ETA and required permits.
These Preparedness strategies keep you calm, limit loss, and set up a clean, compliant fix.
Check Safety First: Evacuate, Ventilate, Avoid Sparks
When a repair crosses into a safety hazard, treat it like an incident scene: get people and pets out of the immediate area, ventilate only when it’s safe, and eliminate ignition sources. You’re not overreacting—many home hazards escalate fast, and safety protocols exist to prevent injury, fire, or exposure.
- Evacuate anyone with limited mobility first, then do a quick headcount at a pre-set meeting spot.
- Assess from a distance: look for smoke, hissing, chemical odors, sparking, or heat before you re-enter.
- Ventilate cautiously by opening doors or windows only if you don’t smell gas or see active combustion.
- Avoid sparks: don’t flip switches, use lighters, run tools, or plug in devices near suspected fumes.
If conditions feel unstable, call emergency services and wait outside.
Shut Off Water, Gas, or Power (Step-by-Step)
Next, you’ll stop the damage fast by shutting off the right utility at the source. You should know where your main water shutoff and individual fixture valves are, and you’ll turn them clockwise until they stop—without forcing stuck handles.
If you smell gas or see electrical hazards, don’t touch switches or breaker panels; follow your utility’s emergency guidance. Shut off service only if it’s safe and permitted, and call the utility or emergency services.
Locate And Turn Off Valves
Before you grab a wrench or call a contractor, you should locate your main shutoffs and know how to cut water, gas, or power fast—because stopping the source limits damage, reduces fire and flood risk, and aligns with basic safety guidance (for example, don’t operate electrical switches around suspected gas leaks and don’t work on live circuits).
Document valve location now, and practice shutoff procedures when conditions are calm, per your utility and local code guidance.
- Water: Find the main valve at the meter, basement, or crawlspace; turn clockwise until it stops.
- Gas: Locate the meter shutoff valve; keep the tool nearby and know the quarter-turn position.
- Power: Identify the main disconnect/breaker panel; label the main and critical circuits.
- Verify: Confirm flow/pressure drops, note any stuck valves, and replace faulty handles.
Safely Cut Gas Or Power
Although shutting off a utility feels drastic, you’ll reduce immediate risk fastest by cutting gas or power the moment you smell gas, see sparking, or notice water near electrical equipment.
For Gas safety, don’t flip switches or use flames; leave the area if the odor is strong. If you can safely reach the meter, turn the shutoff valve a quarter-turn with a wrench so it’s crosswise to the pipe, then don’t turn it back on—call the utility or licensed tech.
For a Power shutdown, go to the main breaker panel with dry hands, stand on a dry surface, and switch the main breaker to OFF. Tag it, keep people away, and contact an electrician before restoring power.
911, the Utility Company, or a Pro: Who to Call
When something breaks and time matters, you’ll make better decisions by matching the problem to the right call—your landlord, the utility company, or a licensed pro—because leases, local codes, and service agreements often dictate who’s authorized to fix what.
Call based on responsibility and access, not guesswork, so you don’t violate your lease or void coverage.
Use this quick triage:
- Landlord/property manager: Anything tied to building systems you can’t legally alter; report in writing and note time.
- Utility company: Meter, main line, service outages, or hazards on their side; ask about restoration ETA and Utility billing credits.
- Licensed pro: Issues inside your unit that aren’t utility-owned; choose insured, permitted trades.
- Emergency services: Immediate life-safety threats; don’t wait for approvals.
Stop the Spread While You Wait for Emergency Repairs
After you’ve made the right call—landlord, utility, licensed pro, or 911—your job is to limit damage and liability until help arrives. Start with a quick risk assessment: identify water, gas, electricity, fire, and structural hazards, then keep everyone out of danger zones.
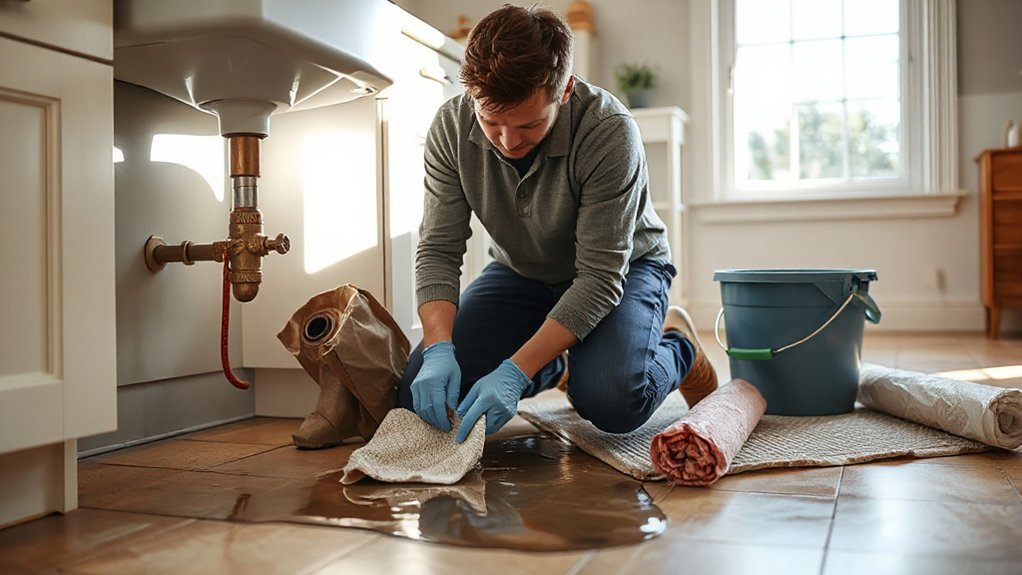
If it’s water, shut off the nearest valve, move valuables up high, place towels or buckets, and ventilate to slow mold.
If it’s gas, don’t flip switches; open windows, evacuate, and wait outside.
If it’s electrical, kill power at the breaker and keep hands dry.
For heat or fire damage, close doors to contain smoke, and don’t re-enter.
Follow lease rules and local codes. Keep basic supplies staged as emergency preparedness.
Take Photos and Notes for Insurance and Contractors
Once the immediate spread is contained, you should document the damage fast for your insurer and any licensed contractor you hire. Take clear photos and video from all angles.
Then note the date, time, location, and what happened, including any temporary fixes you made.
Save everything in a labeled folder (room, system, and date) so you can submit a complete claim and get accurate repair quotes without delays.
Capture Damage From All Angles
Even if you’re focused on stopping the leak or securing the area, take five minutes to document the damage from every angle before you clean up or move anything.
Thorough camera documentation supports a clean damage assessment for your insurer and speeds contractor estimates, while keeping you aligned with typical policy and building-code expectations for substantiating loss.
- Shoot wide room views, then medium shots, then close-ups to show context and severity.
- Capture ceilings, floors, walls, and points of change where materials meet (trim, seams, joints).
- Include fixed reference points like outlets, vents, and plumbing penetrations for scale.
- Photograph adjacent areas that look “fine” to show boundaries and prevent scope disputes.
Use steady light, avoid filters, and take multiple angles per item.
Record Dates, Times, Details
Before you call the claim in or schedule a crew, write down the exact date and time you discovered the damage, what happened (as best you can tell you), and every action you took to mitigate it—shutoff location used, breakers flipped, tarps placed, fans started.
Then back it up with time-stamped photos, short videos, and receipts so your insurer and contractors can verify the timeline, confirm code-appropriate emergency measures, and quote the correct scope without guesswork.
Note weather, odors, unusual sounds, and visible spread, and log who you notified and when.
Label photos by room and distance, and capture serial numbers on affected equipment.
Don’t alter evidence beyond necessary safety steps; document any temporary repairs.
Treat this habit as Emergency preparedness and a trigger for Maintenance scheduling so recurring leaks, overloads, or drainage failures get corrected before the next loss.
Organize Files For Contractors
Your timeline and evidence get far more useful when you package them into a clean, shareable file set contractors and insurers can read in minutes. Good File organization reduces disputes, speeds estimates, and helps you meet policy notice requirements and local permit documentation standards.
Create one folder per incident and name files consistently (date-room-issue). Use this 4-part bundle for fast Contractor communication:
- Photos: wide shots, close-ups, and a ruler for scale; include before/after.
- Notes: what failed, when you found it, temporary fixes, and safety hazards.
- Documents: policy number, claim ID, adjuster emails, invoices, and mitigation logs.
- Access info: site address, lockbox code, utility shutoffs, and preferred hours.
Share as a single link, and log who received it.
Prevent Repeat Emergency Repairs With a Simple Plan
When you set a simple maintenance plan and document it, you’ll cut down repeat emergency calls and stay aligned with warranty terms, local code requirements, and any landlord or HOA rules.
Start with Maintenance routines you can actually follow: monthly leak checks, quarterly filter changes, and seasonal HVAC and gutter inspections.
Add Preventative measures like shutoff-valve testing, drain screens, and surge protection to reduce failures before they become emergencies.
Put tasks on a calendar, assign responsibility, and keep receipts, permits, and inspection reports in the same folder you use for contractors.
If you rent out the property, include access procedures and notice timelines required by law.
After each repair, ask the pro for a root-cause note and update the plan so the problem doesn’t repeat.
Frequently Asked Questions
What Emergency Repair Costs Does Homeowners Insurance Typically Cover?
Homeowners insurance typically covers emergency repairs from covered perils like fire, wind, hail, or sudden plumbing leaks, including mitigation. You’ll navigate the claims process and coverage limits; wear-and-tear, neglect, and floods usually aren’t covered.
How Do I Find a Reputable Emergency Contractor After Hours?
Find a reputable after-hours contractor by calling vetted referrals and checking Contractor credentials, licensing, and insurance. Use your Emergency contact list. Confirm permits, written estimates, and 24/7 response. Avoid cash-only demands; document work and payments.
Should I Authorize Repairs Before Speaking With My Insurance Adjuster?
Authorize only urgent, damage-stopping work—like sandbagging a floodgate—before you speak with your adjuster. Get Emergency authorization in writing, document everything, and avoid permanent fixes until Insurance approval confirms coverage, scope, and pricing.
What Basic Tools Should Every Home Have for Sudden Repair Emergencies?
Stock a flashlight, shutoff wrench, adjustable wrench, screwdrivers, pliers, utility knife, duct tape, pipe repair tape, and a small first-aid kit. Follow DIY tips, use Safety precautions, and meet local code when patching.
How Can I Handle Emergency Repairs if I’M Renting, Not Owning?
First, you’re a renter—so document, then delegate: that’s your playbook. Check Rental obligations, stop further damage safely, and start Landlord communication fast in writing. For urgent hazards, call emergency services, then notify promptly. Keep receipts.
Conclusion
When emergency repairs hit, you don’t need to be a superhero—you need a checklist. Like Odysseus lashing himself to the mast, you stay steady by following safety rules: evacuate if needed, ventilate, and don’t flip switches near gas. Shut off water, gas, or power at the correct main, then call 911, your utility, or a licensed pro. Document everything for insurance, contain the damage, and set a simple plan now to prevent the sequel.


