
You can’t start a redundant barn conversion with mood boards; you start with a hard look at what you’ve actually got. You check structure, access, services, and planning routes, then you decide how to bring in daylight without wrecking the building’s agricultural honesty. You’ll balance insulation and airtightness with breathable build-ups, and you’ll place glazing where it works, not where it shouts. The real question is which constraints will shape everything next…
Key Takeaways
- Start with measured and structural surveys to confirm defects, moisture, roof spread, and how much new glazing the frame can safely take.
- Choose the right consent route—Class Q, full planning, and possibly Listed Building Consent—based on intervention level and heritage constraints.
- Keep a central bay open and place enclosed rooms in darker zones to preserve volume, improve circulation, and pull daylight deep inside.
- Add light through “edited” openings: align glazing with existing bays, use deep reveals, and concentrate large glazed gables to maintain barn character.
- Upgrade performance with breathable insulation, airtight taped junctions, smart membranes, and planned services (MVHR, drainage, heat pump) to prevent condensation.
Is the Barn Viable to Convert (Survey, Access, Constraints)?
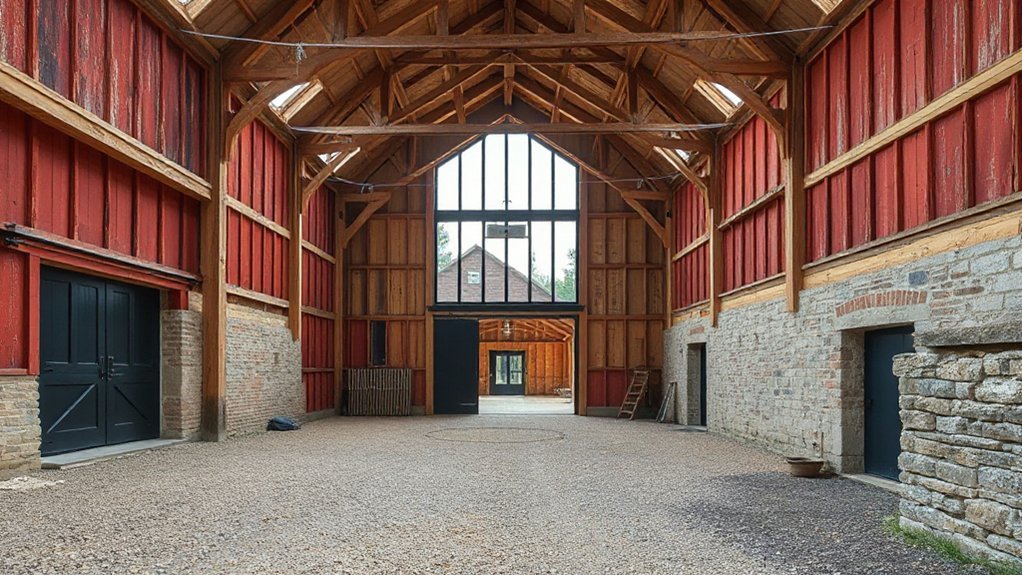
Before you fall for the barn’s volume and character, confirm it’s actually a sensible candidate for conversion by starting with a measured survey and a hard look at access and constraints.
Commission a building surveyor and structural engineer to map defects, test moisture, and judge structural integrity of frames, walls, and slab.
Check roof spread, rot at bearings, masonry bulges, and movement around openings you might enlarge for daylight.
Walk the site: can delivery trucks turn, can services connect, and can you achieve safe, lit entrance routes without brutalizing the landscape?
Identify constraints early—flood risk, drainage capacity, bats, contaminated ground, and rights of way—because each drives cost and layout.
Prioritise low‑intervention fixes to cut environmental impact and preserve character.
Planning Routes: Class Q, Full Planning, Listed Buildings
Next you’ll choose the right planning route: Class Q can be faster and cost-effective, but it tightly controls what you can change.
While full planning gives you wider design freedom for openings, extensions, and layout. You’ll weigh programme and risk against your daylight and space ambitions, then shape the scheme to fit the route rather than fighting it.
If the barn’s listed or curtilage listed, you’ll also secure Listed Building Consent by agreeing a conservation-led approach, documenting significance, and specifying materials and details before you start work.
Class Q Vs Full Planning
Although both routes can get you to a beautifully converted barn, Class Q and full planning permission shape what you’re allowed to design—and how smoothly you’ll get there.
Class Q suits straightforward, light-touch schemes: you reuse the existing shell, keep changes modest, and focus on Rural aesthetics with careful openings and materials.
Full planning gives you wider freedom—extensions, re-massing, bold glazing—but you’ll justify impact, neighbours, access, and landscape, often with stronger evidence for Historical preservation.
Picture the difference like this:
- A crisp timber window cut into an existing bay (Class Q).
- A new glazed link to an added wing (full planning).
- Minimal rooflights aligned to trusses (Class Q).
- A reworked roofline for vaulted light (full planning).
Choose the route that matches your ambition and risk tolerance early.
Listed Building Consent Steps
When your barn is listed (or sits within the curtilage of a listed farmhouse), you’ll need Listed Building Consent alongside Class Q or full planning, and the design bar rises fast: every cut, junction, and material choice must protect the building’s special interest.
Start with a heritage statement, measured survey, and photographic record, then justify each intervention against Historic preservation principles.
Meet the conservation officer early, agree what’s reversible, and keep original fabric wherever possible.
Detail openings like surgery: retain reveals, repair lintels, and use slim-profile glazing only where it won’t erode character.
Specify breathable lime mortars, matching stone, and timber repairs, not wholesale replacement.
Submit annotated drawings, sample boards, and method statements, showing how you’ll keep rustic charm while upgrading insulation, services, and fire safety discreetly throughout.
Building Regs Basics for Barn Conversions (Fire, Structure, Energy)
Once you’ve secured the right planning route, you’ve got to make Building Regulations work with the barn’s character, not against it. You’ll plan fire safety early—escape routes, compartmentation, alarms, and linings—so your big, open volumes stay beautiful and compliant.
You’ll also prove the structure is sound and upgrade energy performance with targeted insulation, airtightness, and glazing choices that respect existing fabric.
Fire Safety Compliance
Because a barn’s open volume can turn smoke into a fast-moving hazard, you’ll need to design fire safety in from day one—not bolt it on at the end. Map your escape routes while you’re still sketching room layouts, then make every corridor and door support quick, intuitive movement.
Specify a compliant fire alarm early, so wiring, detector positions, and audibility aren’t compromised by exposed beams or double-height voids.
Treat emergency exits as architectural features: obvious, well-lit, and never blocked by furniture or sliding doors.
Detail fire-resisting linings and protected routes where required, and coordinate with Building Control before you order bespoke joinery.
Visualise it like this:
- A clear stair enclosure as a “safe spine.”
- Wide, uncluttered hallways.
- Glazed doors with rated performance.
- Night-time signage and lighting that guides you out.
Structure And Energy Standards
Although the charm of a barn lies in its big spans and exposed frame, Building Regs will push you to prove the structure works as a house and that the envelope performs like one too.
Start with a structural survey: you’ll likely need new foundations, stitch repairs to masonry, and steelwork to control spread and wind load, especially once you cut in larger openings.
Specify breathable insulation where you retain solid walls, and hit target U-values with insulated slabs, warm roofs, and high-performance glazing.
Control condensation with airtightness detailing, vapour layers, and continuous ventilation—MVHR often suits open-plan volumes.
Protect character by hiding reinforcement behind Decorative finishes.
Finally, coordinate service routes early so you don’t puncture airtight layers, and align landscaping design to manage surface water and protect thresholds.
Insulation and Airtightness Without Trapping Damp
When you insulate a barn conversion, you’re not just chasing U‑values—you’re redesigning how the building breathes. You’ll keep the shell warm, but you must also let historic fabric purge moisture, or you’ll invite mould and rot that ruin interior aesthetics and blunt Natural lighting with stained reveals.
- Line walls with vapour‑open insulation so stone can dry outward, not sweat inward.
- Tape every junction—rafters, frames, sole plates—so drafts don’t whistle through like a cracked bell.
- Add a smart membrane inside to throttle vapour in winter and relax in summer.
- Detail window and door surrounds with airtight plaster, then set sills to shed any incidental moisture.
You’ll get calmer temperatures, clearer glazing, and crisp shadow lines—without sealing damp into the bones.
Services and Drainage: Water, Power, Sewage, Heat Pumps
Airtight, vapour-smart walls set the comfort baseline, but the build only works as a home once you’ve mapped the hidden systems that serve it. Start with water: confirm mains capacity or design a tested borehole, then zone shut-offs so future repairs don’t disrupt the whole house.
For power, you’ll likely need a new supply and meter position; route cabling through service voids to protect the barn’s historical significance and keep elevations clean for Local planning.
Drainage drives everything: survey invert levels, separate rainwater from foul, and allow rodding access. If there’s no mains sewer, specify a package treatment plant with percolation results and maintenance clearance.
Heat pumps suit barns when you size emitters for low flow temperatures and plan defrost drains. Place external units discreetly.
How to Plan a Bright Barn Conversion Layout
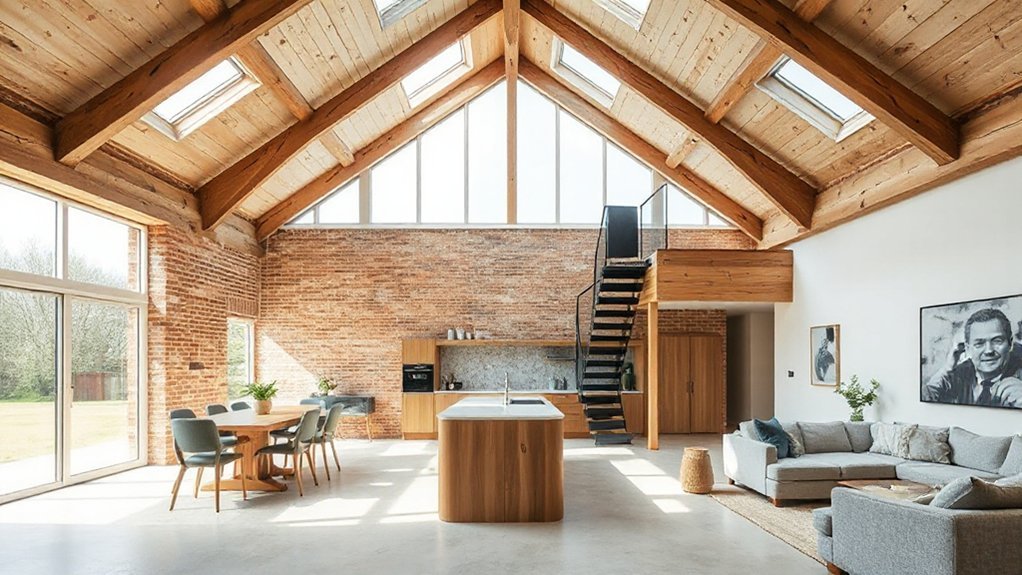
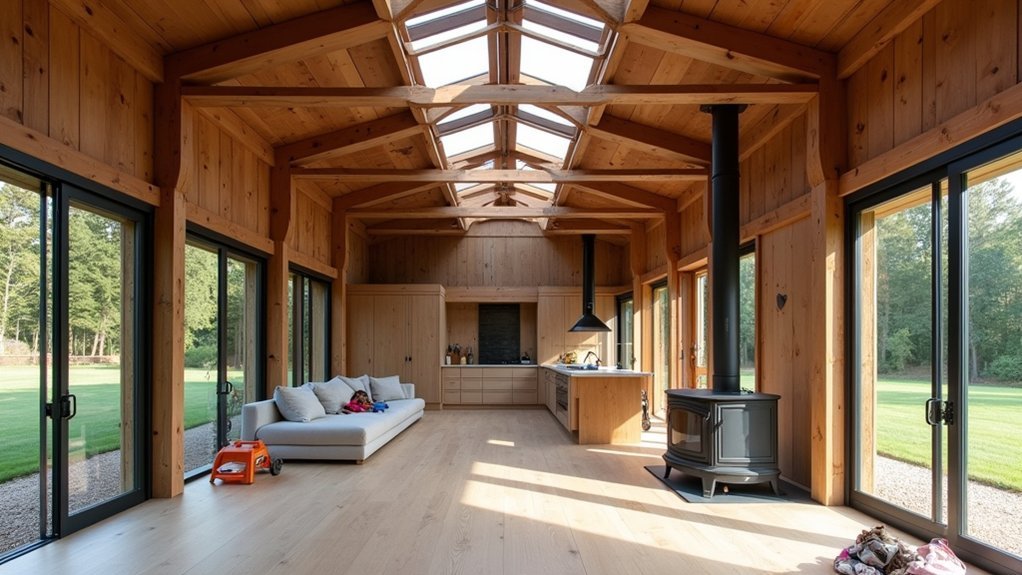
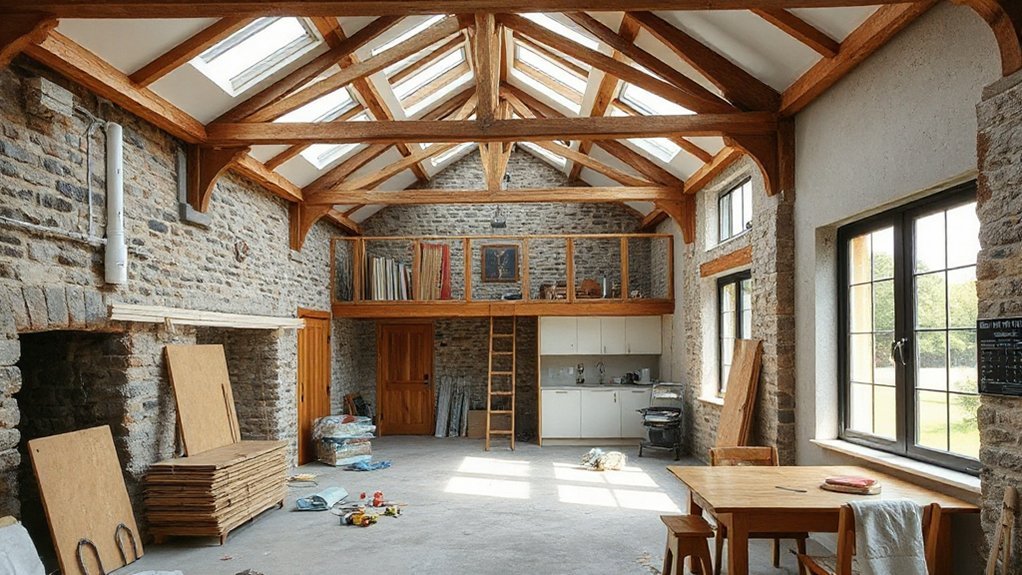
Because barns were built for volume rather than daylight, you’ll get a brighter conversion by treating the layout as a light map first and a room list second. Start by keeping the central bay open so daylight can travel; then tuck enclosed rooms into darker zones.
Respect Historical preservation by retaining primary posts and trusses as your organizing grid, not obstacles. Use Sustainable materials for new partitions and ceilings so they stay thin, breathable, and light-reflective.
Plan sightlines so you borrow brightness from higher volumes rather than chopping them up.
- A double-height “street” through the middle, like an indoor lane
- Bedrooms clustered in the lee of the structure
- A kitchen-dining hub where circulation naturally converges
- Storage and utility walls acting as light baffles, not blockers
Glazing Ideas That Keep the Barn’s Character
Although you’ll likely add more glass than the original barn ever had, you can still keep its character by treating glazing as “edited openings,” not a suburban wall of windows. Start by aligning new panes with existing bays, door slots, and ventilation gaps so elevations read as agricultural, not domestic.
Use deep reveals and set frames back to preserve shadow lines; that’s where Rustic charm lives. If you need big light, concentrate it in one decisive move: a full-height glazed gable, a courtyard-facing screen, or a restrained lean-to link, rather than peppering every wall.
Break large areas into vertical modules that echo boarding rhythms. Choose opening types with purpose: fixed for views, tilt/turn for purge ventilation, and sliding only where you’ll use it daily. Modern glazing performs best when it looks intentional.
Materials That Look Right in a Barn Conversion
Once you’ve decided where the glass goes, the materials around it determine whether the conversion reads as honest farm architecture or a generic new build in costume. Keep what’s structurally sound, and let new layers feel purposeful, not decorative. You’ll get Rustic charm by pairing tactile, imperfect surfaces with restrained Modern finishes that don’t shout.
- Reclaimed brick or stone at thresholds, so wear and shadow look earned.
- Limewash or breathable plaster on walls, softening light and letting masonry move.
- Oiled oak or larch for floors and joinery, showing grain and taking knocks gracefully.
- Blackened steel for frames and stairs, crisp against timber yet visually light.
Match tones to existing timbers, repeat textures sparingly, and avoid faux-aged gimmicks everywhere.
Budget and Timeline: What a Barn Conversion Really Takes
When you price a barn conversion, you’re really buying three things at once: structural certainty, weather-tightness, and the level of finish that makes the space feel intentional rather than improvised.
Start with surveys, engineer sign-off, and targeted repairs; you can’t design around rot, racking, or failing footings.
Next, budget hard for insulation strategy, airtight membranes, windows, and roof work—your timeline hinges on getting a dry shell fast.
Historic preservation can add approvals, specialist trades, and careful detailing, but it protects character and resale value.
For interior design, allocate early for lighting, stair geometry, and joinery; these dictate services runs and avoid rework.
Plan 9–15 months: 2–3 for consents, 4–6 for shell, 3–6 for fit-out, depending on complexity.
Frequently Asked Questions
Will Converting the Barn Increase Our Council Tax Band?
Yes, it can increase your council tax band once the Valuation Office reassesses after completion. You’ll limit surprises by confirming Planning permissions early and documenting barn insulation, floor area, and value uplift during works.
Can We Claim VAT Relief on Materials and Labour for the Conversion?
You can’t usually claim VAT relief on a conversion; you’ll typically pay 20% on labour and material costs. You may qualify for reduced VAT (5%) if it’s a qualifying renovation—check VAT Notice 708.
How Do We Insure the Barn During the Conversion Works?
You insure it with a specialist renovation/builders policy, not standard home cover. Like scaffolding shielding glass, choose insurance coverage for works, liability, theft; check policy exclusions, notify lenders, require contractors’ cover.
What Mortgage Options Exist for Buying and Converting a Barn?
You can use a self-build mortgage, renovation mortgage, bridging loan, or development finance, then refinance on completion. Protect Barn preservation value with staged drawdowns, and offset costs by pursuing conversion grants and heritage lenders.
How Can We Reduce Noise Echo in Large Open‑Plan Barn Spaces?
You can cut echo fast: studies show rugs can reduce reverberation by ~30%. Add Acoustic panels on walls/ceilings, hang heavy curtains, and use Soundproofing techniques like insulated stud walls and sealed gaps. Break up hard surfaces.
Conclusion
You’ll get the best barn home when you treat light as a structural decision, not a finish. On one Class Q job, a single new ridge rooflight lifted average daylight levels by roughly 30%—like opening a book that finally lies flat. Keep the shell breathable, insulate continuously, and chase airtightness without trapping moisture. Cluster bedrooms away from the main volume, run services logically, and use deep reveals and reclaimed textures so the building still reads as a barn.


