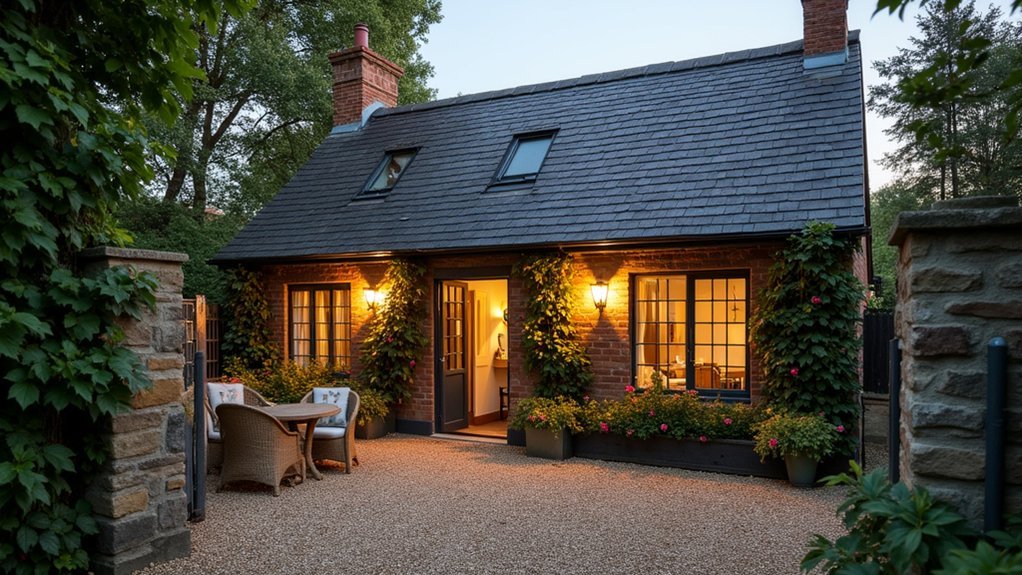
We start by surveying the gatekeeper’s cottage fabric—roof, damp routes, floors, chimneys, wall build-up, and lime versus cement repairs—so we don’t “design over” risk or heritage constraints. Next we set a holiday-let brief, budget, and ROI, then confirm listing status, access, and utility capacities. We tighten circulation, realign key sightlines to the hearth, and add discreet built-in storage in thick walls and stair voids. Next we cover insulation, ventilation, and guest-proof services.
Key Takeaways
- Start with a full survey of structure, damp, roof, drainage, and timber, and identify heritage features and constraints before designing interventions.
- Define the holiday-let brief, target guests, amenities, and budget, separating capex from opex and allowing 10–20% contingency for unknowns.
- Optimize the plan by improving circulation, sightlines, and kitchen placement, using selective opening adjustments that respect original proportions and character.
- Add discreet built-in storage within thick walls, chimney breasts, and stair voids, and improve daylight with carefully positioned, low-profile rooflights and splayed reveals.
- Upgrade comfort and durability using breathable insulation, reliable ventilation, modern electrics and heating controls, leak-protected plumbing, and easy-clean kitchen and finishes.
Survey the Gatekeeper’s Cottage First (Risks + Limits)
Before we sketch layouts or pick finishes, we’ll commission a full building survey of the gatekeeper’s cottage to map what we can safely change—and what we can’t. We’ll inspect roof structure, chimney stability, floor deflection, damp pathways, and timber decay, then correlate findings with drainage runs and the garden landscape levels outside.
We’ll test for lime versus cement pointing, identify thermal bridges, and confirm whether walls are solid stone, rubble, or cavity. We’ll record window proportions, hearth geometry, and stair pitch so any interventions respect the historical context.
We’ll flag constraints early: protected elevations, low head heights, buried services, and limited access for plant. From this, we’ll set a risk register and a scope that’s buildable.
Set Your Holiday-Let Brief, Budget, and ROI
Next, we’ll set a clear holiday-let brief by defining your target guest, peak-season usage, and the amenity spec that supports that audience.
We’ll lock a cost plan around must-haves versus nice-to-haves, then map it to a pricing model so you can forecast ROI with realistic occupancy and operating assumptions.
Finally, we’ll ring-fence a contingency that matches the cottage’s risk profile, so design decisions stay aligned to budget and payback.
Define Brief And Audience
Although the cottage’s charm might tempt us to start picking paint colours straight away, we’ll get a better outcome by locking in a clear holiday-let brief and a defined audience first—because those two decisions set the budget, dictate the specification level, and determine what “return” really means.
We’ll decide whether we’re designing for walkers needing boot storage and drying rails, couples seeking a quiet retreat, or families wanting robust finishes and flexible sleeping. From that, we’ll fix capacity, zoning, and durability: arrival flow, kitchen usability, acoustic separation, and maintenance cycles.
We’ll align garden landscaping with use—parking, lighting, bin store, seating, dog-proof boundaries—then match interior decor to the promise: heritage-led, modern-minimal, or cosy-country, with a coherent palette, lighting plan, and storage strategy throughout.
Budget, ROI, And Contingency
Once we’ve fixed the brief and target guest, we can build a budget that maps directly to revenue potential and operational reality. We’ll run Budget planning in parallel with design decisions: every finish, layout move, and system upgrade must earn its keep.
We price by element, not guesswork, then validate with ROI analysis using realistic occupancy, seasonality, and cleaning/utility load.
- Separate capex (fabric, MEP, joinery) from opex (linen, maintenance, platform fees).
- Model payback for high-impact upgrades: insulation, heat pump, durable flooring, hot water.
- Set a contingency: 10–15% for known unknowns; 20% if structure/services are uncertain.
- Lock a value-engineering ladder so we can cut smartly without compromising guest experience.
We’ll review monthly against quotes, programme, and projected ADR.
Permissions to Check (Listed, Access, Utilities)
Before we freeze the layout and specification, we’ll verify whether the cottage is listed and exactly what triggers Listed Building Consent—windows, roof coverings, fireplaces, stair geometry, and any internal partitions.
Next, we’ll confirm access and right-of-way in writing, including turning circles, gate widths, parking allocation, and any shared drive maintenance obligations that affect the site plan.
Finally, we’ll map utility connections and easements—water, foul drainage or septic, power capacity, broadband route, and meter locations—so our service runs stay compliant and the design doesn’t fight hidden constraints.
Listed Building Consent Needs
While we refine plans for a gatekeeper’s cottage holiday let, we should lock down the permissions framework early—starting with whether the building is listed (and at what grade) and which elements are protected. Then, map that to every proposed intervention from window upgrades and internal insulation to fireplace alterations and new bathrooms.
Listed Building Consent typically hinges on Historic preservation principles, so we’ll justify changes with a heritage statement, measured survey, and a schedule of works aligned to Building regulations where applicable. We should test reversibility, breathability, and fabric impact, and coordinate early with the conservation officer to avoid redesign.
- Confirm listing grade, curtilage status, and protected features
- Specify like-for-like repair vs alteration scope
- Detail materials: lime, timber profiles, glazing, hearths
- Document services routes to minimise historic fabric loss
Access And Right-Of-Way
Although the cottage itself may sit comfortably within its plot, we still need to verify the legal and practical access position—vehicular approach, pedestrian routes, parking, and any shared drives—because right-of-way constraints can dictate everything from construction logistics and refuse collection to guest arrival experience and emergency access.
We’ll review title plans, historic deeds, and any adopted highway limits to confirm legal access and any third‑party access rights across lanes or forecourts. Where a right of way crosses the site, we’ll design surfaces, lighting, gates, and sightlines so movement stays safe and legible without encroaching on neighbours’ use.
If boundaries feel ambiguous, we’ll pursue boundary agreements and mark ownership on setting‑out drawings to avoid later disputes. We’ll also test turning circles and delivery bay locations against real vehicle dimensions.
Utility Connections And Easements
Once we’ve pinned down who can get to the cottage and how, we need the same certainty for what serves it: water, foul drainage, power, telecoms, and any heating fuel runs. We’ll map existing routes, confirm meter locations, and check capacity at the point of connection, because heritage fabric rarely tolerates ad‑hoc trenching or surface trunking.
Utility easements must be read against title plans and any estate covenants, then translated into a coordinated services layout that protects trees, archaeology, and sightlines. We’ll also ask each provider about connection restrictions, lead times, and whether upgrades trigger new wayleaves.
Before design freeze, we’ll verify:
- Legal route and width for each service
- Allowed excavation depths and reinstatement spec
- Isolation points, meters, and access for maintenance
- Shared services, liabilities, and diversion costs
Quick Layout Wins for Awkward Gate-Lodge Plans
Because most gate-lodges were designed to surveil an entrance rather than support modern living, we can usually open the biggest gains by editing circulation first: tighten the entry sequence, eliminate dead corridors, and let one spine route do the hard work.
We’ll realign doorways so sightlines run from porch to hearth, then shift the kitchen to the brightest corner and keep services on the shaded flank.
If the stair pinches the plan, we can rotate its first tread to square the landing and recover usable wall lengths.
We’ll widen openings selectively with nib walls to keep structure legible, and we’ll zone sleeping behind a single door for acoustic control.
Outside, Garden landscaping should mirror the new axis; interior decor should reinforce it with lighting and flooring direction.
Built-In Storage That Doesn’t Steal Floor Space
If we treat every thickened wall, stair void, and chimney breast as storage volume, we’ll add capacity without shrinking the rooms. We’ll map each niche in plan and section, then specify built-in storage that aligns with skirting, architraves, and historic reveals so it reads as joinery, not furniture stealing floor space.
We’ll keep doors flush, hinges concealed, and handles minimal to reduce visual noise and snag points.
- Full-height cupboards recessed between studs, with adjustable shelves
- Drawer banks under window seats, on soft-close runners
- Fire-surround side cabinets, vented to protect masonry
- Under-stair pull-outs sized for vacuums, boots, and linens
We’ll use moisture-tolerant plywood carcasses, solid lippings, and a paint system matched to trim for durability and easy touch-ups.
Add Daylight Without Losing Cottage Character
To brighten the cottage without flattening its proportions, we’ll place rooflights where sightlines don’t catch them—tight to the ridge or tucked behind a rear slope—so they wash light deep into the plan while staying visually discreet.
We’ll size and align openings to the existing rafters and keep external profiles low. Then, we’ll manage solar gain with orientation and blinds rather than oversized glazing.
At the windows, we’ll specify period-matched units—slim sightlines, appropriate bar patterns, and conservation-style detailing—so the new glass reads as original even as it performs like a modern build-up.
Discreet Rooflight Placement
While we’re chasing brighter interiors, we won’t sacrifice the gatekeeper’s cottage silhouette, so we’ll place rooflights where they read as quiet interventions rather than new features. Our rooflight placement starts from the plan: we align openings to circulation zones, not feature walls, and we keep them below the ridge to reduce visual noise.
We’ll specify discreet skylights with low-profile frames and set them between rafters to avoid structural gymnastics. Internally, we’ll splay reveals to widen daylight throw, then tune reflectance with pale limewash so light feels even, not spotlit.
Externally, we’ll sit units parallel to the roof pitch and coordinate to existing openings for rhythm. Key moves:
- Keep to rear slopes where possible
- Match module to rafter spacing
- Use slim kerb upstands and neat flashings
- Avoid valley, hip, and verge clutter
Glazing That Matches Period
Because the cottage’s charm lives in its window proportions and glass character, we’ll add daylight by upgrading glazing specification and detailing rather than chasing bigger openings.
We’ll keep Vintage frames where they’re sound, repair splices in matching timber, and reset them square so reveals read crisp.
For performance, we’ll specify slim-profile double glazing or vacuum units where sightlines allow, targeting a low U-value without thick beads.
Where reflections would look too perfect, we’ll use lightly reeded or restoration cylinder glass on the outer pane to protect glazing aesthetics.
We’ll match putty lines, glazing bar widths, and spacer colours to existing paint tones, and we’ll detail trickle vents as concealed slots.
Finally, we’ll seal perimeter gaps with compressible tapes so drafts drop while sashes still slide.
Insulate, Ventilate, and Stop Damp: Sensitively
Even if the cottage looks dry on a summer viewing, we can’t treat insulation as a simple “add more and seal it up” job in a small masonry gatehouse. We’ll design for moisture balance: keep walls warm, let vapour move, and preserve historical accuracy with Eco friendly materials.
- Specify breathable internal insulation (wood fibre or hemp-lime) with taped, vapour-open membranes
- Repair lime pointing and limewash to shed rain while staying permeable
- Add discreet background ventilation: trickle vents, undercut doors, and passive grilles in cupboards
- Detail junctions to avoid thermal bridges at window reveals, eaves, and floor edges
We’ll map damp with moisture readings and salts tests, then target sources—ground splashback, blocked gullies, hard cement patches—before insulating.
Done right, comfort rises and mould risk drops without trapping the fabric.
Guest-Proof Electrics, Heating, Water, and Waste
Before we choose finishes and furniture, we’ll make the cottage’s services guest-proof by designing electrics, heating, water, and waste for predictable loads, simple controls, and easy maintenance in a tight, historic shell.
We’ll upgrade the consumer unit with RCBO protection, fit interlinked smoke/heat alarms, and add RCD-spurred bathroom circuits for electrical safety. Sockets get USB only where warranted, and all circuits are clearly labelled for quick fault-finding.
For heating, we’ll use a simple programmable thermostat, lockable setpoints, and weather-compensated controls; TRVs balance rooms without guest tinkering.
Water gets a pressure-reducing valve, isolation valves to every branch, and leak sensors at risers.
Waste runs get rodding access, swept bends, and acoustic wraps to keep nights quiet. All for guest proofing.
Small Cottage Kitchen: Durable, Compact, Workable
Once the cottage’s services behave predictably, we can design a small kitchen that works hard without feeling crammed, using durable materials and a layout that keeps prep, cooking, and washing in a tight, logical loop.
Compact design starts with appliance sizing and clearances: 600mm modules where possible, a 450mm dishwasher if needed, and a 500mm oven to free drawer banks.
We’ll prioritise Material selection that tolerates wet coats, sandy shoes, and constant wipe-downs.
- Quartz or compact laminate worktops with radiused edges
- Matt, washable cabinetry; soft-close hinges; replaceable door fronts
- Slip-resistant porcelain floor with minimal grout lines
- Under-cabinet task lighting and a single-bowl sink with pull-out spray
We’ll keep tall storage to one end, protect splash zones, and specify robust hardware throughout.
Make the Bathroom Feel Bigger (Lighting + Fit-Out)
With the kitchen locked down to durable, tight-clearance modules, we can turn to the bathroom—where perceived space matters as much as waterproofing. We’ll chase Space optimization through layout, lighting, and visual continuity.
We specify a wall-hung WC and a slim vanity (max 450mm deep) to free floor area and reveal more tile. A recessed mirrored cabinet doubles storage without projecting into the room.
For the shower, we use a frameless clear screen, linear drain, and a single fall to keep sightlines clean. Bathroom lighting does the heavy lifting: an IP-rated downlight for ambient, vertical LED strips at the mirror to kill shadows, and a 3000K dimmable circuit for evening calm. Pale grout, large-format tiles, and a flush threshold extend the footprint.
Frequently Asked Questions
How Do I Market a Gatekeeper’s Cottage Holiday Let Effectively?
We’ll market your gatekeeper’s cottage by optimizing listings with architectural photos, amenity specs, and SEO titles, then running Local marketing partnerships. We’ll refine Guest communication with automated pre-stay briefs, concierge scripts, review prompts, and pricing analytics.
What Cleaning Schedule and Turnover Time Should I Plan Between Guests?
Like clockwork, we’ll plan 4–6 hours between guests for standard cleans, 6–8 for deep resets. We’ll document Cleaning protocols (linen, bathrooms, touchpoints) and lock Turnover timing to check-out/in windows, quality-checked.
Do I Need Specialist Holiday-Let Insurance, and What Does It Cover?
Yes, we’ll usually need specialist holiday-let insurance; standard home policies won’t meet policy requirements. It covers insurance coverage for guest liability, accidental damage, theft, business interruption, and compliant safety features, plus legal expenses, contents, and public liability.
Should I Allow Pets, and How Do I Manage Pet-Related Wear?
We’d allow pets if we set clear Pet policies, specify zones, and charge a deposit; we’ll manage wear with wipe-clean finishes, washable rugs, slipcovers, and entry mats, and we’ll schedule deep cleans between stays.
What Pricing Strategy Works Best for Peak and Off-Season Bookings?
We’ll use Pricing analysis to set a dynamic base rate, then apply Seasonal adjustments: premium weekends and holidays, minimum-stay rules, and yield-based discounts midweek. You’ll track comps, occupancy, and RevPAR to refine.
Conclusion
If we survey first, lock the brief, and respect permissions, we can turn a gatekeeper’s cottage into a robust holiday let without losing its character. We’ll solve awkward plans with clear circulation, built-ins, and compact, durable kitchen and bath spec. Then we’ll prioritise insulation, vapour control, ventilation, and damp detailing, and guest-proof services—RCD protection, safe heat, reliable hot water, and compliant waste. Like checking a telegram, we’ll validate every interface before handover.