Underfloor mat heating is the most accessible form of electric underfloor heating — a pre-spaced heating cable woven into a mesh mat that unrolls over the subfloor, goes under the tile adhesive, and delivers warm floors without the complexity of a wet system, a boiler connection, or a manifold. It is the format that most people encounter first when considering underfloor heating for a bathroom or kitchen, and it is the format most frequently installed by homeowners and tilers rather than specialist heating engineers. Understanding what it is, how it works, where it works well, and how to specify and install it correctly makes the difference between a system that delivers effortless warm floors for twenty years and one that fails within five.
Key Takeaways
- Underfloor heating mats are electric resistive heating cables pre-fixed to a mesh carrier at a set spacing — the mat is rolled out, cut and turned to fit the room shape (cutting the mesh, never the cable), then covered with tile adhesive and tiles.
- Mat heating is ideal for bathrooms, kitchens, and small rooms — the installation is straightforward, the cost is low, and the running cost impact in a small area is modest. It is not typically suitable as a primary heating system for large areas.
- The standard power density is 150–200 W/m² — 150 W/m² for rooms where the mat supplements other heating; 200 W/m² where the mat is the primary heat source or where the room has significant heat losses.
- Tile and stone are the ideal floor coverings for mat heating — they absorb and transmit heat efficiently and their thermal mass retains warmth after the mat switches off. Engineered timber and LVT require specific mat products and careful temperature control; solid timber is generally not suitable.
- A floor sensor is not optional — it is essential — without a floor temperature limit set by a floor sensor, the mat can overheat sensitive floor coverings or damage the element itself in areas where insufficient tile adhesive covers the cable.
- The mat must never overlap itself or cross another heating circuit — cable-to-cable contact concentrates heat at the contact point and will destroy the element at that location.
- A professional electrician must connect the mat to the mains supply — the wiring from the mat’s cold tail to the thermostat and from the thermostat to the consumer unit is notifiable work under Part P of the Building Regulations in kitchens and bathrooms.
What Is an Underfloor Heating Mat?
An underfloor heating mat consists of a resistive heating cable — typically twin-conductor or single-conductor — woven into or fixed to a fibreglass mesh carrier at a predetermined spacing. The mesh holds the cable at consistent intervals, ensuring even heat distribution across the floor area, and provides a surface that bonds to tile adhesive, keeping the cable in position during installation.
The mat arrives as a roll with a cold tail — a non-heating section of cable at one end that exits the mat and connects to the thermostat. The cold tail is the only cable section that can be cut or shortened; the heating cable itself must never be cut.
The heating cable generates heat through electrical resistance — the cable heats up when current passes through it, and this heat transfers through the tile adhesive and tiles to warm the floor surface and, over time, the room above.
Single-conductor vs. twin-conductor cable:
A single-conductor cable requires both ends to return to the thermostat — the cable must be looped back to the starting point, which complicates layout planning but allows the cable spacing to be adjusted at different ends of the run. Single-conductor is more common in loose cable systems than in mat heating.
A twin-conductor (or twin-and-earth) cable has both conductors within a single sheath, with only one end connecting to the thermostat. The other end terminates with a sealed end cap. Twin-conductor mats are simpler to install — roll out, cut and turn, connect one end — and are the standard format for domestic heating mats.
Types of Heating Mat
Standard Heating Mat (Tile and Adhesive Applications)
The most common format. A twin-conductor cable at 150 W/m² or 200 W/m², fixed to a fibreglass mesh carrier, supplied in a range of widths (typically 0.5m wide) and lengths to cover standard areas. The mat is installed under tile adhesive and ceramic, porcelain, or natural stone tiles.
Standard mats are suitable for concrete or screed subfloors (installed on top of the screed) and for timber subfloors with appropriate building board covering (Hardie Backer or similar cement board). They should not be installed directly on timber subfloors without an intermediate layer.
Low-Profile Mat (For Minimal Floor Depth)
A low-profile heating mat uses a thinner cable profile — often 3mm or less in total height, versus the standard 4–6mm — to minimise the floor build-up. In retrofit situations where the floor level is constrained (door frame heights, step differences), a low-profile mat reduces the depth of tile adhesive required above it.
These mats are available at the same power densities as standard mats and perform equivalently; they simply allow a shallower total floor build-up.
Heating Mat for Engineered Timber or LVT
Specialist mats designed to work with floating floor finishes (engineered timber click-lock, luxury vinyl tile) are available in a foil or ultra-low-profile format. These sit beneath the floating floor on the subfloor and are not embedded in adhesive.
The power density of these mats is typically lower (80–100 W/m²) because floating floor finishes provide more insulation resistance than tile, and because the maximum floor temperature limit for timber (27°C surface) is lower than for tile (35°C). A floor sensor with a low temperature limit is particularly important with timber floor covers.
Power Density: Specifying the Right Output
The power density of a heating mat — expressed in W/m² — determines how much heat the mat produces per square metre of floor area. Choosing the right power density for the application is the most important specification decision in a mat heating project.
150 W/m² — the standard specification for most domestic applications where:
- The mat supplements an existing heating system (the room has a radiator or towel rail that handles the bulk of the heat demand)
- The room has moderate insulation and modest heat losses
- The primary purpose is floor comfort warmth rather than full room heating
200 W/m² — the higher specification for applications where:
- The mat is the primary or sole heat source for the room
- The room has significant heat losses (external walls, large windows, poor insulation)
- A faster warm-up time is required
- The bathroom is used in the morning and needs to reach comfort temperature quickly from a cold start
100 W/m² — the lower specification for:
- Supplementary warmth only, where the room is well-insulated and already heated
- Engineered timber or LVT applications where the lower floor temperature limit requires reduced power density
- Conservatories or spaces where minimal heat input is sufficient
Calculating the required power:
The approximate heat demand of a room can be calculated by estimating its heat loss — the rate at which it loses heat through walls, windows, floor, and ceiling to the outside at design conditions. This is typically expressed in Watts. If the room has a calculated heat loss of 800W and the heated floor area is 6m², the mat must produce at minimum 133 W/m² — so 150 W/m² is the appropriate standard specification.
The heated floor area is not always the full room area — mats cannot be installed under fixed furniture (kitchen cabinets, bathroom vanity units, baths, shower trays) because the floor beneath these items cannot dissipate heat effectively, leading to overheating of the element. Only the area of clear floor can be counted as heated area.
Floor Covering Compatibility
Ceramic and porcelain tile: The ideal companion for heating mats. Tile has high thermal conductivity — it transfers heat from the mat to the room efficiently — and significant thermal mass, meaning it stores heat and releases it slowly after the mat switches off. A well-tiled floor above a heating mat reaches a comfortable surface temperature relatively quickly (typically 30–60 minutes from cold, depending on tile depth and adhesive thickness) and remains warm for a useful period after the element switches off.
Natural stone (slate, limestone, marble): Similar characteristics to ceramic tile — high conductivity, good thermal mass. Stone is one of the best floor coverings for mat heating. The floor sensor temperature limit should be confirmed against the stone supplier’s recommendation, but most natural stone is compatible with surface temperatures up to 35°C.
Engineered timber: Compatible with specific mat products, subject to the maximum floor temperature limit (typically 27°C surface temperature — check the timber supplier’s specification). Only use mats rated and warranted for use under engineered timber. A floor sensor is essential and must be correctly set.

Luxury vinyl tile (LVT): Most LVT products are compatible with underfloor heating. Check the manufacturer’s maximum temperature specification and use a thermostat with a floor sensor set to the appropriate limit. Low-profile or foil-based mat systems are preferred under floating LVT.
Carpet: Standard heating mats are not suitable under carpets. Carpets act as thermal insulators, trapping heat at the element surface and causing overheating. The combined thermal resistance (tog value) of carpet and underlay must be below 2.5 for any UFH system; most standard domestic carpet and underlay combinations exceed this. If carpet is required, the system should be specified from the outset for carpet compatibility, which typically means a lower-density wet system rather than an electric mat.
Solid timber: Generally not suitable for electric heating mats. Solid timber moves significantly with changes in temperature and humidity, and the cycling of a heating element beneath it accelerates this movement, causing gaps, cracking, and surface deformation. Engineered timber — which is dimensionally more stable — can work with appropriate mat products and careful temperature control; solid timber should be avoided.
Installation: Step by Step
Preparation
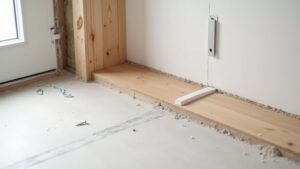
1. Check the subfloor. The subfloor must be flat (max 3mm variation in 3 metres), clean, and dry. Any raised spots, hollows, or contamination must be addressed before the mat is installed. A self-levelling compound can be used to flatten an uneven subfloor.
2. Install insulation boards. For maximum efficiency, fit PIR or EPS insulation boards beneath the heating mat. These direct heat upward rather than allowing it to dissipate through the subfloor. 6mm or 10mm insulation boards add minimal floor height while improving efficiency by 20–40%. This step is often skipped but should not be.
3. Install the floor sensor conduit. Before the mat is rolled out, the conduit (a small-bore plastic tube, typically 10mm or 6mm internal diameter) that will house the floor sensor probe must be laid. The conduit runs from the wall (where the thermostat will be positioned) across the floor between the mat rows, terminating mid-floor in the heated zone. The conduit must be sealed at the far end to prevent tile adhesive from entering. This step is critical — a floor sensor installed without a conduit cannot be replaced without lifting the tiles.
Layout Planning
4. Plan the mat layout. The mat covers the floor area that will be tiled, avoiding the footprint of fixed furniture. The mat enters from the wall where the thermostat cold tail will exit, travels the length of the room, is cut and turned at the far end (cutting the mesh only, never the cable), and returns. Multiple passes are made until the full heated area is covered.
The mat must not overlap itself — cable cannot touch cable or cross another heating element. Maintain a consistent gap between rows equal to the pre-set spacing of the cable within the mat.
5. Secure the mat. Some mats self-adhere to the subfloor or insulation board; others require stapling or mechanical fixing at intervals. The mat must lie flat without kinks, bunching, or lifting.
Installing the Floor Sensor
6. Feed the floor sensor probe. The floor sensor (a thermistor probe on a flexible lead, connected to the thermostat) is pushed through the conduit until the probe sits between two cable rows at the centre of the heated area. The conduit and sensor are the same operation — the sensor lives inside the conduit permanently, accessible for replacement from outside the floor.
Tiling Over the Mat
7. Apply tile adhesive. A flexible tile adhesive compatible with electric underfloor heating is applied over the mat, fully encasing the cable in adhesive. The recommended minimum adhesive thickness over the cable is specified by the mat manufacturer — typically at least 3–5mm above the cable. Insufficient adhesive creates hot spots where the cable is exposed to air rather than covered by conductive adhesive.
The adhesive must be worked carefully between the cable rows using a notched trowel — the aim is complete encapsulation without voids or air pockets.
8. Lay tiles. Tiles are laid directly into the adhesive above the mat, in the same manner as a standard tile installation. The tiles should not be grouted until the adhesive has cured — typically 24 hours.
9. Electrical connection. At this stage, the mat’s cold tail (the non-heating lead from the mat) and the floor sensor cable are routed to the thermostat position. The connection from cold tail to thermostat, and from thermostat to the consumer unit circuit, is carried out by a registered electrician. This is notifiable work under Part P in kitchens and bathrooms.
Testing
10. Test before and after covering. The resistance of the mat should be measured with a multimeter (or dedicated insulation resistance tester) before the mat is covered with adhesive, after adhesive application, and after tiling. The resistance reading should match the manufacturer’s specified value for the mat. A significant deviation indicates a damaged cable. Testing at each stage establishes when damage occurred and simplifies fault location.
11. The 24-hour rule. The heating system must not be energised until the tile adhesive has fully cured — typically a minimum of 24 hours, and ideally 48–72 hours for thick adhesive beds. Energising before curing can cause the adhesive to crack and the cable to overheat in insufficiently covered sections.
Thermostat Settings for Mat Heating
The thermostat for a mat heating system should be set with:
An air temperature setpoint — the target temperature for the room. For a bathroom, 22–24°C during use periods is typical; 18°C setback temperature when unused.
A floor temperature limit — the maximum floor surface temperature. For tile, this is typically 35°C. For engineered timber or LVT, typically 27°C. The floor sensor reading visible on the thermostat display allows this to be confirmed.
A programmed schedule — the mat should run for 1–2 hours before the period of use (the slow thermal response of the floor means it must pre-heat to reach temperature) and should revert to a setback temperature during extended unoccupied periods.
Running the mat continuously at high temperature outside occupied periods wastes electricity and reduces the element lifespan. Even a simple two-period schedule (occupied/unoccupied) significantly reduces running cost compared to a thermostat left at a fixed temperature.
Maintenance and Lifespan
A correctly installed electric heating mat from a quality manufacturer (Warmup, Devi/Danfoss, Heatmiser, Nexus) has an expected service life of 20–25 years under normal operating conditions. The element itself requires no maintenance — it is sealed within tile adhesive and tiles and has no moving parts.
The components most likely to require attention over the system’s life are:
The thermostat: Electronic components have a finite life. Thermostats typically last 10–15 years and can be replaced without disturbing the floor.
The floor sensor: Thermistor sensors can fail. If the sensor conduit was correctly installed, the sensor can be withdrawn and replaced without touching the floor — a 15-minute job. If no conduit was installed, replacement requires lifting tiles.
The cold tail connection: The junction between the cold tail and the thermostat wiring should be in an accessible junction box or within the thermostat backbox, not buried in the floor. A failed cold tail connection is repairable; a failed cold tail buried under tile is not.
A heating mat that fails during its intended service life — before the 20–25 year design life — has almost always done so because of installation damage (the cable was cut, kinked, or crossed with another element during tiling), insufficient adhesive cover causing hot spots, or overheating of the element through a failed or absent floor sensor. Correct installation prevents all of these; shortcuts in installation cause all of them.