Design a garden with zones that work together by sketching your actual circulation first—doors to gates, compost, and hose bibs—then assign each zone to measured microclimates: hourly sun, prevailing wind, frost pockets, slope, and runoff paths. Confirm soil texture, compaction, and infiltration per zone before fixing beds or hardscape. Map hose reach and group plants by water demand within coverage bands. Repeat path geometry, materials, and a tight plant palette, and soften boundaries with layered edges and mulch buffers. Next, you’ll see how to phase it efficiently.
Key Takeaways
- Start with a scaled site map, block primary circulation first, then assign zones by microclimate, access, and service needs.
- Test soil texture, compaction, and drainage per zone; map runoff and infiltration, and fix wet spots before final bed placement.
- Map hourly sun, seasonal shade, wind corridors, frost pockets, and slopes so each zone matches plant tolerance and comfort.
- Plan water distribution by mapping hose reach from spigots; group plants by water demand within coverage bands and add splitters or bibs as needed.
- Create cohesion with consistent path widths, repeated materials, unified bed edges, and a limited plant palette repeated across zones for continuity.
Start With a Quick Garden-Zoning Plan
Before you plant a single bed, sketch a quick zoning plan that matches how you’ll actually use the site. Walk the property at morning and late afternoon, and mark sun angles, prevailing wind, frost pockets, and roof runoff. Note slopes, compacted paths, and any utility easements so your zones respect access and drainage.
Draft on graph paper or a scaled base map; block in circulation first, then assign functional zones by microclimate and service needs. Place high-touch areas within hose reach and near storage to streamline garden maintenance.
Reserve tougher edges for low-input plantings, and map shade shifts to guide plant selection. Finally, confirm each zone’s soil texture and irrigation capacity before you commit to bed geometry and permanent hardscape placements.
List How You Actually Use the Garden
Although microclimates and soil tests matter, your zoning works best when it mirrors your real routines. So start by listing exactly how you use the garden across a normal week and a full season. Track trips from doors, driveway, and hose bibs, and note what you carry: harvest baskets, pruners, mulch, or feed. Log time-of-day tasks—morning watering, evening checks—and identify high-frequency routes that compact soil or demand hardscape.
Next, map activities by month: seed starting, transplanting, trellising, deadheading, and tool cleaning. Include where you stage materials for composting techniques (kitchen scrap drop, browns storage, turning space) and where you inspect for Garden pests (scouting loops, trap placement, quarantine pots).
Note noise, light, and privacy needs for work sessions.
Choose Your Anchor Zone (Most-Used Area)
Once you’ve logged your real garden routines, pick an anchor zone—the area you touch most days—and design everything else to support it. Place it where circulation already concentrates: near the kitchen door, hose bib, and hardscape you use year-round. Lock in ergonomics first—level footing, wind protection, task lighting, and a 3–4 ft clear working aisle.
Treat utilities as the anchor’s backbone: water, power, storage, and waste flow. If you rely on Container gardening, cluster pots at this hub so you can irrigate, fertilize, and deadhead without cross-site hauling; specify drip lines and a drainable surface.
Then tune microclimate edges: add a small water source, layered cover, and pesticide-free plantings adjacent to create Wildlife habitats without interfering with daily access.
Pick the Garden Zones You Need (With Examples)
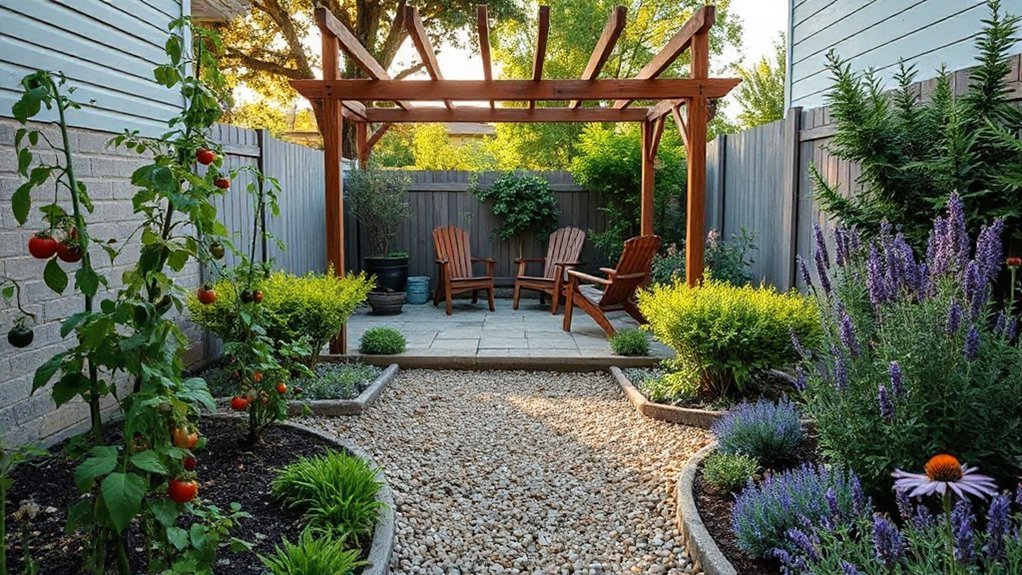
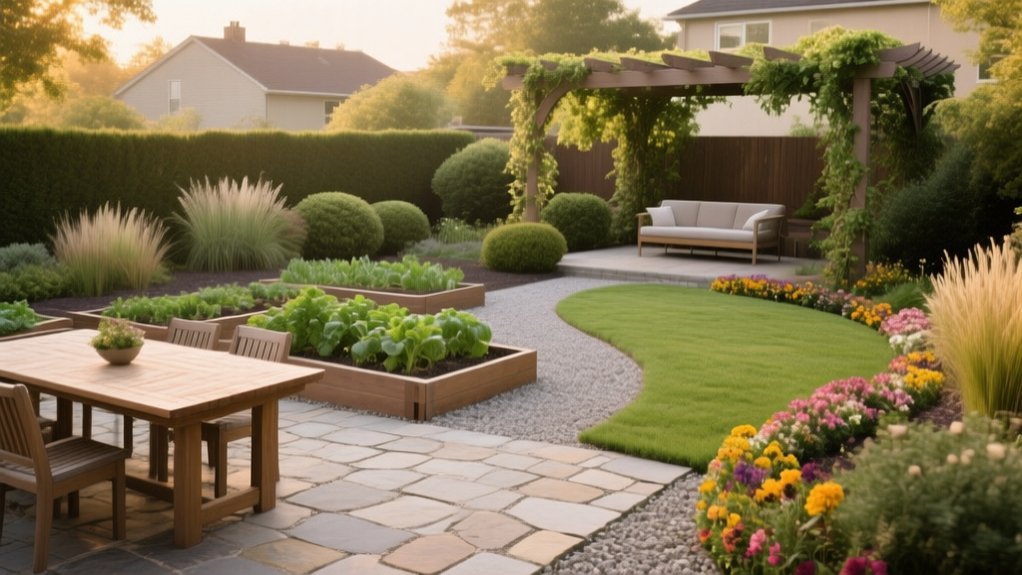
Now you’ll select the zones your site actually needs by function—arrival/entry, circulation, seating/dining, production (veg/herbs), utility (compost/storage), play, and habitat—then assign each one a footprint and adjacency to your anchor zone.
You can combine them into proven layouts, such as Patio + Grill + Herb Strip near the kitchen, or Veg Beds + Compost + Tool Bay on the service side with direct wheelbarrow access.
As you map options, you’ll balance sun, wind exposure, slope, and irrigation reach so each zone performs without constant cross-yard traffic.
Zone Types By Use
Because every site has different circulation patterns, microclimates, and maintenance constraints, you should define garden zones by how you’ll use them rather than by plant lists alone.
Start with an arrival/circulation zone: hard, slip-resistant paths sized to your traffic and turning radius.
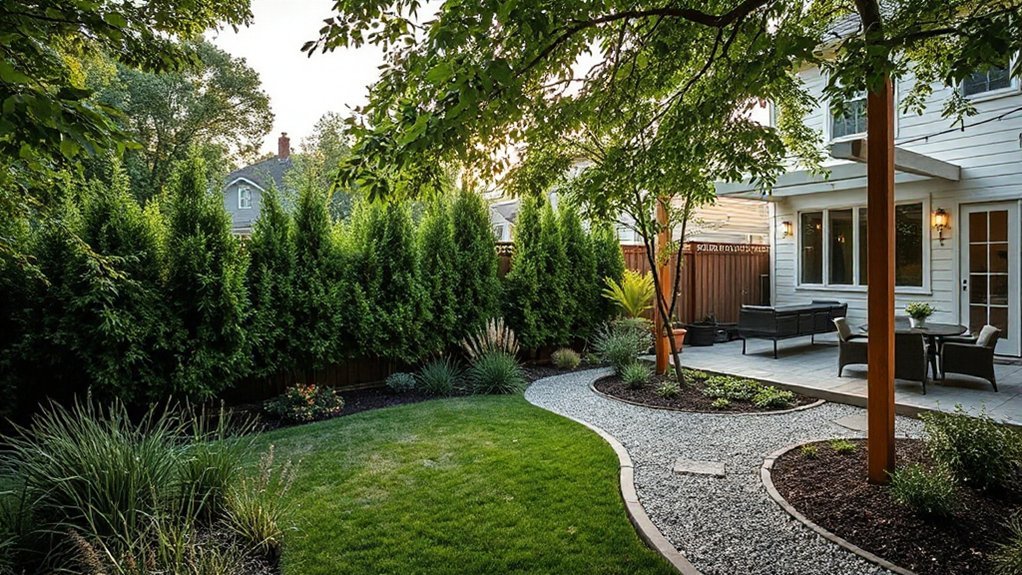
Add an outdoor living zone where wind, solar gain, and sightlines support seating, shade, and lighting.
Include a production zone for vegetables and cut flowers, placed near water and compost to reduce hauling.
Design a service/utility zone for bins, tool storage, rain barrels, and hose access, screened but reachable.
If you want low-input habitat, designate a conservation zone for wildflower meadows, set back from play areas and edged for tidy management.
For tight footprints, assign facade or fence planes to vertical gardens to intensify yield without expanding beds.
Example Zone Layout Combos
After you’ve defined the zone types by use, assemble them into a layout that matches your lot geometry, access points, and maintenance bandwidth.
On a narrow urban lot, run a straight service spine from gate to back door: utility/storage on the hard edge, edible beds midline, and a patio node with Garden art as a focal terminus.
On a corner lot, buffer street exposure with a stormwater/low-mow zone, then step into a higher-care entertaining zone near the kitchen entry; keep compost and tool access on the driveway side for clean circulation.
On a sloped site, terrace three bands: upper gathering, mid Seasonal planting beds for changeouts and cut flowers, lower infiltration or orchard. Keep paths ≤5% where possible and align hose runs to minimize friction.
Map Sun, Shade, and Wind by Zone
Now you’ll map each zone’s microclimate by logging sun exposure hour-by-hour through a typical day, noting seasonal shifts at key dates.
Mark moving shade lines from buildings, fences, and trees, then flag persistent deep-shade pockets that change plant and hardscape options.
Finally, track prevailing and storm winds at plant height, recording sheltered eddies and wind corridors so you can place screens, anchors, and wind-tolerant plantings where they’ll perform.
Identify Daily Sun Patterns
Before you assign plants to zones, map how light and air actually move across your site over a full day. Stand at key nodes—entry, patio, vegetable bed, and boundary edges—and note when direct sun hits, when it turns to bright ambient light, and when it drops below usable photosynthetic levels.
Use a simple base map and mark hourly sun patches with distinct symbols so you can compare zones at a glance. Pay attention to reflective boosts from light walls, paving, or water, and to light “funnels” created by alleys or gaps between structures.
Then align functions: place high-light production beds where exposure persists, and position Bird attractors and Wildlife corridors where predictable light supports nectar and berry cycles across seasons. Keep notes consistent across weather windows.
Track Shade And Wind
Sun notes give you the exposure baseline, but zones only hold up if you also chart where shade lingers and how wind behaves at ground level. Walk each zone at 9 a.m., noon, and late afternoon, then mark hard-edged shade from buildings and fences separately from dappled canopy shade. Note seasonal shifts: winter sun angles and summer leaf-out change durations and intensity.
For wind, use ribbon flags on stakes at 12–18 inches to read true plant height conditions, not rooftop gusts. Record prevailing direction, eddies near corners, and drying corridors between structures.
Translate findings into plant selection: place tender foliage in lee zones, drought-tolerant species in scour lanes, and shade-tolerant groundcovers in persistent pockets. Site garden art where wind won’t tip or chafe.
Check Soil and Drainage Before Placing Zones
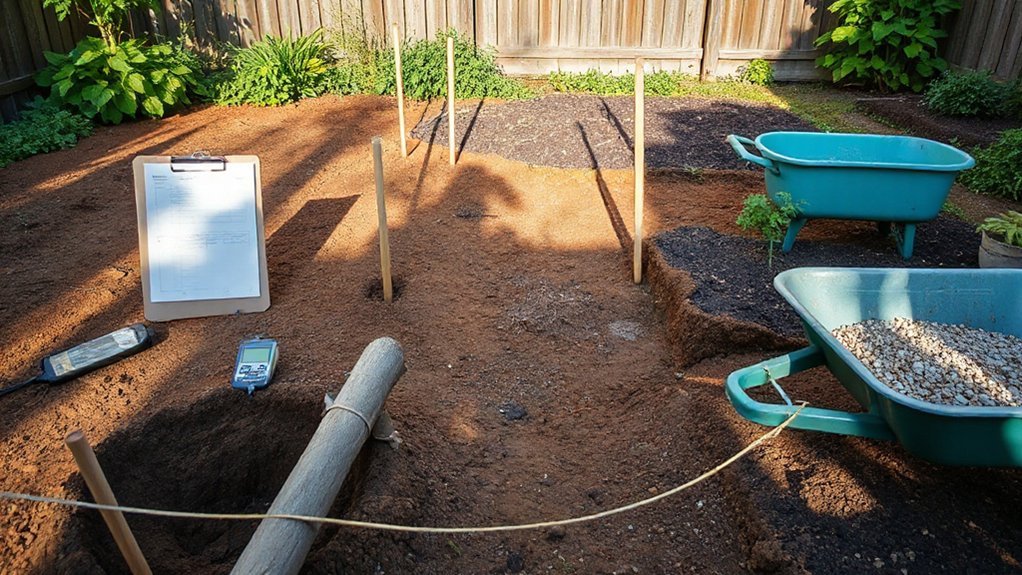
Although you may already have a rough layout in mind, you’ll get a far more reliable zone plan by mapping soil texture and drainage patterns across the site first. Start with Soil testing in each potential zone: dig inspection pits, run a ribbon test for texture, and note compaction, gravel lenses, and topsoil depth.
After rain, flag puddling, seep lines, and areas that stay dark and saturated for 24–48 hours.
Next, confirm infiltration with a simple percolation check and trace where downspouts and hardscape runoff actually flows. Place moisture-sensitive plantings only where water moves through the profile evenly.
Where it doesn’t, design Drainage solutions before you assign a zone: regrade micro-slopes, add swales, amend with structured compost, or install subsurface drains. This prevents mismatched zones and chronic plant stress.
Plan Zones Around Water and Hose Reach
You’ll start by mapping hose coverage from each spigot, marking practical reach and pressure drop across beds, edges, and slopes.
Then you’ll group plants into zones by matched water demand so each irrigation pass stays uniform and efficient.
If coverage leaves dry pockets or forces long runs, you’ll place spigots strategically—near high-use beds and along hardscape—so every zone stays within easy, reliable reach.
Map Hose Coverage Areas
Before you stake out beds or buy plants, map your hose coverage so every planned zone falls within reliable watering range. Measure your hose length, note spigot flow, and sketch arcs from each bibb on a site plan.
Account for obstacles—steps, gates, and tight corners—that reduce effective reach, then confirm by walking the line with the hose pressurized. Keep clear routes where hoses won’t snag Garden lighting cables or edge alongside Water features.
- Mark each spigot and intended quick-connect point.
- Draw reach circles at full length and at 75% working slack.
- Identify friction points: mulch, gravel, paving joints, slopes.
- Note elevation changes that affect spray pattern and runback.
- Flag areas needing a second bibb or timed splitter for consistent access.
Group Plants By Water Needs
Once you’ve confirmed where water reliably reaches, group plants by irrigation demand and place those groups inside your best hose-coverage bands. Assign high-water crops and lush perennials to the inner ring where pressure stays consistent and hand-watering is fastest.
Put moderate-demand shrubs and mixed borders in the mid ring, and reserve the outer, intermittent zones for drought-tolerant natives, herbs, and established groundcovers to support water conservation.
Match microclimate and soil with each group: full-sun, sandy pockets dry faster; shaded clay holds longer. Keep plant compatibility tight by combining species with similar rooting depth and evapotranspiration rates, so one schedule serves the whole bed.
You’ll reduce runoff, prevent stress cycling, and maintain uniform growth with fewer adjustments.
Place Spigots Strategically
Although plant groupings drive your irrigation map, spigot placement sets the hard limits on where those zones can actually live. Walk the site and mark every bib, then measure realistic hose reach with gentle bends and head-loss in mind. You’ll reduce drag lines across paths and keep beds serviceable for Irrigation automation and quick hand-watering.
- Mount splitters with shutoffs to isolate zones without re-plumbing.
- Place a spigot near high-demand beds and seedling areas for consistent pressure.
- Add a frost-proof bib by the compost station to support composting methods and cleanup.
- Keep one outlet accessible from the driveway for fill-ups, rinsing, and tool washdown.
Route hoses along edges, not through zone cores, and plan quick-connects at corners.
Size Each Zone for Real Comfort
Because each zone has to support specific movements and tasks, you’ll get far better results by sizing it from the body outward rather than from the fence line inward.
Set primary paths at 42–48 inches so you can pass with a wheelbarrow; keep secondary access at 30–36 inches for pruning runs.
Give raised beds 24–30 inches of reach from each side, and leave 18–24 inches at bed ends for turning.
Size your tool-staging pad to 5×7 feet minimum so hose, buckets, and harvest crates don’t block circulation.
In the compost area, allow a 3-foot working aisle and a 4-foot fork-swing radius; match bin widths to your composting techniques.
Add 2 feet for pest-monitoring stations to manage garden pests efficiently.
Place Zones to Match Noise and Privacy
If you map your garden zones against the site’s sound and sight lines, you’ll spend less effort buffering activity and more time using each space as intended. Put higher-use areas where ambient noise already exists, and reserve quiet zones where wind and hard surfaces won’t amplify sound. Use built elements and planting to manage views without creating stagnant corners that invite Garden pests or problematic wildlife interactions.
- Site seating downwind of roads to reduce low-frequency traffic wash.
- Place play or tool zones near existing screening (garage, fence, shed).
- Tuck reading or dining into lee-side pockets with soft, layered vegetation.
- Align sight lines so doors and windows overlook entries, not private nooks.
- Keep compost and ripe fruit away from bedrooms to limit nocturnal visits.
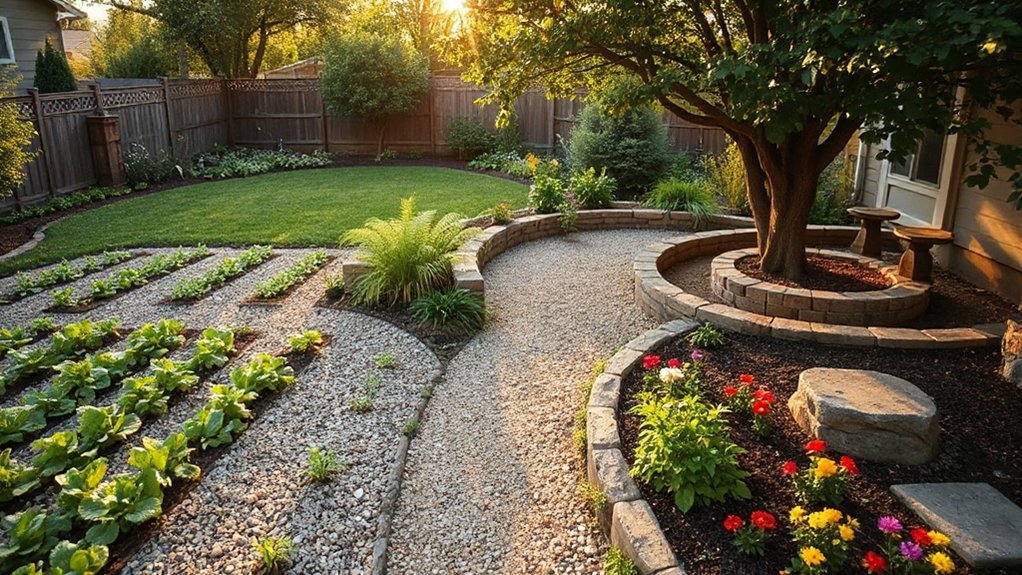
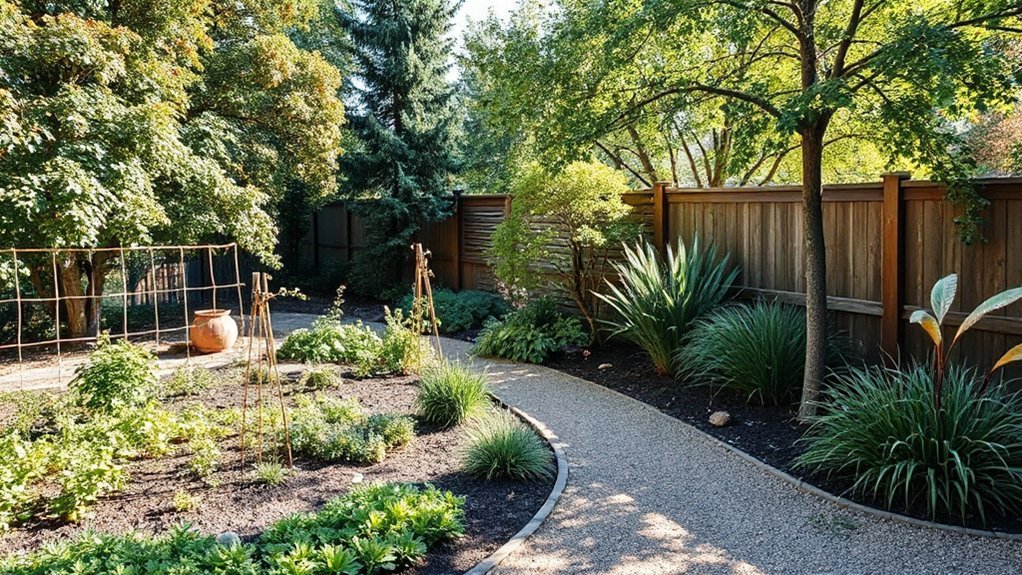
Lay Out Clear Paths Between Zones
Once you’ve fixed the main zones, draw the circulation first so every space connects by the most direct, legible route. Anchor primary paths to doors, gates, the compost bay, and hose bibs, then add secondary links to beds and seating so you won’t cut corners across planting.
Set widths to use: 1200 mm for two-way traffic, 900 mm for service runs. Hold grades under 5% where possible, add crossfall for drainage, and use firm, permeable surfacing that matches your soil and frost heave risk.
Define edges with low steel or stone to protect Wildlife habitats from trampling. Plan step-free loops and passing points to handle Seasonal changes, mud, and winter access without rerouting.
Use Sightlines to Make Zones Feel Connected
Clear paths move you through the garden; sightlines tell you where you’re and pull your eye toward the next zone before you arrive. Stand at key thresholds—gate, patio edge, kitchen door—and align focal points so each area previews the next without revealing everything.
Use Color harmony to stitch views: repeat a restrained palette across beds, then punctuate progressions with a single high-contrast accent to cue movement.
- Frame views with layered heights: groundcovers, mid shrubs, canopy.
- Aim axes at a specimen tree, water bowl, or sculptural boulder.
- Keep sight corridors 30–48 inches wide for human-scale legibility.
- Place nectar plants on the far edge for Wildlife attraction.
- Control background clutter with evergreen massing and selective pruning.
Repeat Hardscape Materials Across Zones
While plant palettes shift from one area to the next, repeating a small set of hardscape materials—say the same sawn bluestone, decomposed granite, and powder-coated steel edging—keeps your zones reading as one garden with distinct rooms. Specify consistent joint width, finish, and edge detail so passages don’t telegraph “new project.”
Run the same bluestone coping at steps, seat walls, and terrace perimeters, then switch only the layout pattern to signal function.
Use decomposed granite for Decorative pathways and match its stabilizer, compaction, and binders across sun and shade so color stays uniform.
For Water feature integration, echo the same stone on spillways and basin caps, and repeat the steel edging as a clean reveal around splash zones, drains, and service access points.
Choose One Planting Palette for the Whole Garden
Even if you plan to vary texture and seasonal emphasis from zone to zone, you’ll get the cleanest read by committing to a single core planting palette that runs through the entire site. Select 6–10 species that tolerate your site’s light, wind, and soil, then deploy them in different densities to suit each zone’s function.
Keep Plant color disciplined so progression feels intentional, not accidental, and let Garden textures do most of the work.
- Choose one dominant foliage tone (cool, warm, or glaucous)
- Limit flower hues to two harmonizing families plus a neutral
- Repeat one grass or strappy perennial for edge continuity
- Use one evergreen backbone for year-round structure
- Match drought or moisture tolerance to each zone’s irrigation plan
Unify the Space With Repeated Shapes
You’ll unify zone shifts by echoing the same curves and straight lines from primary paths into secondary walks, lawn arcs, and planting runs.
Repeat a consistent bed-edge profile—radius, setback, and mowing strip—so boundaries read as one system across the site.
Mirror hardscape geometry in patios, steps, and retaining walls, keeping angles and module dimensions aligned to the same governing layout.
Echo Curves And Lines
If your site already has a dominant geometry—an arcing walk, a curved retaining wall, or a straight fence line—echo that curve or axis in adjacent elements to unify the garden’s zones. You’ll get coherent wayfinding when Echo curves and flowing lines repeat at multiple scales, from circulation to vertical structure.
Align these moves to existing grades, views, and utilities so the geometry feels inevitable, not imposed.
- Extend the walk’s radius into a seating pad or gravel turnout.
- Arc a pergola beam line to match the wall’s sweep and sightlines.
- Set hedge masses on the same centerline to frame transitions.
- Use a consistent tangent where paths meet patios to prevent kinks.
- Curve drip zones and valve runs parallel to hardscape for clean service.
Keep offsets tight and measurable for crisp layout.
Repeat Bed Edge Profiles
Once the main curves and axes read clearly in paths and structures, lock that geometry into the planting zones by repeating a consistent bed-edge profile. Choose one edge type—crisp spade-cut, steel edging, or a mown arc—and run it through each zone so progressions feel intentional, not accidental.
On slopes, keep the profile level in short segments to prevent scalloping and soil creep. In wet pockets, raise edges slightly to hold mulch back and keep crowns dry. At tree driplines, widen the radius to protect roots and simplify mowing.
Tie edges to planting structures like hedges, gravel shoulders, or low retaining bands without changing the outline. You’ll also strengthen Wildlife habitats by creating predictable, continuous cover corridors and maintenance access.
Mirror Hardscape Geometry
Although planting zones can carry their own character, the garden reads as one place when you echo the same hardscape geometry—radii, angles, and offsets—from paths and patios into walls, steps, water edges, and seat pads. Set a governing module, then let Mirror patterns and geometric repetition do the stitching across sunny and shaded rooms.
On site, pull dimensions from your dominant circulation line and lock them to benchmarks so tolerances stay tight through grade changes.
- Match path curve radii to retaining-wall returns
- Align step nosings with patio joints and riser heights
- Repeat seat-pad rectangles in landing and fountain coping
- Offset water edges parallel to paving bands for clean reveals
- Keep corner angles consistent at gates, pergola posts, and beds
Blend Zones by Layering Tall to Low
Because sharp shifts make a zoned garden feel choppy, blend adjacent areas by layering plant height from tall to low across the boundary. Start on the “louder” side with structural verticals—multi-stem shrubs, clumping grasses, or small trees—then step down through midsize perennials to groundcovers that visually dissolve into the next zone.
Match plant massing to sightlines: place the tallest forms where you need screening from paths or seating, and keep low layers where you want views open. Use repeated species or similar textures on both sides so the gradient reads intentional.
Choose staggered bloom times for Seasonal color without disrupting the profile. Incorporate seed heads, berries, and dense foliage to reinforce Wildlife habitat while maintaining clear maintenance access.
Add Transitions (Edges, Thresholds, Buffers)
Layering plant height softens a zone boundary, but you’ll get a cleaner read—and better function—when you also build defined edges, clear thresholds, and practical buffers.
Treat progressions as engineered details: they manage runoff, foot traffic, and microclimates while signaling “enter here.” Set edges to match your maintenance tools and your site’s slope; then reinforce them with materials that won’t heave or wick moisture.
- Install steel or brick edging where mower passes, keeping a straight service line.
- Use a permeable path as a threshold, sized to your wheelbarrow and turning radius.
- Add a mulch buffer strip to intercept splash and reduce weed pressure.
- Place Garden art at gateways to anchor sightlines and cue circulation.
- Band in soil amendments at thresholds to smooth pH/texture shifts between beds.
Phase Your Garden Zones in 3 Stages
When you phase your garden zones in three stages, you lock in circulation and utilities first, then build soil and structure, and only then commit to long-lived plants and finishing details.
Stage 1: stake paths, gates, and sightlines; trench irrigation sleeves and conduit; set grades to move water away from foundations and toward basins.
Stage 2: correct compaction, add targeted amendments based on a soil test, and install hardscape, raised edges, and wind screens. Shape swales, overflow routes, and infiltration areas so each zone handles runoff predictably.
Stage 3: plant canopy and framework shrubs, then infill perennials and seed. Place Garden art after you confirm views and maintenance access.
Finish by adding nest boxes, brush piles, and native matrices to stabilize a Wildlife habitat year-round.
Frequently Asked Questions
Do I Need Permits or HOA Approval to Add New Garden Zones?
You might need Permits approval and HOA sign-off, depending on your city, lot grading, irrigation tie-ins, fences, and easements. Check municipal zoning/landscaping codes and your HOA CC&Rs; align Garden zoning layouts with setbacks.
How Much Does It Cost to Zone a Garden on a Tight Budget?
You can zone a garden for $0–$150 using Budget friendly planning—oddly, your tape measure’s already handy. Map sun/soil, reuse edging, split perennials, and buy mulch in bulk for Cost effective zoning. Prioritize one area now.
Which Apps or Software Help Design Garden Zones Accurately?
You’ll design garden zones accurately with SketchUp, AutoCAD, or iScape; pair them with ArcGIS/Google Earth for georeferenced layers. You’ll run Soil analysis via SoilWeb, then refine Plant selection using PlantNet or Gardenate.
How Do I Keep Garden Zones Safe for Kids and Pets?
You keep zones safe by installing child proofing measures: lockable gates, soft mulch, flush edging, and covered water features. You choose pet safe plants, remove toxic species, anchor tools, and separate play paths.
How Often Should I Update Zones as Plants Mature or Needs Change?
Update zones seasonally and after major growth spurts; review monthly during establishment. As Plant maturity changes light, spread, and access, you’ll make Zone adjustments on-site. Re-map paths, buffers, irrigation emitters, and clearance lines.
Conclusion
You’ll get a garden that behaves like a well-tuned circuit: each zone carries its load and connects cleanly to the next. Start with how you actually use the site, anchor the busiest area, then assign supporting zones. Confirm microclimate by mapping sun, shade, and wind per zone before you plant. Repeat shapes, layer tall-to-low for visual continuity, and build clear progressions with edges and buffers. Phase installation so the layout works early and improves with time.