You’ll create a relaxed outdoor lounge by choosing a leeward, well-drained spot with balanced sun and shade, then sketching a scaled layout that preserves clear circulation. Specify weather-ready materials—powder-coated aluminum, sealed hardwoods, and solution-dyed acrylic fabrics—with UV and mildew resistance. Add ergonomic seating sized for hours, and define the zone with a UV-rated outdoor rug. Improve comfort with adjustable screens, curtains, or evergreen hedges, and reduce mosquitoes using low, oscillating fans and upwind repellents. Continue for a complete setup plan.
Key Takeaways
- Choose a spot with balanced sun and wind exposure, level ground, safe clearances, and drainage away from structures.
- Sketch a scaled layout, grouping seating by sightlines and function, while keeping clear walking paths and comfortable furniture spacing.
- Add privacy with outdoor curtains, modular screens, or evergreen hedges positioned to block sightlines without restricting airflow.
- Select durable, weather-ready materials—UV-stable fabrics, corrosion-resistant metals, and sealed woods—plus outdoor rugs to anchor the seating zone.
- Keep the look calm using two neutrals and one accent, matte finishes, layered textures, and ergonomic seating with quick-dry cushions.
Pick the Best Spot for Your Lounge Area

Although your furniture and décor matter, you’ll get the best results by first selecting a location with the right environmental conditions and clearances.
Evaluate solar exposure throughout the day and season for Sunlight optimization; balance thermal comfort with glare control by using existing tree canopy, eaves, or pergola coverage.
Confirm prevailing wind direction, then position the area leeward of walls or dense planting to reduce turbulence.
Maintain safe offsets from grills, fire features, pool edges, and circulation paths, and verify level grade for stable footings and drainage away from foundations.
Reduce nuisance factors by avoiding drip lines, HVAC discharge, and high-traffic gateways.
Implement privacy solutions using sightline analysis, then add screens, hedges, or slatted panels where needed.
Decide How You’ll Use the Space (and With Who)
Before you buy seating or set out accessories, define the space’s primary use case and its typical user group so you can size, zone, and furnish it correctly.
If you’ll host frequent conversations, you’ll prioritize face-to-face seating, stable side surfaces, and clear circulation paths.
If you’ll read or work outdoors, you’ll specify ergonomic back support, adjustable shade, and glare control.
For family use, you’ll select durable, cleanable textiles and impact-resistant tables; for adult entertaining, you’ll allocate service surfaces for drinks and shared plates.
Match Furniture placement to interaction patterns: clustered for dialogue, linear for views, or modular for flexible occupancy.
Calibrate Lighting ambiance to tasks and mood—brighter for dining, warmer and dimmable for lounging, with controlled spill and safe step illumination.
Sketch a Simple Layout That Fits Your Footprint
Start with a scaled sketch by measuring your patio or yard and marking hard boundaries, access points, and fixed elements.
Next, place the primary seating zones to align with intended sightlines and functional groupings.
Finally, map clear walking paths with adequate clearance so circulation remains unobstructed between entries, seating, and any service areas.
Measure And Mark Boundaries
Once you’ve confirmed the available area, measure the footprint with a tape measure and translate those dimensions into a scaled sketch so your lounge elements fit without crowding circulation paths. Next, transfer the sketch to the site by establishing a crisp perimeter line and verifying it against fixed references like walls, fences, or tree trunks. Use Boundary markers and disciplined marking techniques to prevent layout drift and to maintain orthogonal or radial geometry. Recheck diagonals to confirm squareness, then adjust before you commit to any surface changes.
- Set corner stakes and run mason’s line at consistent tension.
- Spray paint or chalk the line for high-contrast visibility.
- Mark offsets for setbacks, drainage swales, and access clearance.
- Photograph and label measurements for repeatable placement later.
Place Key Seating Zones
With the perimeter now locked in on the ground, sketch a simple seating layout that respects your measured footprint and preserves clear circulation.
Start by designating a primary conversation node, typically centered on a fire feature or low table, then allocate secondary zones for reading or dining as space permits.
Scale your drawing using modular dimensions: sofa lengths, chair widths, and table clearances. Test multiple seating arrangements by rotating components to optimize sightlines, sun exposure, and prevailing wind protection.
Anchor the composition with your largest lounge furniture first, then infill with armless chairs or ottomans to maintain flexibility. Keep each zone proportionate to the footprint, and align edges with hardscape lines to reduce visual clutter.
Mark accessory locations for side tables and lighting to avoid later conflicts.
Map Clear Walking Paths
Although the seating zones may feel settled on paper, you’ll still need to diagram continuous walking paths that connect each node—entry, primary conversation area, secondary seating, dining, and any service points—without forcing detours or pinch points.
Start with your footprint and plot circulation first; effective landscape design prioritizes movement geometry before décor. Keep routes legible, direct, and sized for real use.
- Mark all thresholds and destinations, then draw the shortest connecting lines.
- Set clearances: 36–42 in. primary paths, 30–36 in. secondary links.
- Resolve conflicts by shifting furniture, not narrowing passages; preserve turning radii.
- Specify surface transitions and lighting so walking paths read at night and in wet conditions.
Finalize with a simple, dimensioned sketch you can measure on-site.
Set a Budget: Splurge vs Save Items
How do you set a realistic budget for an outdoor lounge without overspending on low-impact details? Start with budget planning that itemizes must-haves, nice-to-haves, and deferred upgrades.
Apply expense prioritization by funding structural and durability drivers first: weather-resistant materials, corrosion-rated fasteners, UV-stable finishes, and reliable lighting power supplies. You’ll reduce lifecycle cost by minimizing replacement cycles and maintenance labor.
Splurge on components exposed to continuous sun, rain, and temperature swings, such as protective finishes, outdoor-rated textiles, and sealed storage hardware. Save on easily replaceable accents: planters, decorative lanterns, throws, and seasonal cushions.
Standardize sizes and colors to enable modular substitutions without rework. Set a contingency of 10–15% for delivery fees, site prep, and unexpected hardware. Track receipts to keep variances visible.
Choose Seating That’s Comfortable for Hours
A smart budget only pays off if you allocate it toward seating that supports long, relaxed use. You’ll stay outdoors longer when you prioritize Seating ergonomics and verify fit to your body dimensions.
Select chair heights that let your feet rest flat, with a back angle that supports a neutral spine and reduces lumbar fatigue. Favor armrests at elbow height to minimize shoulder load, and test recline stability before you buy.
- Measure seat height, depth, and back height against your anthropometrics.
- Check weight ratings, frame triangulation, and fastener quality for rigidity.
- Evaluate Material durability: UV-stabilized polymers, powder-coated metals, or sealed hardwoods.
- Choose modular formats that adapt to posture changes without complex reconfiguration.
Add Cushions and Weatherproof Textiles
Select outdoor-grade fabrics with UV stabilization, mildew resistance, and water-repellent coatings so your textiles maintain performance in sun and moisture.
Layer cushions by combining firm seat cores with softer back pillows to improve pressure distribution and long-duration comfort.
Coordinate a restrained color palette and compatible patterns to unify the lounge zone while keeping visual clutter under control.
Choose Outdoor-Grade Fabrics
Since outdoor seating faces constant exposure to UV radiation, humidity, and temperature swings, you’ll get better longevity and comfort by specifying outdoor-grade fabrics for cushions and textiles. Prioritize Fabric durability through solution-dyed acrylic, olefin, or PVC-coated polyester, and verify abrasion ratings and UV inhibitors.
Specify quick-dry foam with reticulated cores and pair it with breathable covers to limit microbial growth. Maintain Color coordination by selecting fade-resistant palettes that complement hardscape materials, then confirm lot consistency before ordering.
Use these selection checks:
- Require ASTM or ISO lightfastness and tensile-strength data.
- Choose stain- and oil-repellent finishes, ideally fluorocarbon-free.
- Specify marine-grade zippers, UV-stable thread, and sealed seams.
- Confirm water resistance without trapping moisture.
Layer Cushions For Comfort
Where do you feel pressure after 20 minutes outdoors—seat pan, lumbar zone, or armrest? Map those contact points, then layer cushions to manage load and reduce peak pressure.
Start with a dense, quick-dry foam base to stabilize posture and prevent “bottoming out.” Add a softer topper for microconformity, and include a contoured lumbar pillow to maintain neutral spinal alignment.
For armrests, use slim pads that won’t elevate your shoulders.
Specify weatherproof textiles with solution-dyed acrylic or olefin shells, UV inhibitors, and a DWR finish; they’ll resist hydrolysis, mildew, and abrasion.
Choose removable, zippered covers so you can launder and inspect seams.
This modular stack lets you tune firmness and enhance comfort without changing the frame.
Coordinate Colors And Patterns
Even if your seating is ergonomically dialed in, mismatched cushions and prints can fragment the space visually and make it feel cluttered. To restore coherence, treat textiles as a controlled system: limit variables, repeat anchors, and specify performance fabrics rated for UV exposure, moisture, and mildew.
- Establish a base palette from fixed elements (decking, siding, planters) to guide color coordination.
- Select one dominant pattern and two supporting solids; keep hue values consistent for pattern matching.
- Use scale discipline: pair large geometrics with fine stripes, but avoid competing mid-scale motifs.
- Specify solution-dyed acrylics or olefin, then add zipper covers for maintenance and faster drying.
You’ll achieve a unified lounge that reads calm, intentional, and durable across seasons.
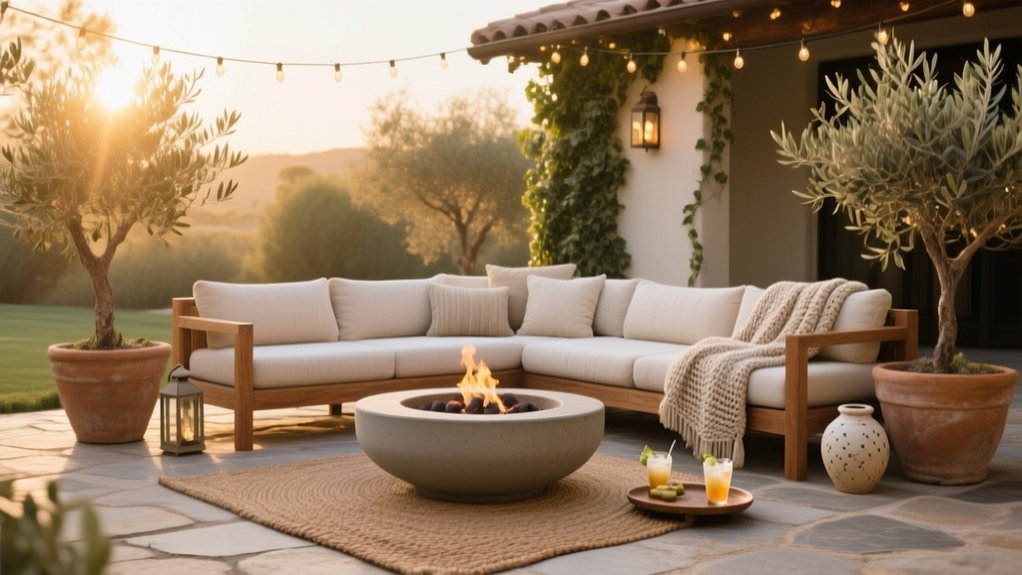
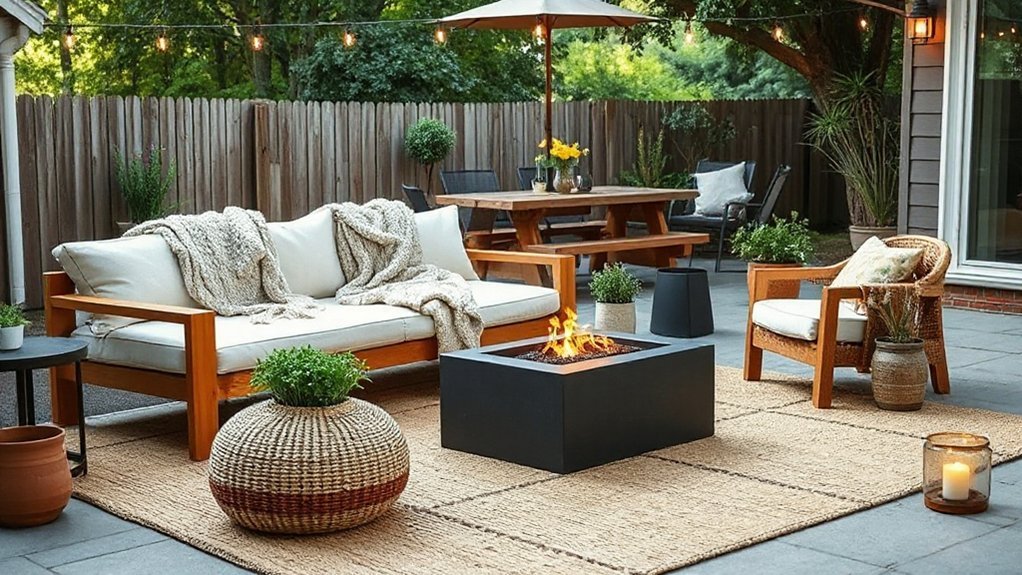
Anchor the Area With an Outdoor Rug
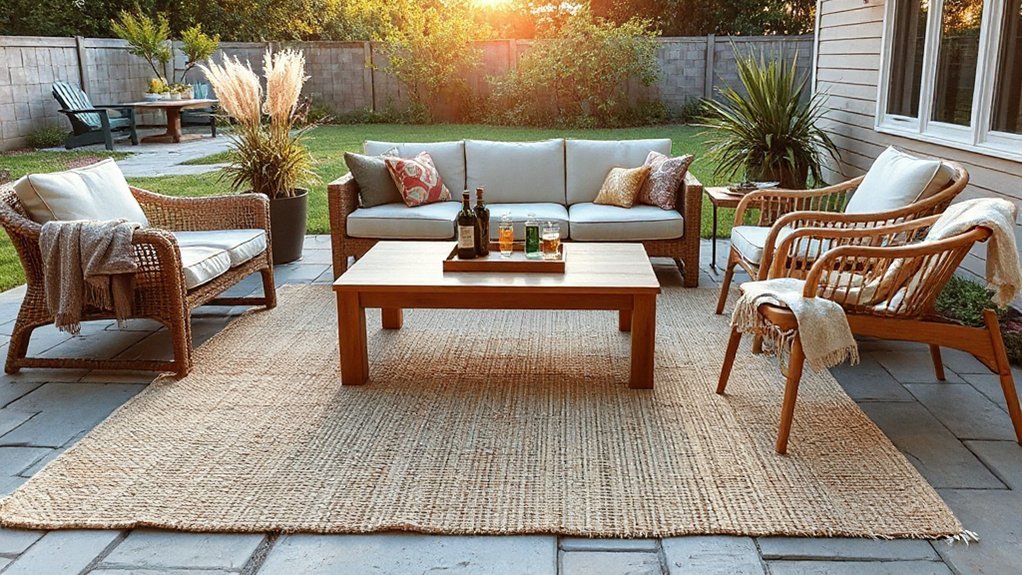
How do you make an open-air seating arrangement feel intentional rather than scattered? You anchor it with an outdoor rug that establishes a clear spatial boundary.
Select a polypropylene or PET weave rated for UV exposure, moisture, and mildew resistance, and verify the backing won’t trap water on decking.
Size matters: choose a rug large enough that front legs of seating and a coffee table sit on it, which stabilizes furniture arrangement and improves circulation paths.
Use low-contrast patterns to mask dirt while maintaining visual order in your outdoor decor.
Install a non-slip pad or corner weights to prevent edge curl and trip hazards.
For maintenance, vacuum debris regularly and rinse with mild soap; dry fully to inhibit odor.
Add Shade: Umbrella, Pergola, or Sail
Although your lounge layout may feel complete, you’ll get better comfort and material longevity by adding dedicated shade with an umbrella, pergola, or tensioned sail. Evaluate solar exposure, prevailing winds, and mounting surfaces before choosing among shade options and outdoor coverings. Select UV-rated, mildew-resistant textiles and corrosion-resistant hardware to reduce maintenance and fading.
- Position a cantilever umbrella to cover seating without obstructing circulation; specify a weighted base and vented canopy.
- Install a pergola for rigid, scalable coverage; anchor posts to footings and add slats or a retractable canopy.
- Tension a sail for aerodynamic shading; set high-strength attachment points and maintain proper catenary tension.
- Verify clearances, drainage paths, and local permitting to keep structures compliant and stable.
Layer Lighting for Cozy Nights (Solar vs Plug-In)
Where should you start when you want your lounge to feel inviting after dusk—without overcomplicating wiring or sacrificing reliability? Build a layered lighting plan: ambient, task, and accent.
For ambient glow, use solar lighting string runs or bollards where daytime irradiance is consistent; verify lumen output, battery capacity, and IP rating, and place panels away from shade structures.
For task illumination, select plug-in options such as low-voltage LED spotlights or wall-mounted fixtures; you’ll get stable output, longer runtimes, and predictable color temperature.
Add accent with low-lumen lanterns or step lights to define circulation lines.
Keep correlated color temperature near 2200–2700K for warmth, and specify dimmers or timers to control glare and energy use.
Add a Small Table Within Arm’s Reach
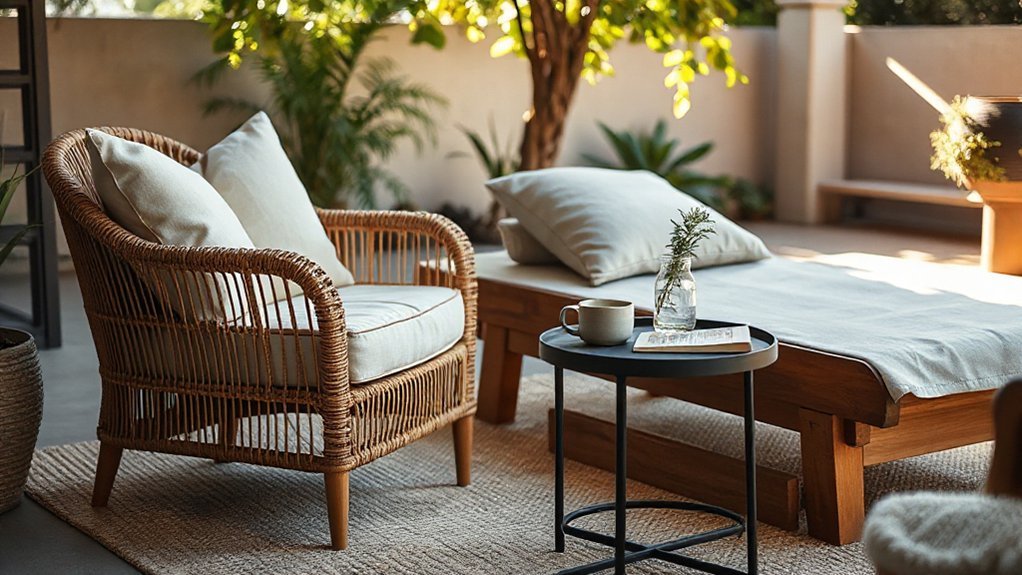
Select a compact, low-profile side table with a weighted base and weather-resistant materials to prevent tipping and premature wear.
Position it within a natural arm’s reach of your primary seat so you don’t disrupt your posture or traffic flow when setting down drinks, a book, or a device.
Keep the tabletop height near the seat’s armrest level to maintain ergonomic access and reduce spill risk.
Choose Compact, Stable Table
How often do you reach for a drink, phone, or book and realize there’s nowhere secure to set it down? Select compact furniture that provides a reliable platform without obstructing circulation or sightlines. Prioritize load rating, corrosion-resistant materials, and a footprint proportionate to your seat’s scale.
- Choose a low center-of-gravity design; wider bases resist tipping under lateral loads.
- Verify leg geometry: splayed legs and cross-bracing increase rigidity on uneven pavers.
- Add stability tips: use adjustable feet, anti-slip pads, or a weighted base for wind exposure.
- Specify surface performance: textured tops reduce sliding, while raised lips prevent roll-off.
You’ll reduce spills, protect devices, and maintain a controlled, orderly lounge setup outdoors.
Prioritize Easy Reach Placement
Even if your lounge layout looks balanced, it won’t function well unless you can place essentials down without leaning, twisting, or stepping out of position. Position a small table within your primary reach envelope, ideally 8–12 inches from the seat edge and level with the armrest. This reduces musculoskeletal strain and keeps beverages, devices, and reading materials stable.
Align the tabletop with your dominant hand side, but maintain a clear egress path to prevent trip hazards. If you entertain, add a second perch table at the opposite seat to equalize access.
Select Accessibility features such as rounded corners and high-contrast edges for visibility at dusk. Incorporate storage solutions like a lower shelf or lidded compartment to stage coasters, napkins, and bug spray.
Use Plants to Soften Edges (Without Crowding)
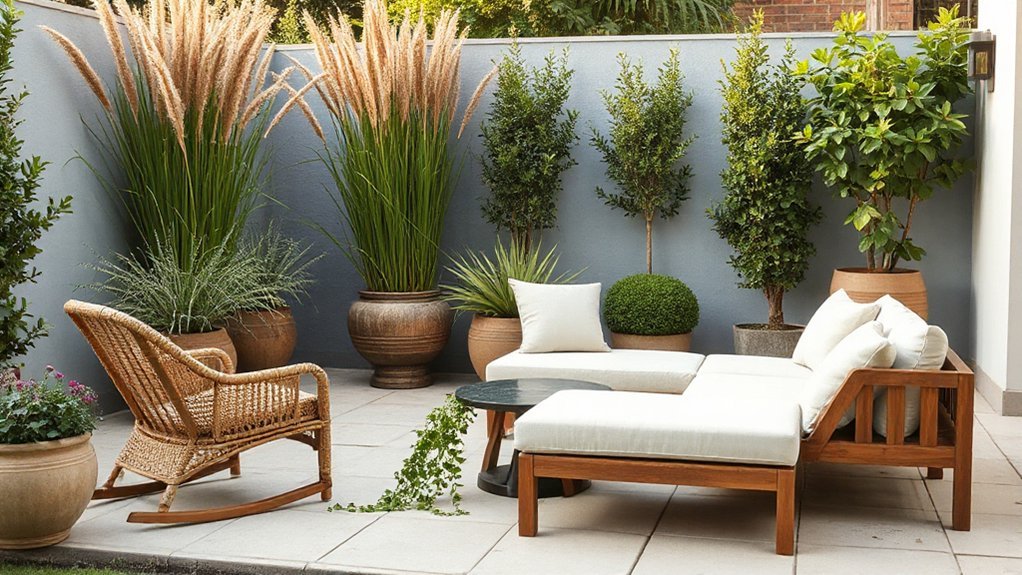
Although hardscape elements give your lounge structure, plants can soften their visual edges without shrinking usable floor area when you treat greenery as a perimeter layer rather than a fill. You’ll get edge softening by specifying narrow footprints and controlled canopies, then aligning pots with walls, steps, and railing lines to preserve circulation clearances.
- Use linear planters or troughs (20–30 cm deep) to define boundaries without encroachment.
- Select upright, clumping species; avoid spreading groundcovers that migrate into walk paths.
- Stage plant arrangements in staggered heights: low foliage front, mid-mass behind, occasional vertical accent.
- Maintain a 90 cm minimum clear route and prune to a consistent datum line.
This method improves microclimate, reduces glare, and keeps seating zones functional.
Create Privacy With Screens, Curtains, or Hedges
To control sightlines and reduce visual noise, you can install modular privacy screens or outdoor-rated curtains as adjustable barriers around the lounge zone.
You’ll improve performance by sizing panels to key viewpoints, anchoring hardware to structural members, and specifying UV-stable, mildew-resistant materials.
For a permanent perimeter, you can plant a dense hedge species with appropriate spacing and mature height to achieve reliable seclusion.
Choose Screens Or Curtains
Where does your outdoor lounge feel most exposed to neighboring sightlines or street-level views? You’ll get the quickest control by specifying Privacy screens or outdoor curtains that suit your layout, wind load, and maintenance tolerance.
Position barriers to block direct lines of sight without constricting airflow or circulation paths.
- Select screen panels with rated hardware, corrosion-resistant fasteners, and modular sections for future reconfiguration.
- Use outdoor curtains in solution-dyed acrylic or polyester; specify UV stability, mildew resistance, and washable liners.
- Anchor posts or tracks into structural members; avoid relying on thin fascia or unstable pavers.
- Add tiebacks, bottom weights, or magnetic closures so fabrics don’t billow and reduce privacy.
Confirm local setback rules and HOA requirements before installation.
Plant Hedges For Seclusion
How much year-round screening do you need, and how quickly do you need it? If you require immediate seclusion, you can stagger planting with temporary mesh panels, then let the hedge mature into a permanent barrier.
For consistent privacy, select Evergreen varieties such as arborvitae, yew, or holly; they retain foliage density through winter and tolerate strategic pruning.
You’ll get better performance by matching species to site conditions: assess sun exposure, soil drainage, and prevailing wind.
Plant in a straight trench, amend with compost, and install drip irrigation for uniform establishment.
Set spacing to achieve canopy closure without overcrowding.
For long-term structure, schedule Hedges maintenance twice yearly: tip-prune for density, thin selectively for airflow, and monitor pests to prevent dieback.
Choose Weather-Ready Materials for Your Climate
In your climate, weather exposure dictates which materials will perform reliably outdoors and which will degrade prematurely. You’ll extend service life by matching substrates to UV load, humidity, salt spray, and freeze-thaw cycling, then specifying protective systems accordingly. Prioritize low-maintenance assemblies that resist corrosion, checking, and mold.
- Choose powder-coated aluminum or marine-grade stainless steel in coastal zones to prevent pitting and fastener failure.
- Use kiln-dried teak, ipe, or thermally modified wood, sealed with Weatherproof finishes to limit cupping and surface erosion.
- Specify solution-dyed acrylic or olefin fabrics with UV inhibitors and quick-dry foam to reduce hydrolysis.
- Plan Seasonal adaptations: breathable covers, modular pieces, and elevated feet for drainage and snow clearance.
Style With a Simple Color Palette and Texture
Once you’ve specified weather-ready materials, control the visual noise by limiting the outdoor lounge to a restrained color palette and a deliberate mix of textures. Select two neutrals and one accent, then repeat them across cushions, planters, and side tables to enforce color coordination. Use matte finishes to reduce glare and keep the scene visually stable in direct sun.
Build comfort through texture layering rather than extra colors. Pair a tight-weave outdoor rug with slatted wood, powder-coated metal, and one tactile textile such as bouclé-look acrylic or solution-dyed olefin. Balance smooth and nubby surfaces at eye and hand height, and keep patterns low-contrast.
Finally, specify one focal object—an oversized throw or ceramic vessel—so the composition reads calm.
Keep Bugs Away With Fans, Candles, and Placement
Although high-quality outdoor textiles improve comfort, flying insects can still disrupt a lounge area, so you’ll want a layered control strategy that combines airflow, targeted repellents, and smart layout.
Prioritize Mosquito control by creating a continuous air barrier and reducing attractants near seating.
- Position an oscillating fan at ankle height; turbulence impairs mosquito flight and disrupts host-seeking cues.
- Deploy candles or diffusers with vetted scent deterrents (citronella, lemongrass, or geraniol), and place them upwind to maximize plume coverage.
- Relocate seating at least 10 feet from standing water, dense shrubs, and compost, where breeding and harboring increase.
- Use warm, low-lumen lighting to limit insect phototaxis, and keep food sealed to minimize odor trails.
You’ll achieve effective suppression without harsh residues.
Frequently Asked Questions
Do I Need Permits for a Pergola, Shade Sail, or Privacy Screen?
You might need permits for a pergola, shade sail, or privacy screen; requirements vary. Check local Building codes and zoning regulations for height, setbacks, and attachment. If it’s freestanding or permanent, you’ll likely need approval.
How Can I Make an Outdoor Lounge Kid-Safe Without Sacrificing Style?
You can keep an outdoor lounge kid-safe and stylish by selecting child proof furniture with rounded edges, anchoring pieces, adding non slip surfaces, using shatter-resistant materials, securing cords, and specifying low-VOC finishes for durability.
What’s the Best Way to Protect Furniture During Storms or Winter?
Treat storms like a siege: you’ll secure furniture by storing it under shelter, using Protective covers, and removing Weatherproof cushions. You’ll elevate legs, tighten fasteners, and apply sealant, then ventilate covers to prevent mildew.
How Do I Reduce Outdoor Noise From Neighbors or Nearby Traffic?
You’ll reduce outdoor noise by using soundproofing strategies: install dense fencing, masonry walls, or acoustic panels as noise barrier options; add evergreen hedges, water features, and soft furnishings, and reposition seating behind barriers.
Can I Create a Relaxed Lounge Space on a Balcony or Rented Patio?
Yes, you can—if you exploit one constraint. Use modular seating, weighted planters, and temporary screens for Balcony privacy. On a Rented patio, choose non-invasive fasteners, weather-rated textiles, and stackable furniture.
Conclusion
You’ll notice that once you’ve chosen the ideal site, defined how you’ll use it, and drafted a compact layout, comfort and durability align almost automatically. Coincidentally, the same budget decisions that prioritize long-wear seating also simplify your color palette and texture strategy. Specify weather-rated materials for your climate, then add privacy via screens or hedges to control sightlines. Finally, mitigate insects with airflow, repellant candles, and smart placement near light sources.