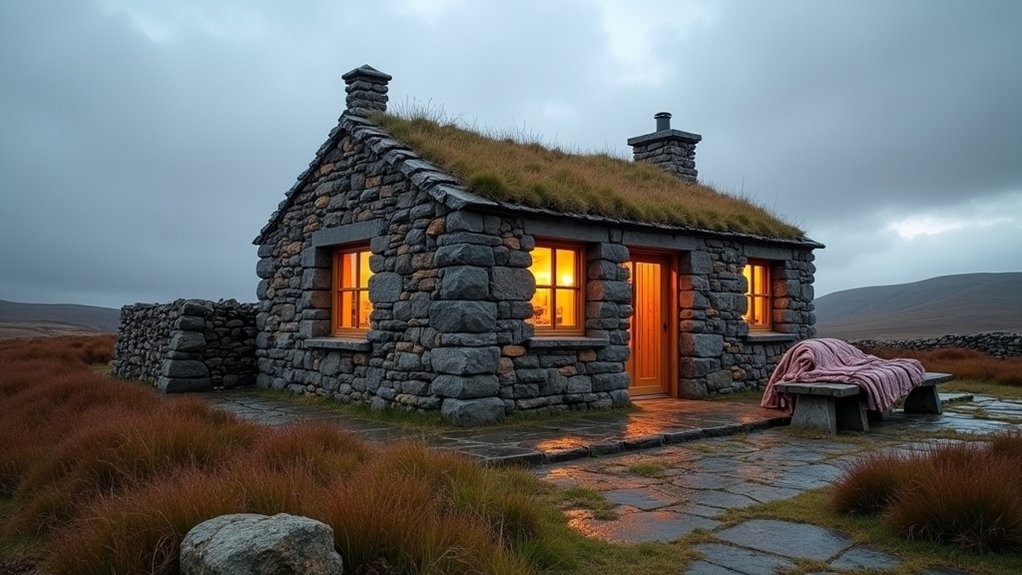
You are looking at buying a remote highland bothy . First things first, start by surveying the bothy’s stone shell, access routes, and any estate or MBA guidance, then you sequence fixes to stop water first. You’ll tighten the roof, door, and window junctions, specify breathable insulation and lime finishes, and design ventilation to control condensation without stripping heat. Next you plan a safe, efficient hearth and a small off-grid electrical setup sized to LEDs and charging. But the real comfort hinge comes from how you handle water and drying space…
Key Takeaways
- Survey structure, damp, and hazards; document fabric and permissions to plan compliant, safe preservation work.
- Weatherproof the roof first, then restore doors and windows with like-for-like repairs, seals, and effective drainage detailing.
- Control damp using breathable insulation and lime finishes, plus drainage or limecrete floors to manage ground moisture.
- Reduce thermal bridging at reveals, floors, and joists; add controlled ventilation and ensure hearth, flue, and CO safety measures.
- Design off-grid essentials: winter-sized solar and LiFePO4 storage, efficient LED lighting, safe water filtration, and simple greywater soakaway disposal.
Assess Your Bothy, Access, and Rules
Before you design a single upgrade, you’ll need a clear baseline: survey the bothy’s structure, services, and constraints, then map how you’ll actually get materials and people in and out without damaging the site.
Record wall thickness, masonry type, settlement cracks, damp sources, and floor build-up; photograph junctions and measure openings.
Check any existing water, hearth, flue, drainage, and electrical remnants, then log capacity limits and safety hazards.
Clarify landowner permission, estate policies, and any MBA guidance, and verify whether planning, listed-building, or conservation area controls apply.
If the bothy has historical significance, document fabric you must retain and note the Architectural style you can’t compromise.
Plan access: footpath gradients, river crossings, helicopter exclusion, carry weights, staging points, and waste removal.
Weatherproof the Bothy: Roof, Doors, Windows
Once you’ve confirmed the bothy’s fabric and permissions, lock in weather tightness by prioritising the roof envelope, then tightening openings with durable, repairable door and window details. Start at the ridge: replace slipped slates, dress flashings in lead or compatible membranes, and keep a clear ventilation path beneath coverings to purge wind-driven moisture without trapping it.
- Roof: Specify like-for-like materials for Historical preservation; add discreet eaves trays, robust gutters, and downpipes to control splashback.
- Doors: Rehang on stainless hinges, fit a compressible perimeter seal, and add a weather bar and threshold tray to shed water.
- Windows: Repair frames, bed glazing in linseed putty, and use storm shutters; integrate drainage with landscaping design to lead runoff away.
Insulate the Bothy for Warmth in Stone Walls
You’ll get reliable warmth from stone walls by specifying breathable insulation—wood fibre, hemp-lime, or mineral wool—paired with lime plaster so moisture can migrate without trapping vapour.
You’ll control damp by managing capillary moisture at the base, keeping junctions vapour-open, and avoiding impermeable foils that push condensation into the masonry.
You’ll prevent thermal bridging by running insulation continuously across wall-to-floor and wall-to-roof junctions, wrapping reveals, and detailing airtightness at penetrations.
Breathable Insulation Choices
Because a stone bothy wall manages moisture as much as it manages heat, your insulation spec needs to stay vapour-open while still delivering a useful U‑value in a thin build-up. You’ll get the best performance by pairing breathable insulation with a capillary-active layer and preserving natural airflow where the building already leaks.
- Woodfibre boards: high heat capacity, easy to tape at joints, and forgiving around irregular stone.
- Hemp-lime or lime-hemp infill: suits wonky cores, adds thermal mass, and keeps the build vapour-permeable.
- Sheepswool batts: resilient in tight studs, good acoustic control, and simple to cut around services.
Detail the edge zones: return insulation into reveals, keep thermal breaks continuous at floor junctions, and specify lime-based finishes to maintain diffusion pathways.
Damp Control In Stone
Although insulation drives the comfort upgrade, damp control sets the boundary conditions for every stone-wall build-up. So start by mapping how water actually moves through the bothy—rain penetration, rising damp, internal vapour, and air leakage. Then choose measures that reduce wetting and accelerate drying rather than trap moisture.
Repoint in lime, not cement, and repair copes, flashings, and harling to cut driven-rain intake while keeping outward drying.
Manage ground moisture: lower external levels where possible, add perimeter drainage, and use a limecrete floor or capillary-break layer to limit wicking.
Inside, specify vapour-open insulation and plasters, then add a variable-permeance membrane only where airtightness needs it, taped continuously.
Control stone moisture with controlled ventilation and humidity monitoring; damp prevention is design, not sealant.
Thermal Bridging Prevention
Once you’ve set the drying strategy, thermal bridging becomes the next limiter on comfort: every uninsulated stone return, joist end, lintel, or floor–wall junction can short-circuit your insulation layer and create cold stripes that pull heat out and push internal surface temperatures toward dew point.
You’ll improve energy efficiency by designing a continuous thermal line and treating junctions as details, not leftovers. Specify materials that tolerate thermal expansion without cracking the airtight layer or finish.
Prioritise:
- Wrap reveals with thin aerogel or calcium-silicate boards, returning insulation past frames and sealing perimeters.
- Isolate joist ends with pockets, hangers, or internal ledgers so timber doesn’t bridge to cold stone.
- Add an insulated upstand at floor edges and carry wall insulation down to meet it, taped and lapped properly.
Stop Damp: Ventilation and Condensation Control
In a remote highland bothy, damp usually starts as trapped water vapour rather than rain getting in, so you’ll control it by managing airflow and surface temperatures. Start with targeted ventilation strategies: trickle vents on window heads, a small continuous extract in the wet zone, and a cross-flow path via undercut doors and a high-level vent.
For condensation prevention, keep the vapour layer continuous on the warm side of insulation and seal service penetrations with tapes and grommets. Specify hygroscopic internal finishes (lime plaster or woodfibre board) to buffer peaks, but don’t rely on them alone.
Maintain minimum surface temperatures by insulating reveals and corners, and avoid impermeable wall paints that trap moisture. Monitor RH with a sensor; aim for 40–60% and purge-vent after cooking or drying gear.
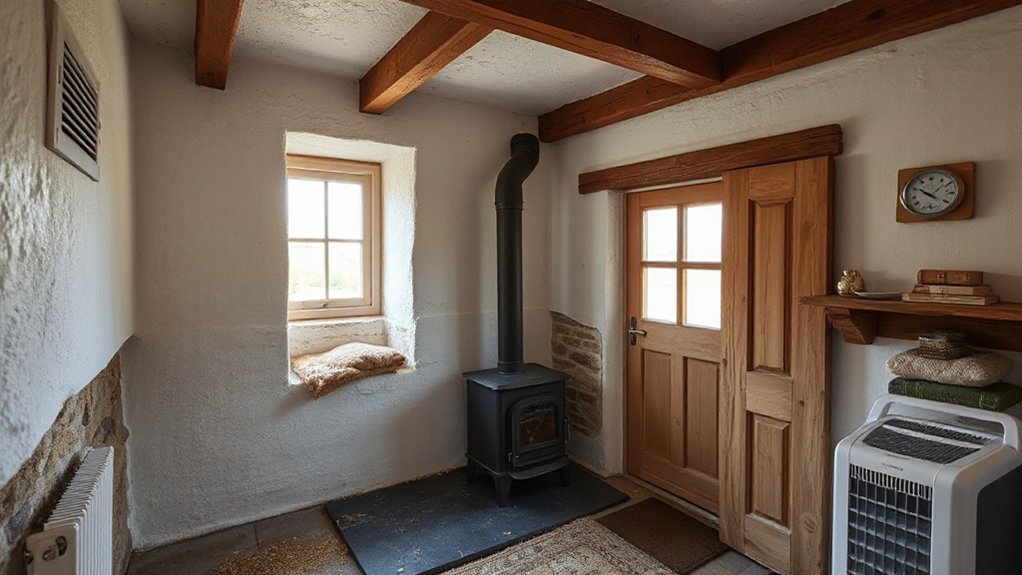
Make the Bothy Hearth Safe and Heat-Efficient
Because the hearth drives both safety and comfort in a remote bothy, you should treat it as an engineered assembly. Start by inspecting the firebox, lintel, and flue for spalling stone, cracked mortar, or soot leakage, then rebuild joints with lime mortar where movement’s evident.
For Fireplace safety, set clearances: a non-combustible hearth extending 300 mm in front and 150 mm to each side, plus a tight-fitting spark guard.
- Sweep and camera-check the flue; fit a register plate to reduce dilution air and improve draft stability.
- Line the chimney if it’s rough or oversized; you’ll cut tar deposition and boost heat transfer.
- Define a Hearth maintenance routine: ash management, gasket checks, and seasonal CO alarm tests.
Set Up Off-Grid Bothy Lighting and Power
You’ll size an off-grid system by matching a solar array and LiFePO₄ battery bank to your daily watt-hours. Then specify an MPPT controller and inverter only where AC loads demand it.
You’ll map an efficient LED layout with layered task, ambient, and exterior circuits, short cable runs, and switched zones to cut losses and keep lighting ergonomic.
You’ll also build in backup power and safety with a small generator or DC alternator input, proper fusing and isolation, RCD/GFCI protection on any AC branch, and fire-safe battery siting and ventilation.
Choosing Solar And Battery
Although the bothy’s remoteness makes grid power impossible, a well-sized solar-and-battery system can deliver reliable lighting and small-appliance power with minimal maintenance. Start by mapping your daily watt-hours, then size solar panels for winter insolation and mounting constraints, not summer peaks. Pair them with robust battery storage so you’re not cycling to empty in cold weather.
- Array sizing: aim for 2–3× your average daily load in midwinter, accounting for panel tilt, shading, and cable losses.
- Battery chemistry: choose LiFePO4 for usable capacity and low-temperature resilience; set a conservative depth-of-discharge.
- Power electronics: specify an MPPT controller, DC fusing, and a pure-sine inverter sized for startup surges, with clear service access.
Efficient LED Lighting Layout
Where do you start if every watt-hour has to come off your panels and out of your batteries? You start with a plan: map tasks, then assign lighting zones.
Put warm, low-glare ambient light on a dimmer for the main room, and keep it under 3–5W/m². Add high-CRI task strips over the worktop, table, and gear-bench so you don’t overlight the whole space.
For LED placement, mount strips in aluminum channels with diffusers to control glare and improve thermal management; heat kills efficiency. Use narrow-beam downlights only where you need punch, like entry hooks and the stove area.
Put each zone on its own switch to avoid parasitic runtime. Keep cable runs short to cut voltage drop.
Backup Power And Safety
Because winter cloud and long nights can flatten your solar yield, design a true backup layer that keeps lighting, comms, and fire-start essentials running without stressing the battery bank.
Size a 12V LiFePO4 reserve for 2–3 days at your critical load, and isolate it with a DC-DC charger so brownouts don’t cascade.
Add low-voltage disconnects, fused distribution, and labeled circuits to keep faults contained.
- Keep a sealed USB-C PD power bank and AA headtorches in a grab bag for Emergency preparedness.
- Install a CO alarm, smoke alarm, and an ABC extinguisher; route wiring clear of stove clearances for fire safety.
- Stash a small inverter generator with stabilized fuel, plus a transfer plug and earth rod for safe recharge.
Handle Bothy Water: Filter, Store, Wash Up

Before you fit a sink or plan any cooking routines, map your bothy’s water path end-to-end: source, treatment, storage, and greywater disposal.
Choose a reliable intake: uphill spring, burn, or collected rain, then specify Water filtration to match turbidity.
Run a staged setup: coarse pre-filter, 0.2–0.5 micron hollow-fibre, then activated carbon; add UV or boil for high-risk periods.
Design storage solutions that don’t freeze: food-grade jerrycans inside an insulated box, or an underslung tank with drain-down valves and quick-disconnects.
Fit a manual pump or gravity feed, plus an air-gap at the sink to prevent backflow.
For wash-up, use minimal soap, scrape first, and route greywater to a soakaway trench away from the source and doorways.
Choose Bothy Furniture: Light, Tough, Multi-Use
Once your water route is sorted—intake to filter to sink to soakaway—set the interior up so daily tasks don’t fight the space. Choose pieces you can carry in, repair with basic fixings, and reconfigure fast when weather pins you indoors.
Push a restrained Furniture style: simple planes, exposed fasteners, and sealed timber that shrugs damp. Keep decorative accents minimal but purposeful—one wool runner, a matte-black hook rail—so they don’t become clutter.
- Bench-table hybrid: 18mm marine ply, folding legs, doubles as worktop and dining.
- Stackable crates: serve as pantry, seat, and step; add lids for dust control.
- Wall-mounted drop desk: hinges into studs, clears floor, parks under a window.
Stock Bothy Essentials: Bedding, Cooking, Safety
Although a bothy rewards minimalism, you need a deliberate baseline kit—bedding that insulates when humidity climbs, a cooking setup that runs clean and packs down, and a safety layer that anticipates isolation rather than reacting to it.
Choose a synthetic or treated-down bag (0–5°C) plus a closed-cell foam pad under an R4 inflatable; add a vapor barrier liner to stop damp loft collapse.
Cook with a remote-canister stove, windscreen, and 1–1.5L hard-anodized pot; carry a fireproof mat to protect original flagstones for Historical restoration.
Fit a CO alarm, headlamp, spare cells, map/compass, and PLB.
Stash a trauma kit, blister care, and water treatment.
Label, inventory, and store gear to respect the bothy’s cultural significance.
Frequently Asked Questions
How Much Does It Cost to Renovate a Remote Bothy?
You’ll typically spend £30,000–£150,000 to renovate a remote bothy, depending on access logistics, surveys, and services. Budget more for Historic preservation detailing and Sustainable materials, plus structural stabilization, insulation, roofing, and off-grid systems.
Do I Need Insurance for a Restored Bothy Retreat?
Yes—you’ll need it; skip it, and one leak can undo everything. Check Insurance requirements for buildings, contents, and public liability if guests visit. Address legal considerations: lender stipulations, planning conditions, fire safety, access liability.
Can I Legally Rent Out a Bothy as Holiday Accommodation?
You can legally rent out a bothy as holiday accommodation if you meet Local planning regulations, change-of-use, and building standards; secure licensing where required; and respect Historical preservation constraints, with compliant access, fire strategy, and serviced design.
How Do I Manage Waste and Toilet Needs Responsibly?
Plan, design, and maintain: separate streams, seal storage, and schedule removals. Use Eco friendly waste disposal with pack-in/pack-out, bear-proof bins. Install Composting toilet options with vent stack, urine diversion, carbon cover, and compliant off-site emptying.
What Tools Should I Bring for Ongoing Bothy Maintenance?
Bring a Tools checklist: folding saw, hatchet, pry bar, hammer, screwdrivers, cordless drill, bits, hand auger, spares, sealant, brush. Follow a Maintenance schedule with tape, level, headlamp, gloves, first-aid.
Conclusion
You’ve now turned a draughty Highland bothy into a controlled, low-impact refuge: weather-tight envelope, breathable insulation, intentional ventilation, and a safer, cleaner heat source. If you’re thinking “modern upgrades will ruin the character,” they won’t—when you keep interventions reversible, conceal cabling, and match lime, timber, and ironwork to the original fabric. With solar-fed LEDs, treated water, and tough multi-use kit, you’ll get comfort without clutter—and resilience in every season.