
You’re taking on a bastle house that was built to resist raid and weather, so you can’t treat it like a blank shell. You start by mapping thick rubble walls, slit openings, and hearth zones, then you prioritise movement, moisture paths, and fabric that must stay breathable. You’ll route services where they won’t scar stone, and you’ll add light without weakening structure. The first decision you make will dictate every intervention that follows…
Key Takeaways
- Commission a measured survey and condition report, mapping movement and damp, and verify building phases with historic records.
- Secure listed-building consent, building control approval, ecological checks, and community input to align conservation, access, and interpretation.
- Stabilize masonry minimally using pin-and-stitch, compatible lime mortars, and low-pressure grouts while preserving tooling marks and smoke-blackened surfaces.
- Manage moisture by fixing roofs, flashings, gutters, and ground levels, using breathable lime pointing and limewash, plus underfloor and void ventilation.
- Upgrade comfort discreetly with vapour-open insulation, secondary or slim double glazing in deep reveals, and hidden service routes within floor voids or battens.
Identify Key Bastle House Features
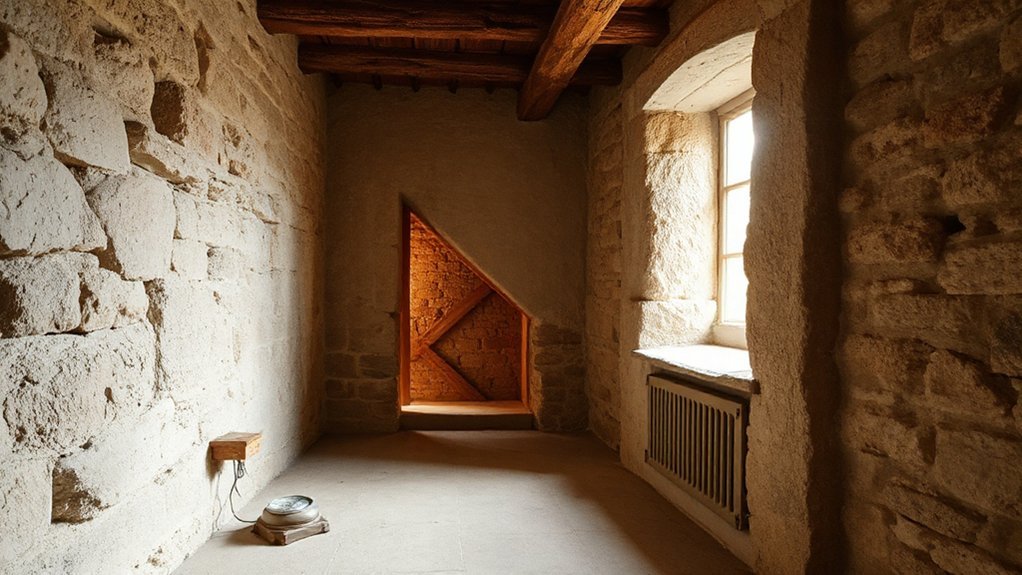
Although bastle houses vary by region and date, you can identify one quickly by reading its defensive fabric: thick loadbearing stone walls, a low, narrow plan, and minimal ground-floor openings. You’ll typically find rubble masonry with tight lime pointing, shallow window reveals, and chamfered surrounds sized for shutters or yetts.
You can read vertical hierarchy: a byre or store at ground level, a first-floor hall reached by a narrow stair or ladder, and a loft under steeply pitched rafters. Look for a barmkin wall, turnpike stair, and gun loops or slit vents that preserve security without sacrificing ventilation.
In Medieval architecture terms, you’re tracing pragmatism. In Bastle house history, these details map border risk into form and plan.
Survey, Permissions, and Repair Priorities First
Before you specify lime, timber, or glazing, commission a measured survey and condition report that maps movement, moisture, and decay onto the bastle’s fabric and plan. Cross-check findings against Historical documentation to verify phases, blocked openings, and later insertions, then translate evidence into a risk-ranked schedule.
Start permissions early: align proposals with listed-building consent, building control, and ecology constraints, and record assumptions so you can defend them at pre-application.
Run community consultation to surface access expectations, interpretive value, and local craft capacity, then lock priorities to what protects significance and enables safe use.
Focus on:
- datum levels, crack gauges, moisture profiling
- services routes, ventilation intent, fire strategy
- joinery windows, door heads, ironwork condition
- procurement sequencing, temporary works, monitoring plan
Stabilise Masonry Without Over-Repair
You stabilise the bastle’s masonry by designing for minimum intervention: pin and stitch only where movement is active, retain sound fabric, and let the wall’s original load paths keep working.
You’ll specify compatible lime-based mortars and low-pressure, void-filling grouts that match strength, permeability, and salt behaviour, so repairs don’t trap moisture or force cracks into the stone.
You document each intervention’s extent and reversibility, keeping the new work legible and structurally effective without over-repair.
Minimum Intervention Masonry Strategy
Where the bastle’s walling still carries load and sheds water, a minimum-intervention strategy focuses on stabilisation rather than cosmetic renewal. You begin with a defect map, then test movement and moisture so you only touch fabric that’s failing.
You prioritise Historical accuracy by retaining tooling marks, raggled quoins, and smoke-blackened faces, while improving visitor accessibility through safer edges and legible routes that don’t disguise age.
- Pin local bulges with discreet stainless ties set back from faces, limiting visual change.
- Re-bed loose through-stones, keeping original geometry and wall thickness.
- Consolidate friable arrises with targeted stone indents, matching bedding planes and texture.
- Manage water at details: reset coping, clear weeps, and reinstate drips to stop saturation.
Compatible Mortars And Grouts
Although the bastle’s masonry looks monolithic, the mortar does most of the regulating—moving salts, buffering moisture, and taking micro-movement—so compatible lime-based mortars and low-pressure grouts let you stabilise joints and voids without locking the wall into a brittle, cement-rich repair.
Start by sampling existing Mortar composition: binder type, aggregate grading, fines, colour, and vapor permeability. You’ll then specify a lime putty or NHL blend matched to strength, not hardness, and adjust sand mix to maintain capillarity.
Rake only failed joints, keep arises crisp, and repoint flush or slightly recessed to shed water without smearing stone faces. For internal voids, inject from low points, stage lifts, and tune grout consistency so it flows yet won’t segregate.
Cure slowly, protect from wind, frost, and rapid drying.
Stop Damp With Breathable, Traditional Methods
Because bastle houses were built to shed weather rather than trap it, the most effective damp strategy pairs diagnosis with breathable, traditional materials that let moisture migrate and evaporate. You start by mapping moisture paths—roof leaks, failed flashings, bridged thresholds—then you correct details so the wall can dry to both faces.
For Historical preservation and Modern aesthetics, you keep interventions legible yet discreet, matching texture, colour, and permeability.
- Clear ground levels and open perimeter drains so splashback can’t soak the plinth
- Repoint with lime and finish with limewash to regulate wetting and drying cycles
- Fit leadwork, drip edges, and repaired gutters to throw water clear of the wall
- Ventilate underfloors and voids, then monitor RH to verify the fix holds
Insulate Stone Walls Without Trapping Moisture
Once you’ve stopped bulk water and stabilised the wall’s drying cycle, insulation becomes a detailing exercise: you need to cut heat loss without turning the stone into a cold, wet reservoir.
Favour capillary-active, vapour-open systems: woodfibre boards or cork bedded in lime adhesive, finished with lime plaster. Keep the build-up continuous at junctions; return insulation into reveals, wrap floor edges, and avoid hard thermal bridges at joist pockets with insulated liners.
Specify a smart vapour control layer only where indoor humidity is high, and detail it airtight but serviceable.
Maintain moisture control by preserving outward drying: no cement renders, no closed-cell foams on stone.
Validate thermal performance with hygrothermal modelling, and size thickness to avoid interstitial condensation. Add monitoring points for seasonal verification too.
Repair or Upgrade Windows and Doors Quietly
You’ll start by tightening windows and doors with reversible draughtproofing—brush piles, compressible gaskets, and discreet beads—so you cut air leakage without reworking historic frames.
Where noise control matters, you’ll specify acoustic glazing with matched pane thickness and generous cavity, then integrate perimeter seals that maintain continuous compression.
You’ll tune ironmongery, thresholds, and meeting stiles so the assemblies close square and quietly, preserving sightlines while boosting comfort.
Draughtproofing Without Alteration
Even if the bastle’s thick masonry buffers temperature swings, air leakage at windows and doors can still dominate heat loss and comfort. You’ll get the biggest gain by targeting joints and interfaces, not by changing profiles. Work reversibly, so interior preservation stays intact and the joinery reads as original.
- Fit compressible, paintable draught strip into existing staff beads or parting beads; rout only where prior cuts exist.
- Seal frame-to-stone gaps with lime-compatible backer and a minimal lime-filler, keeping vapour pathways aligned with Historic ventilation.
- Add discreet brush seals to door heads and jambs, then tune hinges and keep to achieve even contact pressure.
- Use a drop-down threshold seal on the door leaf; keep the sill visually untouched and water-shedding.
Acoustic Glazing And Seals
Although thick walls blunt some external noise, most sound still threads through the weakest links—single glazing, loose sashes, and leaky perimeter gaps—so tackle the window and door assembly as a system. Start by surveying frame squareness, hinge play, and sash-to-frame clearances; you can’t “glass” your way past poor geometry.
Choose Acoustic glazing that respects historic sightlines: a slim double unit with asymmetric panes, or secondary glazing set deep in the reveal to preserve external joinery. Specify laminated inner panes for low-frequency attenuation and confirm spacer thickness won’t foul putty lines.
Then focus on seals options: concealed brush piles for sliding sashes, compression gaskets for casements, and threshold drop-seals for doors. Use continuous perimeter seals, break air paths at meeting rails, and test with smoke to verify closure.
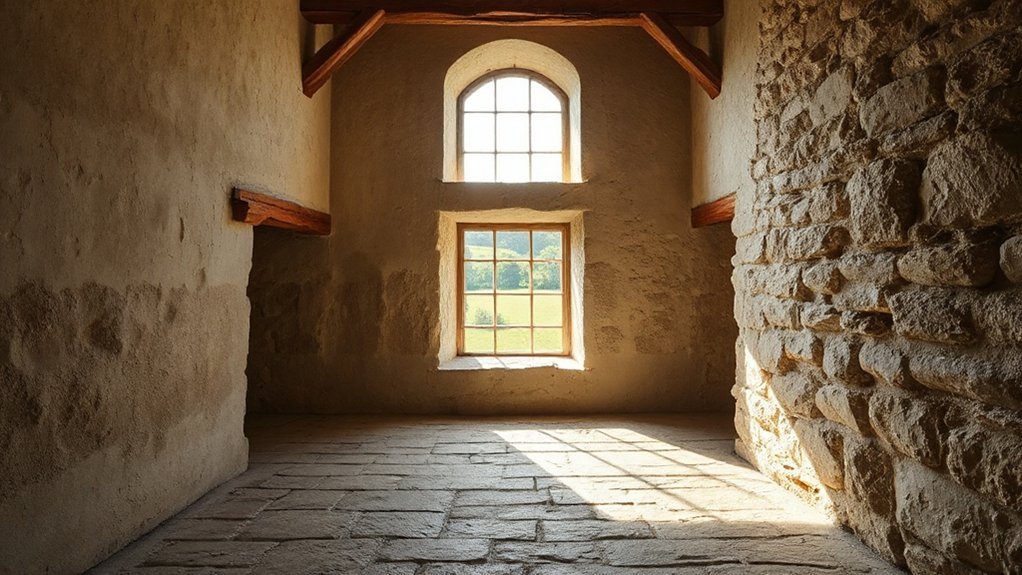
Add Daylight Without Weakening the Structure
Because a bastle house relies on thick masonry and tight apertures for stability and defense, add daylight by working with the existing wall logic rather than cutting new voids: prioritize reopening historic slit windows, upgrading deep reveals with high-reflectance limewash, and inserting thin, structurally independent glazing frames that bear on sound stone rather than friable mortar.
Calibrate brightness by redirecting light, not removing fabric. Keep interventions reversible and legible, and prove them with on-site mockups and measured lux readings.
- Treat reveals with splayed linings to increase sky-view without widening the exterior.
- Use Skylight placement only where roof timbers can bypass loads to new trimming members.
- Specify laminated low-iron glass to maximize transmission through narrow apertures.
- Integrate daylight sensors to modulate supplemental lighting and avoid glare.
Run Electrics, Plumbing, and Heating Safely
Where do you hide modern services in a bastle house without drilling its defensible masonry full of weak points? You’ll plan routes as reversible layers: run electrics in floor voids, behind skirtings, or within new service battens, then drop to outlets via minimal chases in sacrificial lining, not the core wall.
Specify armoured cable where impact risk exists, fit RCD/AFDD protection, and bond all metalwork for modern safety.
For plumbing, keep pipework on internal partitions, insulate to prevent freezing, and use leak-detection shutoffs in concealed runs. Put manifolds and valves in accessible cupboards.
For heating, choose low-temperature emitters, hide distribution in joist zones, and locate plant discreetly to retain Historical authenticity while meeting servicing clearances and fire-stopping requirements.
Use Lime Plasters, Paints, and Finishes That Breathe
Once you’ve threaded electrics, plumbing, and heating through reversible voids and linings, you need finishes that won’t trap the moisture those changes can introduce. Specify lime-based systems so the bastle’s rubble walls can buffer humidity, purge salts, and dry to both faces without blistering.
You’ll also keep Historical authenticity by matching aggregate size, colour, and trowel texture to surviving bays.
- Use haired lime plaster on lath or masonry; avoid gypsum on damp-prone walls.
- Choose limewash or silicate paints; they stay vapour-open and sacrificial.
- Detail junctions with permeable fillers and no acrylic caulks at stone reveals.
- Prioritise local material sourcing: hot-mixed lime, sharp sands, and breathable pigments.
Finish with wax-free casein or lime glazes where you want abrasion resistance, not sheen.
Frequently Asked Questions
How Much Does a Full Bastle House Rehabilitation Typically Cost?
You’ll typically spend £250k–£800k+ for a full bastle house rehabilitation, depending on fabric repairs, services, and conservation scope. Use cost estimation early; include budgeting considerations for surveys, structural stabilization, insulation detailing, and approvals.
Can You Legally Live in a Bastle House During Restoration?
You can, but it’s like camping in a scaffolded ship—only if you meet Legal restrictions. You’ll need habitable-room standards: safe egress, sanitation, power, fire separation, and follow Preservation guidelines permits.
What Insurance Is Available for Occupied Historic Building Renovation Projects?
You can secure Insurance options like renovation/contract works, existing-structure, public liability, and employer’s liability policies; add historic building coverage via listed-building rebuild valuations, specialist materials clauses, and alternative accommodation, plus site-security and hot-works endorsements.
How Do You Source Period-Appropriate Fixtures and Furnishings Ethically?
Don’t cut corners: you’ll use Authentic sourcing by vetting provenance, insisting on documented salvage, and prioritizing Ethical procurement through FSC timber, fair-trade metals, and local craftspeople. Specify reversible fixings, low-VOC finishes, and transparent supplier audits.
Will Rehabilitation Increase or Reduce the Property’s Resale Value?
Rehabilitation can raise resale value if you document Historical significance and manage Preservation challenges. You’ll boost buyer confidence by upgrading services discreetly, stabilizing masonry, improving moisture detailing, and retaining authentic fabric with reversible interventions throughout.
Conclusion
Rehabilitate your bastle house as if every stone’s watching—because it is. You’ll survey ruthlessly, prioritise permissions, then stabilise masonry with lime, not brute cement. You’ll wage war on damp using breathable plasters, capillary breaks, and disciplined ventilation, then insulate without sealing the walls into a silent sponge. You’ll refine openings, slip in discreet glazing for daylight, and thread services invisibly. Finish with vapour-open paints, so the building can finally breathe again.


