Start Renovating An Old Air Raid Shelter by mapping cracks, spalls, efflorescence, and rebar exposure, then probe for delamination and test for asbestos, lead, mold, radon, and low oxygen. Confirm permits, insurance, code egress (two independent exits), and fire/CO safety before framing. Stop water first with exterior regrading, downspout extensions, perimeter drains, crack repair, and a sump with backup power. Add balanced HRV/ERV ventilation, dehumidification, dedicated circuits, and low-profile dimmable lighting, then finish with sound isolation and durable surfaces. Keep going to see layout, AV, and acoustics specifics.
Key Takeaways
- Start with a structural inspection for cracks, spalling, rebar corrosion, water ingress, and confirm permits, egress, and fire-safety code requirements.
- Test hazards like asbestos, lead paint, mold, radon, and low oxygen risks before demolition, then plan remediation and safe ventilation.
- Fix moisture at the source with grading, downspout extensions, perimeter drains, wall/slab sealing, and a sump pump with backup power.
- Install balanced ventilation (HRV/ERV) and dehumidification to maintain 40–60% RH, with filtration to control odors, CO₂, and particulates.
- Plan the layout (theater/games/bar) early to route power, AV, plumbing, lighting, and acoustics before closing walls and adding durable finishes.
Assess Air Raid Shelter Structure and Hazards
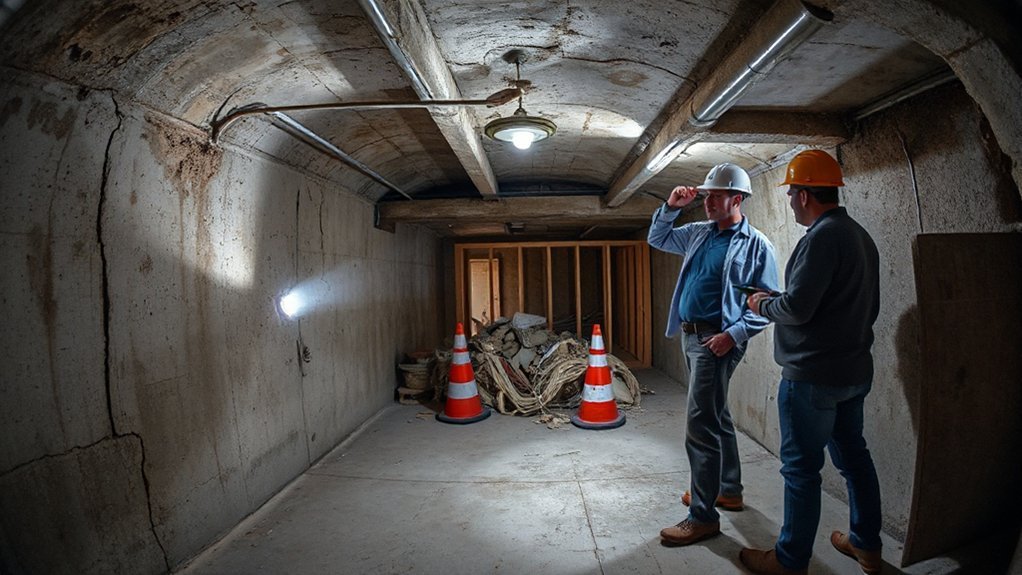
Before you design the layout or run any wiring, you need to verify the shelter’s structural integrity and identify hazards that could turn renovation into a safety incident. Start with a visual survey: map cracks, spalls, efflorescence, and rebar exposure on walls and slab.
Probe concrete for delamination, check ceiling for sagging, and confirm door frames aren’t racked. Inspect joints, penetrations, and any previous patching for active water ingress.
Perform a hazard assessment for asbestos lagging, lead paint, mold, and rodent contamination; sample suspect materials instead of guessing. Test for radon and low oxygen risk in confined spaces.
Evaluate corrosion on steel shutters and anchors. Finally, verify drainage paths and sump function to prevent hydrostatic pressure and flooding.
Confirm Permits, Egress, and Insurance for Shelters
Although the shelter already exists, you still need to confirm what your local building authority and insurer will require once you change its use to an occupied entertainment room. Ask whether the work triggers Permit requirements for change-of-use, electrical upgrades, ventilation, plumbing, damp-proofing, or structural alterations.
Verify minimum ceiling height, smoke/CO detection, emergency lighting, and fire separation to the dwelling above. Egress is critical: you’ll likely need two independent exits, compliant door widths, and escape hardware that opens without keys; if you rely on a ladder hatch, confirm it’s acceptable.
Document ventilation rates and combustion-air provisions for any appliances. Finally, call your broker and get Insurance coverage confirmed in writing, including liability, water ingress, mold, and electrical fire endorsements.
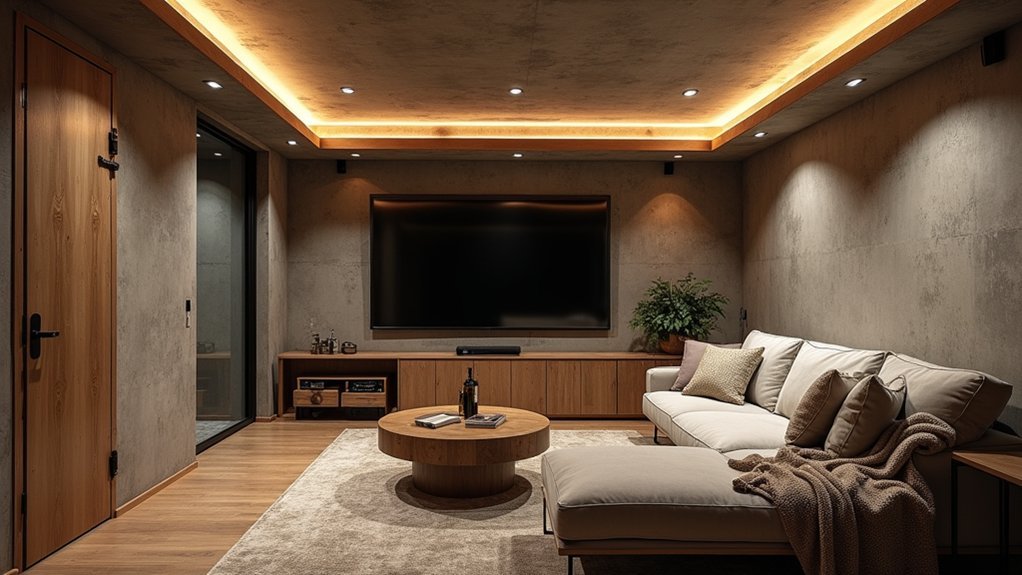
Choose Your Shelter Room: Theater, Games, or Bar
Once you’ve nailed down compliance constraints, pick a primary use for the shelter—home theater, games room, or bar—because that decision drives your layout, MEP loads, moisture strategy, and sound isolation details.
For a theater, center the screen wall on the longest run, plan conduit for projector/AV, and reserve space for an equipment rack with ventilation.
For games, prioritize circulation clearances, durable wall finishes, and ceiling height allowances for cues, darts, or VR tracking.
For a bar, locate plumbing-ready zones, provide dedicated circuits for refrigeration, and specify noncombustible backsplash materials.
In Shelter decoration, use dark, low-glare finishes for theater, bright task lighting for games, and layered accent lighting for a bar.
Your furniture selection should match access constraints, modularity, and load paths.
Waterproof the Air Raid Shelter (Drainage + Sealing)
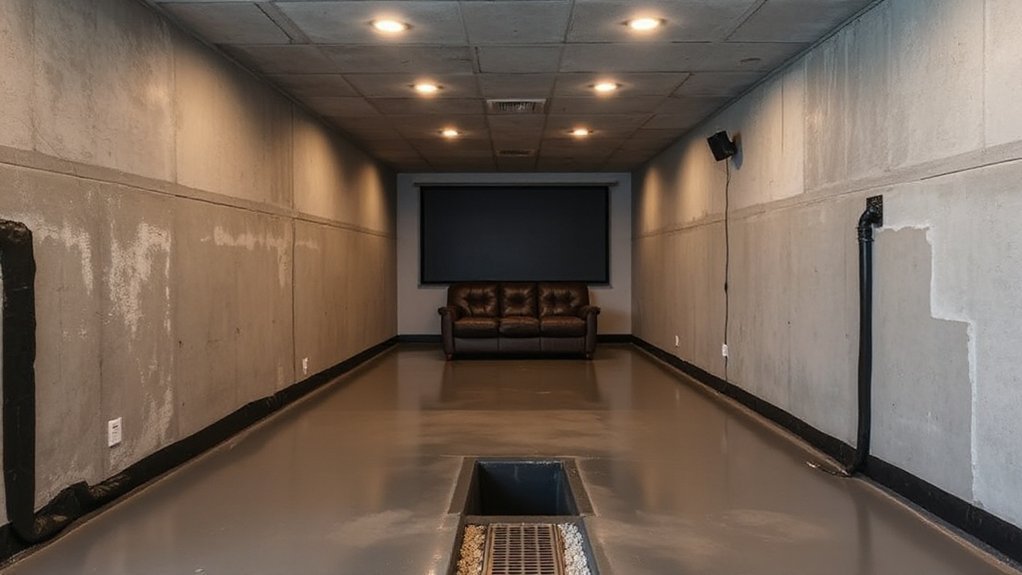
Start by mapping exterior drainage so you’re moving water away from the shelter—confirm grading, extend downspouts, and plan a perimeter drain if hydrostatic pressure is likely.
Next, seal the envelope by repairing cracks, applying a cementitious waterproof coating or membrane on walls, and using a moisture-rated floor system with sealed joints.
If seepage can’t be eliminated, you’ll install a sump pump with a sealed basin, check valve, and dedicated discharge line to keep the room dry under load.
Exterior Drainage Planning
Before you seal a single crack, you need a clear exterior drainage plan that keeps groundwater from ever building hydrostatic pressure against the shelter walls.
Start with Rainwater diversion at the surface: regrade soil to fall 5% away for at least 3 m, and keep finished grade 150 mm below any vents or hatches.
Tie roof runoff into a gutter system with downspouts that discharge to solid pipe, not splash blocks, and send it to daylight or a dry well set downslope.
Next, install a perimeter French drain at footing level: perforated pipe on washed gravel, wrapped in geotextile, sloped 1% to an outlet or sump.
Add cleanouts at corners, and keep the trench outside the shelter footprint.
Verify flow during heavy rain events.
Wall And Floor Sealing
After you’ve proven the exterior drainage can move water away during a hard rain, seal the walls and slab to block capillary wicking and stop vapor drive from turning the shelter into a damp box.
Start by grinding off loose paint, efflorescence, and laitance, then vacuum clean.
Fill cracks and honeycombs with hydraulic cement or epoxy injection, and reprofile joints with polyurethane sealant.
Apply a cementitious crystalline wall treatment to damp concrete, working it into pores; coat corners with a reinforcing fabric.
At the slab perimeter, cut a reglet and install a capillary break membrane lapped up the wall.
For floor finishing, prime, then roll on a two-part epoxy moisture-barrier rated for your slab’s RH, and topcoat with a wear layer.
Seal penetrations with butyl.
Sump Pump Installation
One reliable sump system turns an occasionally wet shelter into a controllable space by giving groundwater a low point to collect and a powered path out. You’ll core a pit at the lowest slab point, set a perforated liner in washed stone, and keep the rim flush for trip-free flooring.
Install a cast-iron pump with a sealed lid to limit humidity and odors. Run 1-1/2 in. PVC with a check valve, union, and dedicated GFCI circuit; discharge downhill to daylight or a storm line with an air-gap.
Add a battery backup and high-water alarm for security enhancements during outages. Use vibration pads and avoid cutting original blast walls, supporting historical preservation.
Test with a hose, verify float travel, and log cycle counts.
Ventilate the Air Raid Shelter for Fresh Air
You’ll start by evaluating air-quality needs: calculate room volume, target fresh-air exchange rates, and check baseline CO₂, VOCs, radon, and particulate levels.
Then you’ll install mechanical ventilation sized for that load—typically a balanced HRV/ERV with ducted supply/return, filtration, and backdraft dampers.
Finally, you’ll manage moisture and odors by controlling RH (≈40–60%), integrating a dehumidifier or condensate drain as needed, and using sealed penetrations plus activated carbon or MERV-rated filters to keep smells from lingering.
Assess Air Quality Needs
How fresh is the air down there once the hatch closes? Don’t guess—measure. Start with Air quality testing: log CO₂, O₂, VOCs, and particulates over a full day with the room occupied, because concrete can off-gas and moisture can spike. Check for mold indicators and radon with short- and long-term kits, then map readings by corner to spot stagnant zones. Inspect existing penetrations and door seals for odor backflow.
- Take baseline readings, then repeat after cooking, gaming, and a full house.
- Identify sources: damp walls, stored fuels, cleaning solvents, nearby soil gases.
- Define targets and controls, including filtration systems matched to particle size and odor load.
Document everything so your later ventilation choices stay right-sized.
Install Mechanical Ventilation
Once you’ve logged CO₂, VOCs, humidity, and radon, size and install mechanical ventilation so the shelter reliably exchanges air with the outside.
Target 0.35–0.5 ACH or 15–20 CFM per occupant, and choose a balanced ERV/HRV to limit heat loss.
Core-drill two penetrations, slope sleeves outward, and seal with fire-rated mastic.
Use rigid duct where possible, insulate runs, and include backdraft dampers to prevent pressure reversals.
Add Air filtration with a MERV 13 (or higher, space permitting) supply filter and an accessible filter rack for maintenance.
Integrate humidity control via a controller or ERV latent core, and interlock fans to run boost mode during gatherings.
Verify airflow with a hood and adjust dampers.
Manage Moisture And Odors
With the ventilation hardware in place and airflow verified, focus shifts to controlling the two problems that make underground rooms feel “stale”: persistent moisture and adsorbed odors. Keep RH at 45–55% and stop mold before it starts by pairing ventilation with targeted drying and filtration.
- Dehumidifier placement: set the unit near the dampest wall or floor joint, but leave 20–30 cm clearance for intake/exhaust. Pipe condensate to a drain so it can run continuously.
- Air movement: aim a low-watt circulation fan across corners and behind seating to prevent cold-surface condensation.
- Odor absorption techniques: use activated carbon panels in the return path, plus a zeolite tray near textiles. Replace media on a schedule.
Rewire and Add AV Cabling in the Shelter
Before you close up any newly framed walls or ceiling channels, run fresh power and low-voltage lines so the shelter can support modern AV loads without noise, dropouts, or safety issues. Install a dedicated circuit for the rack, projector, and subwoofer, and use AFCI/GFCI protection where required.
Keep line-voltage and signal runs separated, crossing only at 90 degrees, and pull everything in conduit or raceway for serviceability.
For video, run certified in-wall HDMI plus a Cat6A backup to every display point; home-run Cat6A to a small patch panel for streaming, control, and future upgrades.
Add speaker wire even if you plan Wireless speakers; you’ll want options.
Prewire smart lighting with neutral conductors and a control hub location. Label both ends and test.
Insulate and Heat the Shelter Without Headroom Loss

After you’ve pulled, labeled, and tested your power and low-voltage runs, shift focus to thermal control, because an underground shelter will stay cold and clammy unless you manage heat flow and moisture.
To avoid headroom loss, keep build-ups thin and continuous, and prioritize air sealing before adding R-value. Use closed-cell foam or foil-faced PIR as primary Insulation materials, taped at seams and sealed at edges to stop vapor drive.
Treat the slab with a thin dimple mat plus rigid board, then a low-profile floating floor.
- Seal cracks, penetrations, and the door frame with foam and mastic.
- Add 25–50 mm PIR to walls/ceiling using furring strips and fire-rated board.
- Choose Heating options: electric radiant panels, small hydronic baseboard, or a ductless mini-split.
Light a Low-Ceiling Air Raid Shelter Properly
Because low ceilings amplify glare and shadows, you’ll get the best results by treating lighting as a layered system rather than a single bright fixture.
Start your lighting design with low-profile recessed LED downlights on a dimmer, spaced to avoid scalloping on walls (typically 1.0–1.2× ceiling height from the wall).
Add indirect light using concealed LED strip in a shallow perimeter cove or behind a soffit to lift the ceiling visually without stealing headroom.
For task zones, use wall-mounted sconces or short-arm fixtures with diffusers to keep sources out of eye level.
Prioritize bulb selection: 2700–3000K, 90+ CRI, flicker-free drivers, and sealed IP-rated fixtures if moisture lingers.
Include a separate emergency circuit for safe egress.
Add Acoustics, Seating, and Finishing Touches
Once you’ve dialed in lighting, you’ll get the biggest “room-like” upgrade by controlling sound, then locking in seating geometry and durable finishes. Start with soundproofing techniques: decouple walls with resilient channel, seal every joint with acoustic caulk, and add mineral wool behind fabric panels to tame flutter echo. Keep decorative lighting on isolated mounts so it won’t buzz against concrete.
- Acoustics: Place broadband absorbers at first-reflection points. Add a rear-wall diffuser or thick curtain to prevent slapback.
- Seating: Set the main row at approximately 0.6–0.7 room length from the screen. Keep a 36-inch aisle.
- Finishes: Use rubber underlayment, washable matte paint, and corner guards. Choose low-VOC adhesives to limit odor.
Frequently Asked Questions
How Much Does It Typically Cost to Convert a Shelter Into a Media Room?
You’ll typically spend $15,000–$60,000 to convert a shelter into a media room, depending on structure and finishes. Budget for shelter insulation, ventilation systems, moisture control, electrical upgrades, soundproofing, HVAC, and seating.
How Long Does a Full Shelter-To-Entertainment Renovation Usually Take?
You’ll usually need 8–16 weeks; about 30% of schedules slip due to moisture mitigation. Plan 2–4 weeks for shelter insulation and vapor barriers, plus 1–3 weeks tuning underground acoustics and AV wiring.
Can I Add Wi‑Fi or Ethernet Without Weakening the Shelter’s Walls?
Yes—you can, if you route Ethernet through existing penetrations, surface-mount conduit, or floor channels; core-drilling needs engineering. Prefer Wireless extension, Signal boosters, or PoE access points to avoid new wall cuts entirely.
What Are the Best Pest-Proofing Methods for an Underground Entertainment Space?
Block bugs by sealing seams, screening shafts, and setting steel-door sweeps. For Pest prevention and Damage prevention, use silicone/epoxy crack filler, stainless mesh, backflow valves, dehumidifiers, and bait stations; inspect monthly and remove food sources.
Will Renovating the Shelter Increase My Home’s Resale Value?
Yes, you’ll often boost resale value if you document Historical preservation, meet Safety regulations, and deliver a dry, code-compliant finished space. You should get permits, moisture control, ventilation, and egress; buyers pay more.
Conclusion
You’ve turned a bunker built for sirens into a room built for sound. By checking structure, hazards, permits, and safe egress, you’ve made the shell trustworthy. Waterproofing and drainage keep the floor dry; ventilation keeps CO₂ and humidity down. Updated wiring and AV runs future-proof your gear. Slim insulation, efficient heat, and low-profile lighting protect headroom. Add acoustic treatment and durable finishes, and you’ve replaced cold concrete with controlled comfort—your new underground “stage.”