You’ll get parquet right by prepping first: clear the room, acclimatise packs at 18–22°C, and make the subfloor rigid, clean, flat to ≤3mm over 2m, and dry to ≤75% RH. Snap true centre chalk lines, dry-lay 1–2m² to confirm herringbone/chevron alignment, then spread approved adhesive in small bays with the specified notched trowel and set blocks to the lines. Leave 10–15mm expansion gaps, fit thresholds to the subfloor, and finish by curing, then sanding and sealing or oiling—there’s more to sharpen each stage.
Key Takeaways
- Choose suitable parquet type (solid/engineered/LVT) for your subfloor, moisture risk, and fixing method before buying materials.
- Acclimatise sealed packs in-room at 18–22°C, then clear the space and remove old coverings, fixings, and debris.
- Check subfloor flatness (≤3mm over 2m) and dryness (≤75% RH); repair cracks, squeaks, contamination, and level dips.
- Mark the room centre and snap perpendicular chalk lines; dry-lay 1–2m² to confirm pattern alignment and 10–15mm expansion gaps.
- Install from the centreline, maintain straight courses, cut edges accurately, and allow proper adhesive curing before refitting skirtings and furniture.
Is Parquet a DIY Job for Your Room?
Wondering whether you can fit parquet yourself? Your DIY feasibility depends on layout complexity, subfloor condition, and tool access. If you can measure accurately, keep lines square, and work patiently, you can succeed in a spare room; whole floors or intricate patterns raise risk.
Check skill requirements: you’ll need to assess moisture and flatness to UK tolerances (aim ≤3mm over 2m), correct high spots, and choose the right adhesive or underlay system. You must cut blocks cleanly with a mitre saw, maintain expansion gaps, and control acclimatisation in centrally heated homes. Expect heavy lifting, dust control, and precise setting-out from a centreline. If you’ve never levelled a subfloor or scribed edges, consider a fitter.
Choose Your Material: Solid, Engineered, or LVT
Because parquet blocks behave very differently depending on what they’re made from, you should choose between solid wood, engineered wood, and parquet-look LVT based on your subfloor type, moisture risk, and the fixing method you can support. Solid parquet suits dry, stable UK rooms on sound timber or well-cured, level screeds; you’ll typically secret-nail or full-spread glue, and you must control RH to limit cupping. Engineered parquet (ply core) tolerates UFH and seasonal movement better; you can glue or float it over suitable underlay, but still need DPMs on concrete. Parquet-look LVT works well in kitchens, bathrooms, and basements; it’s click or adhesive, needs a smooth substrate, and simplifies Parquet maintenance and parquet cleaning.
Herringbone vs Chevron: Which Looks Right?
You’ll choose between herringbone’s staggered 90° blocks and chevron’s mitred ends that form a continuous V, and that geometry dictates your set-out lines, cuts, and waste. In UK homes, herringbone often suits period terraces and smaller rooms where you want visual texture without a strong directional pull, while chevron reads more contemporary and emphasises length in open-plan spaces. You should also match block size and angle to room proportions, sightlines from door thresholds, and the feature wall you want the pattern to lead towards.
Pattern Geometry Differences
Before you order boards or set out a centreline, you need to understand that herringbone and chevron aren’t interchangeable patterns—they’re different geometries with different cutting requirements and visual results. In herringbone, you lay rectangular blocks at 90° to each other, so the “V” is stepped; you can usually use square-ended parquet blocks, limiting mitre cuts to perimeter scribing. In chevron, each board’s end is cut to a fixed angle (commonly 45° or 60°), creating a continuous point-to-point “V” along a straight spine, so every piece is a precision mitre. Those Pattern variations change your setting-out tolerances: chevron amplifies cumulative error and creates stronger geometric illusions of length and symmetry, especially across door thresholds and bay returns. Choose accordingly.
Room Style Considerations
Pattern geometry dictates how the floor goes together; room style dictates whether it looks intentional once it’s down. In UK terraces and semis, herringbone suits period proportions because its staggered breaks soften long, narrow rooms, especially where chimney breasts interrupt lines. Chevron reads sharper and more contemporary; its continuous V’s can elongate open-plan kitchen-diners, but it exposes out-of-square walls and needs cleaner perimeter scribing.
- Use Room lighting: bright south-facing rooms tolerate strong chevron contrast; low-light north rooms often look calmer with herringbone.
- Plan furniture placement: align chevrons to sightlines from doorways; let herringbone sit under sofas without forcing symmetry.
- Match detailing: edgings, thresholds, and skirting profiles should echo your joinery and hardware finishes.
Measure the Room and Add Wastage
Although parquet blocks look forgiving, you need precise room measurements to order the right quantity and keep the install moving. Clear the floor plan, note fixed hearths and bay windows, and decide furniture placement so you don’t waste time measuring areas that’ll stay built-in. Measure length and width in millimetres at several points (UK walls aren’t always square), then calculate area: L × W for rectangles, and split irregular rooms into smaller rectangles and triangles. Check door thresholds and alcoves separately. Mark the intended laying direction influenced by room lighting, because a change of direction can increase cuts. Add wastage: 10% for straightforward rooms, 12–15% for herringbone/chevron, and up to 20% for lots of nooks. Round up full packs.
Tools, Adhesive, and Underlay You’ll Need
Once you’ve worked out your coverage and wastage, you’ll need to line up the right kit—parquet isn’t forgiving of blunt blades, the wrong trowel notch, or an underlay that doesn’t match your subfloor. For tools, use a sharp utility knife, pull bar, tapping block, chalk line, and a 2 m straightedge; keep a moisture meter handy for UK subfloors.
Choose adhesive to suit the substrate: MS polymer or PU for concrete/screed, and a flexible wood-floor adhesive for plywood. Pair it with the manufacturer’s specified notched trowel (often B11/B15) to hit coverage.
- Vapour barrier/combination underlay for concrete (DPM to BS 8102)
- Acoustic underlay meeting Building Regs Part E (flats)
- Expansion spacers and a roller for bond integrity
Good Parquet maintenance starts with correct underlay; parquet cleaning stays easier with stable blocks.
Clear the Room and Acclimatise the Parquet
Before you open a single pack, strip the room back to a clean, dry shell—remove furniture, doors if needed, old floor coverings, gripper rods, and any protruding fixings—then stack the parquet packs flat in the space for acclimatisation. Keep packs sealed and cross-stack on bearers so air circulates; don’t lean them against walls. Maintain typical UK living conditions: heating on low and steady, windows closed, no direct blasts from fans or radiators. Aim for 18–22°C and consistent indoor humidity; avoid sudden changes from dehumidifiers or drying laundry. Use good Room lighting to spot debris and check skirting edges for nails. Plan temporary furniture placement in another room, and protect routes with dust sheets. Leave the wood 48–72 hours, longer for wide blocks.
Check the Subfloor: Flat, Dry, and Solid
Before you lay parquet, you’ll check the subfloor is flat, rigid, and free from movement by using a 2 m straightedge and addressing any hollows, ridges, or loose sections. You’ll verify moisture levels with an appropriate meter (and confirm any screed meets the adhesive manufacturer’s limits) so you don’t trap damp under the blocks. You’ll also make sure the surface is clean, dust-free, and sound, because contamination and friable layers will compromise bond strength.
Assess Levelness And Stability
Although parquet blocks can disguise minor surface marks, they won’t tolerate a subfloor that’s uneven, damp, or loose, so check it’s flat, dry, and solid before you commit to any adhesive. During your subfloor inspection, use a 2 m straightedge (BS 8204 guidance) and measure gaps; you’re aiming for no more than 3 mm variation over 2 m for parquet. Mark high spots and hollows, then plan grinding or a suitable smoothing compound so the pattern doesn’t telegraph through.
- Walk the floor and listen: squeaks or bounce mean movement you must fix.
- Probe suspect areas; any crumbling screed or loose boards need repair or replacement.
- Record moisture testing results, then confirm the base feels rigid under load.
Verify Moisture And Cleanliness
A flat, stable base still needs to pass moisture and cleanliness checks, because parquet adhesive won’t bond reliably to a damp or contaminated surface. Start with Moisture testing: on sand/cement screeds use an in-situ RH probe (aim ≤75% RH, or the adhesive’s limit); on concrete use the same method; on timber confirm it’s dry and well ventilated. Don’t rely on a cheap pin meter alone. If you’ve got underfloor heating, run the commissioning cycle, then let the slab cool before testing. Next, verify surface cleanliness: vacuum thoroughly, then degrease and remove paint, plaster, old adhesive, curing compounds, and dust laitance by light grinding. You shouldn’t see chalky residue on your hand.
Fix Dips, Cracks, Damp, and Squeaks First
Once you’ve checked the room’s levels, sort the subfloor issues that’ll telegraph straight through parquet—dips, cracks, moisture, and movement—because adhesive and timber won’t compensate for a poor base. For dips, bring the floor within BS 8203 tolerances using a cementitious smoothing compound over a primed substrate, feathering edges to avoid ridges. For crack repair, chase out loose material, vacuum dust, then fill with an epoxy resin or polymer-modified mortar and stitch where needed. Build in Damp prevention: confirm the DPM is intact; on slabs, apply a liquid surface DPM where readings demand it, and lap to walls per manufacturer guidance. Stop squeaks by re-fixing loose boards into joists, adding noggins, and tightening nails.
- Dips: prime, level, cure fully
- Cracks: chase, fill, stitch
- Squeaks: re-fix, noggin, tighten
Mark Your Centre Line and Starting Point
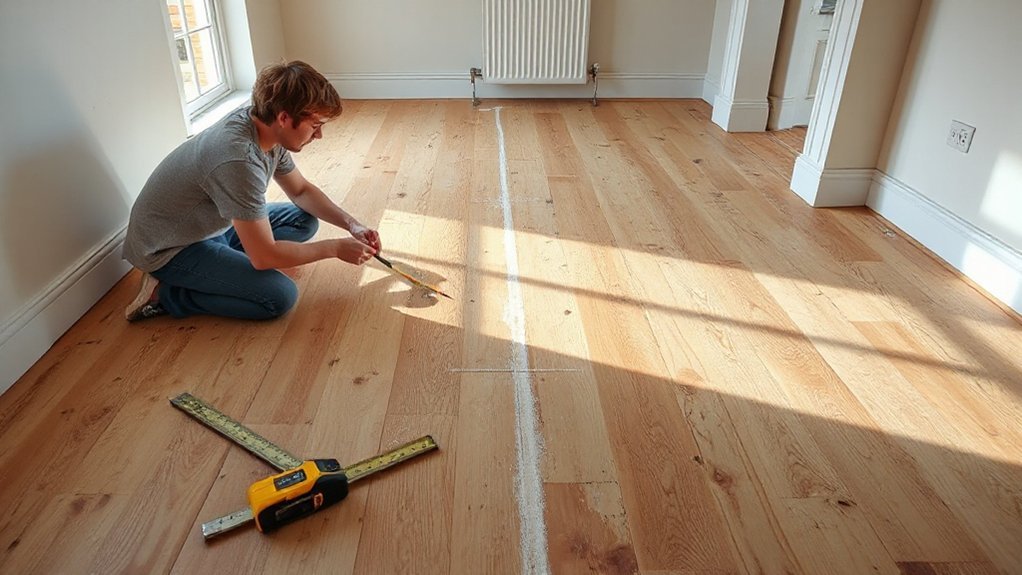
You’ll find the room’s centre point by measuring and marking the midpoints of opposing walls, then checking the diagonals to confirm it’s true. Snap a chalk line through the centre in both directions to create your reference axes for the parquet field. Dry-lay a starting square on the lines and confirm it’s aligned with the longest sightline (typically the main doorway) before you commit to adhesive.
Find Room Centre Point
Before any blocks go down, establish the room’s true centre point so your parquet layout stays balanced and square to the space. Clear the floor, then measure wall-to-wall in both directions at skirting level (ignore alcoves and bay projections). Halve each dimension and mark the midpoints with a sharp pencil on the subfloor, not the skirting. Join the two midpoints mentally to locate the exact centre; verify by measuring from that point to each corner—your diagonals should match. Consider Room lighting and furniture arrangement now, so the pattern’s focal point sits where it’ll be seen, not hidden under a sofa.
- Measure length and width twice (metric tape), record halves.
- Check diagonals for equal corner-to-corner distances.
- Mark centre with a small cross for reference.
Snap A Chalk Line
With the room’s centre confirmed, snap a chalk line through your centre cross to create a true datum for the parquet pattern. Load the Chalk line with blue chalk (less likely to stain oak than red), then hook it on your centre mark and pull it taut to the opposite wall. Keep the string 5–10mm above the subfloor, check it doesn’t snag on debris, and pluck sharply to leave a crisp line.
Repeat for the perpendicular axis so you’ve got a clear crosshair. Use a pencil to tick the line at door thresholds and around radiator pipe notches, preserving references if dust gets disturbed. This marking technique gives you repeatable layout control before any adhesive or blocks go down. Confirm lines remain visible during cleaning.
Confirm Starting Square Alignment
Once your chalk crosshair’s down, check it forms a true 90° starting square so the parquet pattern doesn’t drift across the room. Use a builder’s square or the 3-4-5 method (e.g., 600mm, 800mm, 1000mm) from your centre line to verify perpendicularity. If you’re out, re-snap the line now; small errors compound and ruin Design aesthetics at doorways and skirtings.
- Measure diagonals between opposite corners of a taped 1m x 1m square; they should match.
- Dry-lay a few blocks along both axes to confirm even margins to walls and radiator pipes.
- Mark the first block’s corner with pencil, then note maintenance tips: keep adhesive off the line for future repairs.
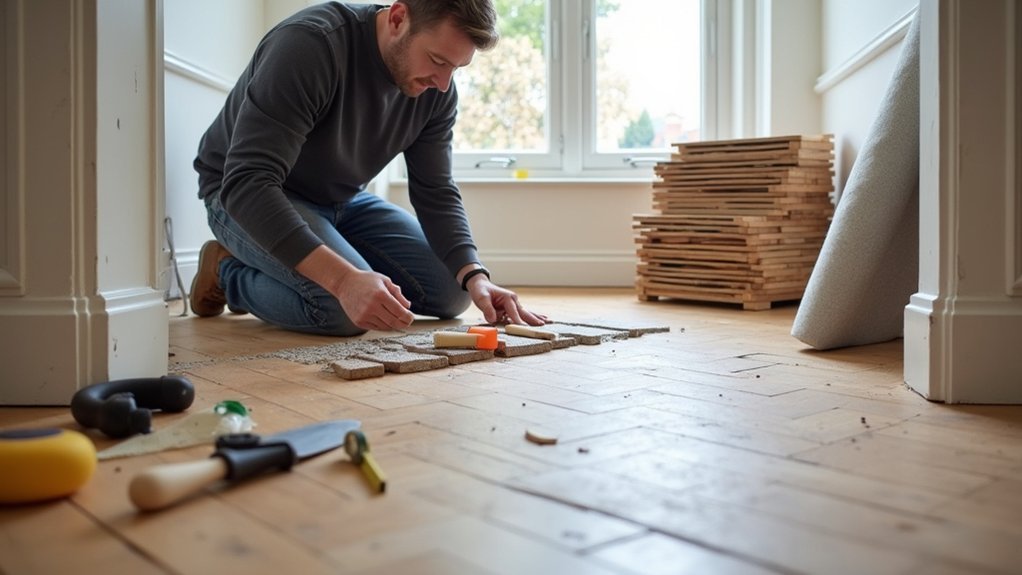
Dry-Lay a Test Area to Confirm the Pattern
Although your parquet layout may look perfect on paper, you should dry-lay a small test area (around 1–2 m²) using the actual blocks to confirm the pattern, orientation, and module size in real conditions. Use the same acclimatised packs, and include any feature strip or border pieces you’re planning, so your pattern confirmation reflects real tolerances. Snap your chalk lines, then lay blocks tight together without forcing tongues/grooves; note if you need to rotate blocks to match grain direction and light fall. Check the module lands square to your starting lines and doesn’t drift over 4–5 courses. Measure edge gaps against your expansion allowance (typically 10–15 mm at walls). Mark any cuts and awkward thresholds, and photograph the arrangement for reference later.
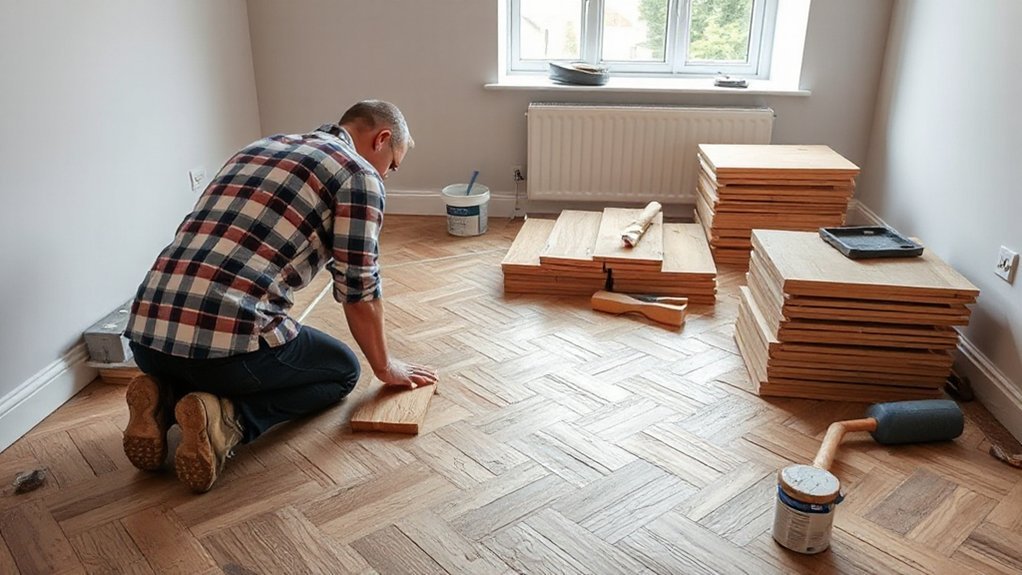
Glue Down Parquet Blocks Step by Step
You’ll prep the subfloor to UK tolerances (sound, dry, and flat) and snap chalk lines from your dry-lay reference so the layout stays square as you work. Then you’ll trowel on the specified parquet adhesive in manageable bays and set each block tight to the lines, maintaining consistent gaps and checking alignment as you go. Finally, you’ll roll the floor to bed the blocks, allow the adhesive to cure per the manufacturer’s datasheet, and clean off squeeze-out before it hardens.
Prepare Subfloor And Layout
Before any adhesive comes out, get the subfloor flat, dry, sound, and clean, then set out a precise layout so the parquet blocks land square and balanced across the room. Start with Subfloor preparation: check moisture (aim <75% RH on concrete), remove laitance/paint, and fill cracks; on timber, secure loose boards and overboard if needed. You can’t hide dips—use a 2m straightedge and keep tolerance within 3mm, then vacuum thoroughly.
For Layout planning, strike a baseline from your main sightline (often the doorway), then snap perpendicular chalk lines to create a true 90° centre cross and test with dry-laying.
- Mark expansion gaps to skirtings and thresholds
- Plan borders/features to avoid thin slivers
- Dry-fit a few rows to confirm pattern alignment
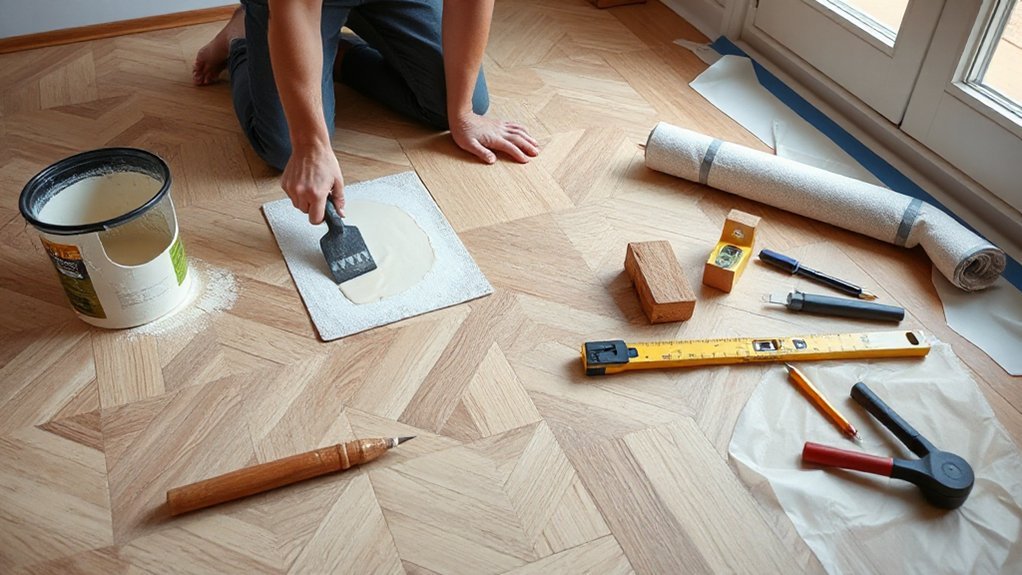
Apply Adhesive And Set Blocks
Once your lines are snapped and the subfloor meets tolerance, spread the correct parquet adhesive in manageable bays and start setting blocks directly off your 90° centre cross. Use the adhesive recommended for UK subfloors (cementitious screed, ply over joists, or an epoxy DPM system), then trowel it with the specified notch so you achieve full-bed coverage without ridging telegraphing. Keep bays small enough that you don’t exceed the open time.
For Adhesive application, hold the trowel at a consistent angle and comb in one direction. For Block setting, press each block firmly into the bed, align to the chalk lines, and maintain tight joints. Stagger end joints, check square frequently, and trim border blocks to leave a perimeter expansion gap.
Roll, Cure, And Clean Up
After you’ve laid a bay of blocks, roll it immediately with a 45–68 kg floor roller (or a hand roller tight to skirtings) to collapse trowel ridges and force full transfer into the adhesive bed. Do roll preparation first: remove grit, check the roller’s clean, and plan passes lengthways then crossways without stopping on the fresh field. Maintain steady pressure so you don’t shift the pattern.
- Re-roll after 30–60 minutes (if the adhesive allows) to seat any spring-back.
- Wipe squeeze-out at joints with manufacturer-approved cleaner; don’t flood the wood.
- Bag waste, scrape trowels, and tape off thresholds to stop foot traffic.
Respect cure duration: typically 24 hours before light access and 48–72 hours before sanding or heavy loads, depending on UK site temperature and RH.
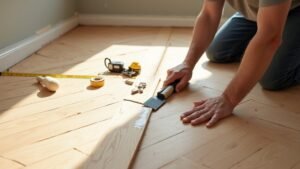
Cut Neatly Around Edges, Pipes, and Doorways
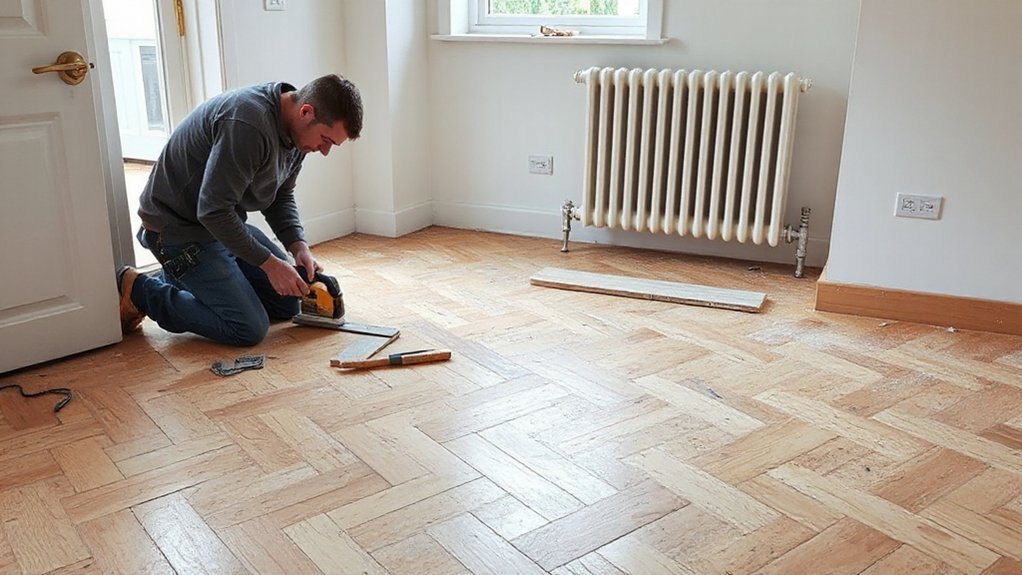
Although parquet blocks go down quickly across open areas, you’ll spend most of your time getting crisp cuts where the floor meets skirting boards, radiator pipes, and door linings. For edge cutting, scribe the last block with a sharp pencil using an offcut as a gauge, then cut on the waste side with a fine-tooth jigsaw or mitre saw. Dry-fit every piece before spreading more adhesive.
For pipe fitting, measure from two fixed faces, mark centres, drill with a hole saw slightly larger than the pipe sleeve, then split the block through the centreline so you can slip it in. Glue the split back together once seated. At doorways, undercut the architrave with an oscillating multi-tool and slip the parquet underneath for a tight, professional reveal.
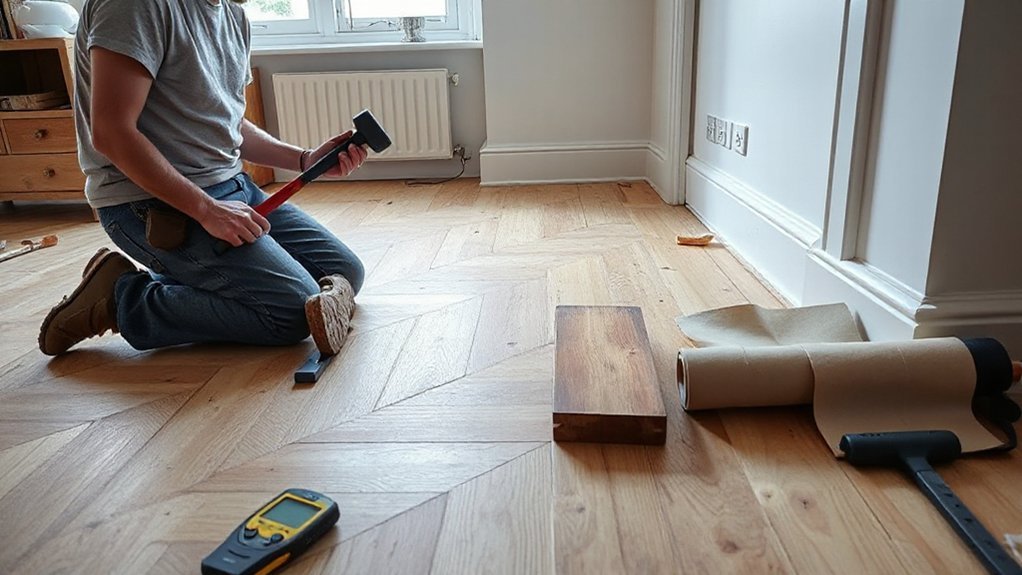
Leave Expansion Gaps and Fit Thresholds
Even if you’re laying parquet tightly to keep the pattern crisp, you still need an expansion gap of roughly 10–15mm around the full perimeter and at any fixed upstands (fireplaces, kitchen units, structural posts) so the timber can move without tenting. Use spacers as you work, then remove them before skirting goes on. Keep Expansion gaps clear of adhesive squeeze-out and debris, and don’t bridge them with blocks.
For Threshold fitting at doorways and changes of floor finish, set your trims after the parquet’s down and stable:
- Undercut architraves and door linings so the parquet slides underneath, preserving the gap.
- Fix threshold bars to the subfloor, never through the parquet, to allow movement.
- Use a reducer or ramped profile where levels differ, maintaining safe transitions.
Sand, Seal, or Oil (Wood Parquet Only)
Once the parquet’s fully bonded and acclimatised, you’ll need to decide whether to sand and finish it or apply an oil system, because that choice dictates the grit sequence, drying times, and room downtime. For unfinished blocks, use professional Sanding techniques: start around 36–40 grit to level, then 60–80 grit to refine, finishing at 100–120 for a uniform scratch pattern; edge-sand to match and vacuum thoroughly with a HEPA unit.
For sealing options, apply a primer/sealer coat (water-based or solvent) to reduce grain-raise and tannin bleed, then 2–3 coats of lacquer, abrading lightly between coats once dry. If you choose oil, roll or trowel a hardwax oil, buff in, then apply a second coat after manufacturer cure times. Maintain good ventilation.
Mistakes That Cause Gaps, Lipping, and Failures
If you rush the prep or ignore movement and moisture control, parquet will telegraph it quickly—gaps open between blocks, edges lip, and the bond can fail. In UK homes, most failures trace back to subfloor flatness, RH, and adhesive choice, not the pattern. Check slab moisture (CM test) or timber subfloor moisture (pin meter), and keep internal RH stable with heating running normally before install. Respect parquet history: traditional blocks moved, but modern systems still need expansion and correct trowel notch.
- Skipping levelling: don’t lay over >3mm deviation per 2m; lipping follows.
- Wrong adhesive/open time: you’ll starve the bond or skin it, causing debonding.
- No perimeter expansion: blocks crush, then spring back as gaps.
Parquet maintenance then becomes damage control, not care.
Frequently Asked Questions
Will Parquet Flooring Work With Underfloor Heating in UK Homes?
Yes, you can use parquet flooring with underfloor heating in UK homes, if you verify heating compatibility. Choose engineered parquet design, follow BS 8204, keep surface below 27°C, and commission moisture-controlled screeds properly.
How Long Should You Wait Before Walking on Newly Installed Parquet?
You should wait 24 hours before light foot traffic, and 48–72 hours before furniture, depending on flooring adhesives’ cure time. Keep rooms 18–22°C, use installation tools carefully, and avoid wet cleaning for seven days.
What’s the Best Way to Clean and Maintain Parquet Flooring Long-Term?
Keep parquet pristine, not polished-to-death: vacuum with a soft brush, then damp-mop using pH-neutral wood cleaner. Cleaning techniques: microfibre, minimal water. Maintenance tips: felt pads, rugs, 45–55% RH, recoat lacquer when worn.
Do You Need Planning Permission or Landlord Approval to Install Parquet?
You usually don’t need planning permission for internal parquet, but you’ll need landlord consent under your tenancy and check Tenant permissions. Comply with Building regulations: acoustics in flats, fire safety, and damp-proofing requirements.
How Much Does Parquet Installation Typically Cost per Square Metre in the UK?
You’ll typically pay £40–£120 per m² in the UK for parquet installation—like hiring a Victorian craftsman. For cost comparison, herringbone runs higher. Follow installation tips: subfloor levelling, moisture testing, and adhesive choice cut labour costs.
Conclusion
If you’ve measured accurately, chosen the right parquet type, and left proper expansion gaps, you’ll get a flat, stable floor that meets UK fitting norms. Check subfloor moisture, acclimatise wood, and keep thresholds tight to stop movement. One telling stat: the NHBC reports around 1 in 10 new-home defects relate to finishes—often flooring—so attention to detail really pays. Finally, sand and seal or oil only after adhesive has fully cured.