Confirm you’ve got a suspended timber floor (hollow sound, “give,” air bricks), then lift boards carefully, map pipes/cables, and fix any damp, leaks, or rotten joists before insulating. Keep subfloor vents clear and maintain a ventilated void. Fit 100–150 mm mineral wool or 70–120 mm PIR between joists, supported with netting or battens, and seal joints to reduce drafts. Add a warm-side VCL in humid rooms. Next, you’ll see the key details that prevent condensation and squeaks.
Key Takeaways
- Confirm you have a suspended timber floor by checking for air bricks, hollow sound, and visible joists at thresholds.
- Lift boards carefully, map pipes/cables, and repair loose boards, rot, or leaks before adding insulation.
- Keep subfloor ventilation clear; don’t block air bricks, and maintain a ventilated void to prevent damp and mould.
- Fit insulation between joists (e.g., 100–150mm mineral wool or 70–120mm PIR) and add a continuous layer under joists if needed.
- Support insulation with netting, straps, battens, or membranes, then refit boards and seal gaps to cut draughts and squeaks.
Is Your Floor a Suspended Timber Floor?
How can you tell if you’ve got a suspended timber floor rather than a solid slab? You’ll usually feel more “give” underfoot and hear a hollow sound when you tap. Check for air bricks or sub-floor vents in the external walls; these strongly indicate a ventilated timber floor, which matters for moisture control under UK Building Regulations. Lift a radiator pipe cover or threshold strip and look for a timber edge, not concrete. In older homes, you may see traditional skirting profiles and uneven floor levels—key Historical building considerations before altering ventilation or finishes. If your aim includes Flooring aesthetics, note that original boards can be refurbished, but added build-ups may affect door clearances and skirting junctions.
What You’ll Find Under the Boards (Joists, Void, Services)
Once you lift the floorboards, you’ll see the joist direction, spacing, and any noggins or subfloor panels that determine how you can fit and support insulation. You’ll also need to identify services—pipes, cables, and ducts—so you don’t trap heat around electrics or create condensation risks, and you should keep access for maintenance. Finally, check the void depth and the state of underfloor ventilation, because you can’t block air bricks or vents without managing moisture in line with building regs guidance.
Joists And Subfloor Layout
Before you choose an insulation method, you need to understand what the floor actually sits on: a series of joists supporting a subfloor (often tongue-and-groove boards or sheet decking), with a void below that may be ventilated and may also carry services. Identify joist direction, depth, and condition, and check for rot, notches, or drilling that could breach structural limits in building regs. Measure centres: Joist spacing considerations affect insulation width, support nets, and where you’ll need noggins to prevent sag. Confirm whether boards run perpendicular to joists and whether they’re nailed or screwed, as this changes access and reinstatement. Sort Floor squeak remedies now: re-fix loose boards, add screws into joists, and shim gaps to avoid crushing insulation later.
Services, Voids, And Ventilation
Although the space under your floorboards looks like “just a void,” it usually functions as a ventilated sub-floor plenum that also routes services—so you need to map what’s there before you insulate. Lift a few boards, identify joist depth, sleeper positions, and any damp staining that signals failed airflow. Don’t block airbricks or cross-ventilation paths; insulation mustn’t bridge the void and trap moisture against timbers.
- Trace services: electrical cables, plumbing, and data runs; keep required clearances and avoid burying junctions.
- Check ventilation: confirm airbricks are clear, and preserve a continuous air gap below insulation.
- Confirm build-up: added insulation can change Floor height and affect doors, skirting, and Decorative finishes.
Fix Damp, Leaks, and Rotten Joists First
Before you insulate, you’ve got to identify the damp source—check air bricks and subfloor ventilation, ground moisture, and any signs of condensation or rising damp. You should repair plumbing leaks, improve drainage, and fix external defects first, because trapping moisture under insulation can breach good building practice and accelerate decay. If any joists are soft, cracked, or fungus-affected, you must replace or sister them to restore structural integrity before you refit the floor.
Identify Damp Sources
Where’s the moisture coming from under your floorboards—rising damp, a plumbing leak, poor subfloor ventilation, or water ingress at the perimeter? Before you insulate, you’ve got to diagnose the source so you don’t trap water against timbers and void compliance with building fabric moisture control expectations.
- Measure and map moisture: Use a pin meter on joists and sleeper walls, note readings, and look for salts/tide marks that indicate rising damp; confirm with hygrometer spot checks.
- Check airflow pathways: Verify air bricks aren’t blocked and cross-ventilation exists; stagnant void air drives condensation, especially with Alternative heating that cools floors.
- Assess barriers and detailing: Identify missing or bridged DPCs and failed moisture barriers; check insulation won’t cover vents or contact wet masonry.
Repair Leaks And Drainage
Once you’ve identified the moisture source, fix it at the fabric level—repair plumbing leaks, clear and regrade drainage at the perimeter, and stop rainwater ingress (gutters, downpipes, gullies, and external ground levels) so the subfloor can dry to a stable equilibrium. Isolate and pressure-test suspect pipework, renew failed seals, and lag cold services to cut condensation risk. Confirm subfloor vents are unblocked and cross-ventilation meets local building guidance; don’t reduce airflow with stored materials. Use a hygrometer to track Indoor humidity and confirm drying before you fit insulation or vapour control layers. Treat localized mould with an approved biocide and remove wet debris. Stabilising moisture protects fixings, prevents odours, and preserves Flooring aesthetics above. Record findings for compliance and future inspections.
Replace Rotten Joists
After you’ve stopped the moisture source and verified the subfloor is drying, deal with any rotten joists straight away because insulation can’t compensate for compromised structure. Confirm decay with a bradawl test and moisture readings; if ends are soft or section loss is significant, replace or sister to restore bearing. Follow local Building Regulations/IRC requirements for spans, fixings, and preservative-treated timber, and maintain required ventilation and clearances from masonry.
- Support first: Prop the floor, then remove loads before cutting out decayed sections.
- Rebuild correctly: Fit new joists with hangers or proper bearings, level them, and bolt/screw to spec.
- Plan finishes: Choose Alternative flooring options that match thickness and stiffness; apply historical building considerations so you don’t trap moisture with impermeable layers.
Keep Air Bricks and Subfloor Vents Clear
Although insulating under floorboards reduces heat loss, you must keep air bricks and subfloor vents clear so the suspended timber floor void stays properly ventilated and compliant with building guidance. Don’t block vents with insulation, expanding foam, or debris; maintain the original free area and airflow path from one side of the building to the other. Check external ground levels, paving, and flowerbeds: they shouldn’t bridge or cover air bricks, and you should clear leaves and mortar droppings. Internally, fit insulation netting or battens so quilt can’t slump across vent openings. If you’ve got Decorative flooring or Underfloor heating above, ventilation still matters below; trapped moisture can rot joists and encourage mould. Inspect vents seasonally and add sleeves or ducting only to route, not restrict, airflow.
Choose Insulation: Mineral Wool vs PIR vs Spray Foam
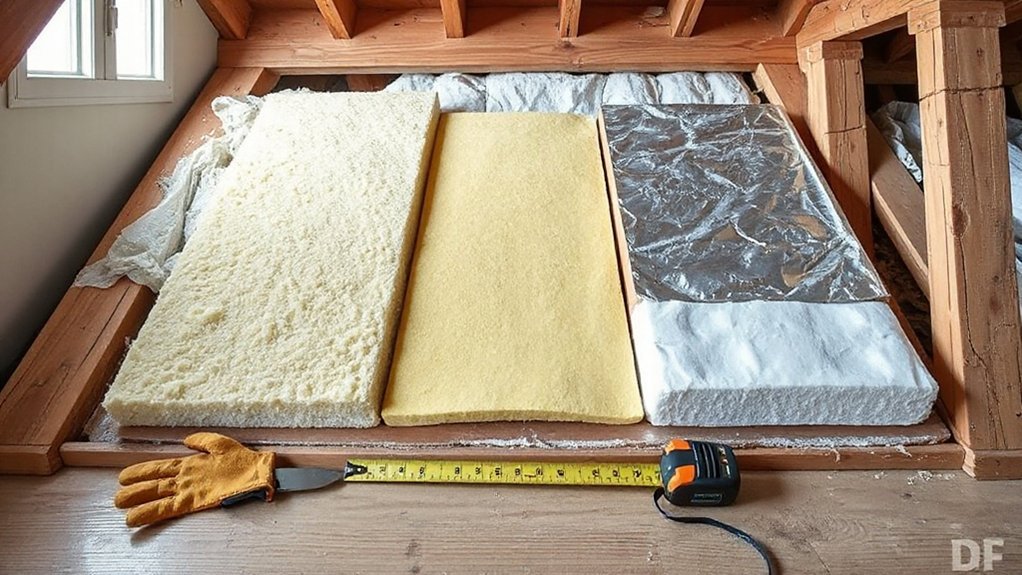
Because your suspended timber floor needs both thermal performance and reliable moisture control, you should choose insulation by balancing U‑value, vapour behaviour, fire performance, and how easily you can fit it without blocking subfloor ventilation. Mineral wool friction-fits between joists, stays vapour-open, and helps with acoustic control, but you must support it with netting and keep it dry for Insulation durability. PIR boards deliver high performance in limited depth and can improve Flooring aesthetics by reducing draughty cold spots, yet you must tape joints and manage condensation risk at edges. Spray foam seals gaps well, but it can hinder future timber inspection and may conflict with lender and building-control expectations. Choose based on:
- Vapour permeability and condensation risk
- Reaction-to-fire ratings and lining needs
- Access for services, repairs, and inspections
How Thick Should Underfloor Insulation Be?
While you can’t pick a single “right” thickness for every suspended timber floor, you can size underfloor insulation by working back from the U‑value you need (Building Regulations Part L in England) and the joist depth and ventilation you’ve actually got. For retrofits, aim to fill the joist depth where possible: 100–150 mm mineral wool typically gives a strong improvement, while 70–120 mm PIR can achieve similar performance at lower thickness, depending on λ‑value and edge detailing. If you can’t fully fill, add a continuous layer below joists (where headroom allows) to cut thermal bridging. Keep a ventilated void and don’t block airbricks; moisture control affects required thickness. Choose insulating materials that fit services and preserve Flooring aesthetics above.
Tools, Fixings, and PPE You’ll Need
Before you lift a single board, assemble the right tools, fixings, and PPE so you can work cleanly between joists, keep ventilation paths clear, and meet basic safety expectations (especially for dust, fibres, and confined voids). Choose kit that suits different insulation types (mineral wool, PIR, wood fibre) and won’t compromise Flooring aesthetics when you refit finishes. You’ll need:
- Measuring/cutting: tape, straightedge, insulation saw or fine-tooth panel saw, sharp knife, marker, and a head torch for voids.
- Fixings/support: vapour-permeable membrane, staples and staple gun, netting or battens, corrosion-resistant screws, expanding foam, and foil tape for board joints.
- PPE/controls: FFP3 respirator, goggles, gloves, coveralls, knee pads, and a HEPA vacuum; isolate electrics and check for pipes/cables before fastening.
How to Lift T&G Floorboards Without Damage
Before you lift T&G floorboards, you’ll locate hidden fixings—nails, screws, or secret-nailed tongues—so you don’t split the board or damage services below. You’ll isolate any circuits in the area and work to safe practice expectations before levering, keeping your pry points on joists and using a wide bolster to spread load. Once you’ve confirmed fixing positions, you’ll pry up in small increments along the length to release the tongue-and-groove cleanly.
Identify Hidden Fixings
If you want to lift T&G floorboards cleanly, start by locating the fixings you can’t see: most boards are secret-nailed through the tongue, face-screwed then plugged, or pinned at board ends over joists. Hidden fixings and other concealed fasteners dictate where you cut, drill, or release tension, so don’t guess. Work in good light, clear floor coverings, and note services zones to avoid breaching safe cable routes.
- Find joists: use a stud/joist finder, then confirm by measuring typical centres (often 400–600mm).
- Spot plugs/pins: look for colour-matched pellets, filled holes, or end-grain pin marks; probe gently with a bradawl.
- Check tongues: inspect board edges at thresholds or vents; a mirror/torch reveals secret nails and screw lines.
Pry Up Boards Safely
Where do you start prying without splintering tongues or levering against pipework and cables? Begin at a board end near a wall where replacement’s easiest, and confirm services are clear with a detector. Score paint lines, then drive a thin pry bar over a joist line, not between joists, so you don’t crack the groove. Use a wide bolster to spread load and lift in small increments, moving along each joist to release nails or screws progressively. If it’s T&G, cut the tongue with a multitool on the sacrificial board, then lift the remaining boards intact. Bag fixings, label boards, and keep edges dry for Flooring maintenance and Home decor finish quality. Follow HSE PPE and Part P caution around electrics.
Seal Drafts at Skirting and Board Gaps First
Although you might be enthusiastic to fit insulation straight away, you’ll get better results by sealing draughts at the skirting line and between floorboards first, because uncontrolled air leakage can bypass the insulation and undermine its performance. Start with visible Skirting gaps and any board-to-board cracks; airtightness here improves comfort and helps you meet Part L intent on reducing unwanted infiltration. Use compatible, flexible products so movement doesn’t reopen joints, and keep existing ventilation paths to subfloors clear to avoid moisture risk (Part C).
- Run acrylic sealant along skirting-to-floor junctions; tool it tight and continuous.
- Apply flexible filler or rope caulk to board gaps; avoid blocking airbricks or vents.
- Fit brush strips or draught excluders at door thresholds and service penetrations.
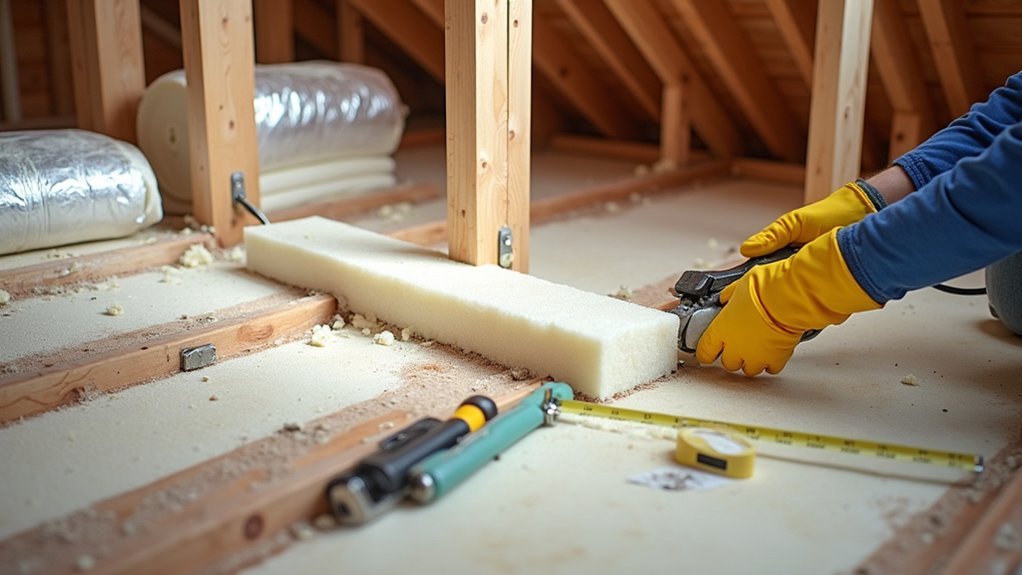
Fit Mineral Wool Between Joists (Step by Step)
Now that you’ve sealed the perimeter drafts, you can measure joist spacing accurately (centre-to-centre and clear width) so the mineral wool fits without compressing, in line with manufacturer guidance and Part L performance intent. Cut the batts slightly oversize with a serrated insulation knife so they friction-fit tight to the joists and fully fill the depth with no gaps or slumping. Install and secure the insulation with netting, straps, or support battens as required, keeping ventilation paths clear and avoiding contact with services unless they’re rated for it.
Measure Joist Spacing
Before you cut any mineral wool, measure the joist spacing accurately so each piece friction-fits without bowing the boards or leaving gaps that compromise thermal performance. Floor structures vary, so don’t assume 400 or 600 mm centres; measure each bay because old joists can twist, taper, or sit out of square, creating insulation gaps. Use a steel tape and record the clear distance between joist faces at several points along the span, then note the smallest consistent dimension for each bay. Keep services and ventilation paths in mind to stay compliant with moisture-control and electrical safety expectations.
- Measure face-to-face width at front, mid, and rear of the bay.
- Check for obstructions (pipes, cables) and note their positions.
- Mark bay IDs and dimensions on a simple sketch for accuracy.
Cut Mineral Wool Batts
With your bay measurements and obstruction notes in hand, start cutting the mineral wool batts to match each joist space so they press in place without slumping or forcing the floorboards up. Use a straightedge and insulation knife; cut on a firm board to avoid tearing fibres. Add 10–15 mm to the measured width for a friction fit, but don’t over-pack, as compression reduces declared thermal performance and can distort Flooring materials above. Cut batts to stop short of services, maintaining clearances required by electrical guidance and allowing ventilation paths where specified. Around pipes and cables, slit and notch neatly, then close the cut so edges meet. Keep cuts square so joints align, reducing gaps and convection. Label each piece by bay to speed placement across Insulation types.
Install And Secure Insulation
How do you get mineral wool to stay tight between joists without sagging or lifting boards? You fit it snug, keep it flush, and lock it in place so you meet thermal targets without compromising flooring aesthetics or decorative finishes.
- Measure joist bays, then friction-fit each batt 5–10 mm oversize; push it up to the underside of the boards with no voids at edges or services.
- Add support: staple breathable netting, fit insulation support wires, or nail timber battens to joist sides. Space supports 300–400 mm to prevent slump over time.
- Seal details: keep ventilation paths clear, maintain required air gaps where specified, and don’t block vents. Around pipes/cables, split and wrap batts, avoiding compression that reduces performance and may conflict with fire-stopping requirements.
Fit PIR Boards Between Joists (No Cold Gaps)
Although PIR boards deliver high thermal performance for their thickness, they only work as intended if you fit them tightly between the joists so there aren’t any cold bridges or air paths around the edges. Measure each bay; joists vary, so don’t assume standard centres. Cut boards 2–3 mm oversize, then friction-fit them so the faces sit flush with the joist sides and the underside of the floor deck.
Stagger joints where possible and avoid lining up seams across adjacent bays. Seal perimeters and butt joints with foil tape or low-expansion PU foam to meet air-tightness expectations and reduce interstitial condensation risk. Keep the insulation continuous at party walls and around services; box-in pipes and cables rather than leaving voids. Check compatibility with Flooring underlay and other Insulation types used nearby.
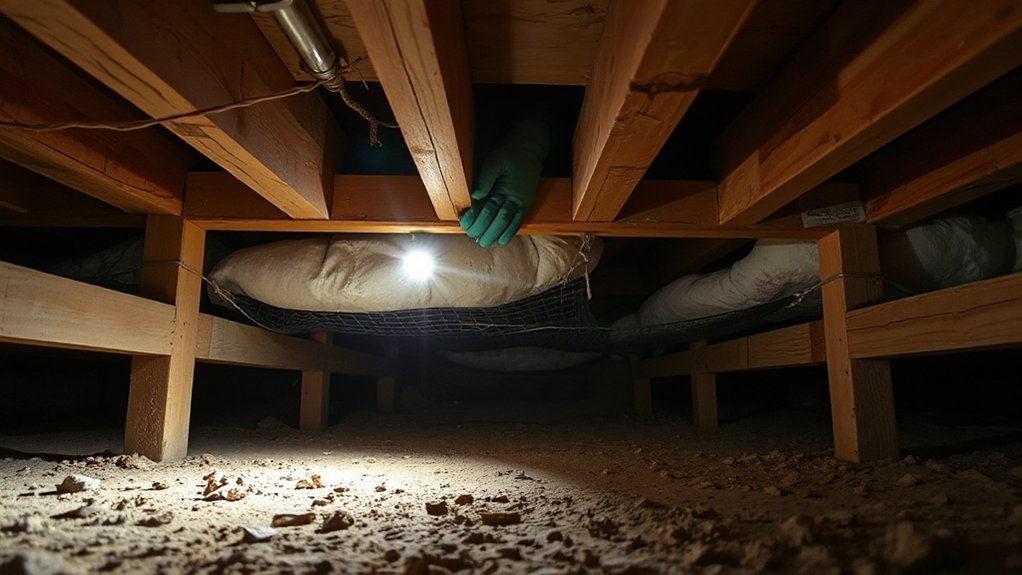
Support Insulation With Netting, Battens, or Membranes
Once you’ve cut and sealed the PIR tight between the joists, you still need a positive means of support so the insulation can’t drop, bow, or open up gaps over time. Choose a fixing method that suits your insulation types (PIR, mineral wool, woodfibre) and keeps required Ventilation options clear to the sub-floor void, in line with manufacturer guidance and Building Regulations moisture control principles.
- Netting/straps: Staple insulation netting or polypropylene strapping to joist sides at tight centres; it’s quick and supports batts evenly.
- Battens: Screw treated battens to joist sides to form a ledge; it’s robust for rigid boards and serviceable later.
- Membranes: Fit a vapour-permeable support membrane under joists, lapped and taped, so insulation stays continuous without blocking airflow paths.
Work Safely Around Pipes and Electrical Cables
Before you push insulation into the joist bays, map every pipe run and electrical cable so you don’t trap services where they’ll overheat, sweat, or become inaccessible for maintenance. Keep heating pipes on the warm side where possible, and leave clearance around plastic pipes to prevent distortion. Don’t compress insulation against copper: allow space for expansion and avoid rubbing that can cause noise. For electrics, follow current wiring guidance: don’t bury cables in insulation unless their current-carrying capacity is de-rated or the circuit is protected accordingly; if in doubt, reroute or clip to the joist sides. Maintain protection plates where cables cross joists, and seal grommets at penetrations. You’ll preserve Flooring aesthetics above while improving thermal comfort safely.
Do You Need a Vapour Control Layer (VCL)?
After you’ve kept pipes and cables correctly spaced and serviceable, focus on moisture control in the floor build-up, because insulation changes how the joist void dries. A VCL isn’t always required, but you must manage vapour movement to avoid interstitial condensation and mould, especially in older suspended timber floors. Follow a risk-led approach consistent with UK Building Regulations (Parts C and L) and BS 5250 guidance.
- If the room above is humid (kitchens, bathrooms), add a warm-side VCL with sealed laps and taped penetrations.
- If you’re using vapour-open insulation (wood fibre, mineral wool), avoid impermeable Vapour barriers unless you’ve checked dew-point risk.
- If the void below is damp, prioritise ground moisture reduction and choose membranes that maintain drying potential.
Refit Boards, Stop Squeaks, and Check Ventilation
Although the insulation work happens out of sight, you should refit the floorboards methodically so the deck stays tight, service access remains possible, and the void below still ventilates as intended. Number boards before lifting, then refit in order, keeping original gaps consistent for historical flooring. Screw boards back to joists (pilot-drill hardwood) rather than nailing, and use countersunk fixings so Decorative finishes don’t chip later. If you’ve got tongue-and-groove, re-seat joints fully and replace split tongues. Stop squeaks by packing loose joist bearings, adding noggins where edges bounce, and running a bead of flexible construction adhesive on joist tops—don’t glue boards you’ll need to lift. Finally, confirm air bricks and underfloor vents remain clear, and don’t block cross-ventilation with insulation or debris.
Frequently Asked Questions
How Much Does Underfloor Insulation Typically Cost per Square Metre?
You’ll typically pay £20–£60 per m² installed, depending on access and insulation materials. For cost comparison, DIY can run £5–£25 per m². You’ll need compliance with Part L and fire-rated products.
Can I Insulate Under Floorboards Without Lifting Them?
Yes—you can, like threading a needle, by accessing from below via a crawlspace. You’ll avoid floorboard removal, fit approved insulation materials between joists, add support netting and a vapour layer, maintaining ventilation and fire-safety rules.
Will Insulating Under Floorboards Reduce Noise Between Rooms?
Yes, you’ll cut airborne noise, but impact noise may persist unless you add resilient layers. Use Soundproofing techniques with dense Insulation materials (mineral wool). Seal gaps, maintain ventilation, and meet fire/acoustic requirements for floors.
How Long Does a Typical Underfloor Insulation Job Take?
You can typically finish in 1–3 days, depending on flooring removal extent and access. You’ll spend extra time fitting insulation materials, sealing gaps, and meeting fire, ventilation, and building-control requirements, plus cleanup and reinstatement.
Do I Need Building Regulations Approval for Insulating Under Floorboards?
You often don’t need Building permits, but you must comply with Building Regulations, especially Part L and fire safety. If you alter structure, ventilation, or use new Insulation materials, you’ll likely need approval. Check locally.
Conclusion
Once you’ve insulated under your floorboards, you’ve turned a draughty void into a sealed jacket—without suffocating the building. You’ve checked joists, fixed damp, and kept air bricks clear so moisture can still escape. You’ve chosen compliant insulation, supported it properly, and protected pipes and cables. If a VCL’s needed, you’ve detailed it carefully. Refit boards tight, silence squeaks, and recheck ventilation—because performance lives in the details.